1. Introduction
If you have a large network and discovery doesn’t help, it helps to find a source of truth for starting to fill your management system. The provisioning integration server PRIS is a software which helps you to integrate OpenNMS to single or multiple external inventory systems. It gives you several steps to integrate, transform, clean up, and merge your extracted data before you provide the data into OpenNMS. The result of PRIS is the OpenNMS requisition model which can be read from OpenNMS Provisiond.
The service is used to provide an integration point for OpenNMS external inventories or home brew inventories. With PRIS the data is normalized to the OpenNMS requisition model and can be consumed from OpenNMS provisiond. It is highly specialized to enrich the requisition model with SNMP information i.e. SNMP interfaces, generic SNMP attributes like system location, system contact, and system description. Besides that, Provisiond can also run service detectors against IP interfaces and allows to run policies to control the monitoring behavior. PRIS is an instance in front of Provisiond, it allows to aggregate information from different sources and manipulate them in a flexible way.
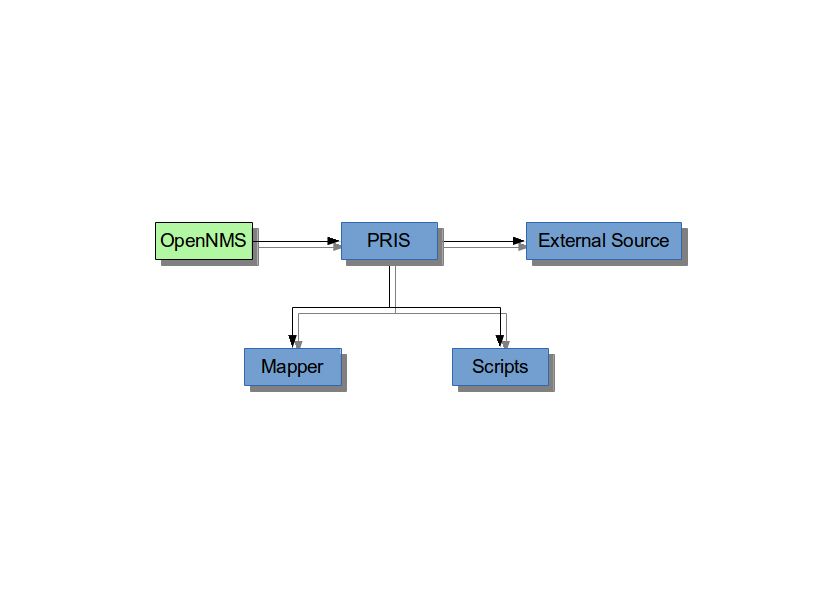
The output from PRIS is provided as XML over HTTP and can be used in Provisiond to import and discover services and SNMP data from. In OpenNMS a requisition is a set of nodes (networked devices) that you want to import into OpenNMS for monitoring and management. You can assign in OpenNMS services, detectors and policies to model the network monitoring behavior. For this reason a good practice is to organize nodes with a similar network monitoring profile in a requisition. The PRIS components are shown in Overview.
1.1. Overview
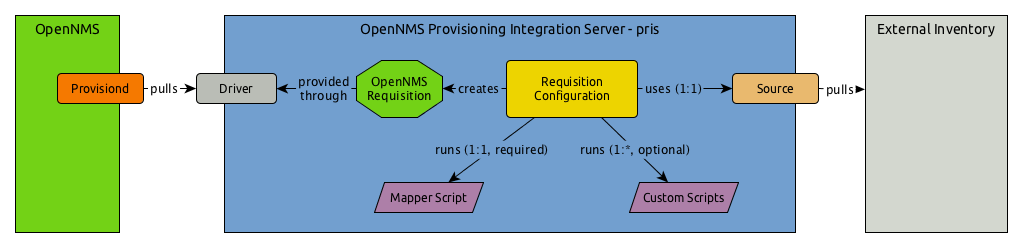
The components from left to right are described as followed:
-
OpenNMS Provisiond: This is the internal daemon responsible to get nodes (networked devices) into OpenNMS. Provisiond scans for SNMP information, network services and has to model the network monitoring behavior for OpenNMS.
-
Driver: The driver is the method how to present the data from PRIS to OpenNMS. It is only possible to configure one driver per PRIS instance
-
OpenNMS Requisition: The data model which has to be built inside of PRIS. This is the shared model between OpenNMS and PRIS.
-
Requisition configuration: The description of the integration of your external datasource. A requisition configuration defines which source should be used or which scripts should be applied to modify or transform the data before they are provided into OpenNMS Provisiond.
-
Mapper Script: The mapper script is the last script executed before the generated requisition goes to OpenNMS Provisiond through the driver. You can use a mapper script to enrich the requisition, remove nodes or replace OpenNMS requistion node attributes.
-
Custom Scripts: In some cases an external inventory has its own data model, e.g. OCS Inventory. The script source can be used to map the external inventory-specific model into the OpenNMS requisition model.
-
Source: This is the specific implementation retrieving the data for from your external inventory.
-
External Inventory: The inventory from which you want to import data for OpenNMS. It could be a free application like phpIPAM, idoIT, ITIL ticket system like OTRS, a simple spreadsheet or just another OpenNMS instance.
1.2. Files and Folder structure
The latest release of PRIS can be downloaded from the github release page of the project.
It is recommended to extract the tar.gz content to /opt/opennms-pris.
The examples and the documentation are built based on this file structure.
It is possible to install PRIS in a different directory, but you have to take care about adapting the paths in this documentation.
After extracting the archive the file structure should look like this:
.
├── documentation (1)
├── examples (2)
|   ├── fileExample
|   ├── httpExample
|   ├── jdbcExample
|   ├── mergeExample
|   ├── ocsExample
|   ├── scriptExample
|   └── xlsExample
├── global.properties (3)
├── lib (4)
├── opennms-pris.bat(5)
├── opennms-pris.init(6)
├── opennms-pris.jar(7)
├── opennms-pris.service(8)
├── opennms-pris.sh(9)
├── requisitions (10)
└── scriptsteps (11)
    ├── custom (12)
    └── default (13)
| 1 | This documentation in HTML format; if you run PRIS in HTTP mode you can access the documentation at http://<your-ip>:<port>/documentation |
| 2 | Configuration examples for requisitions for every available source |
| 3 | Default configuration for PRIS to run in HTTP mode on port 8000 |
| 4 | Libraries for the different sources which can be used with PRIS |
| 5 | Start script to run PRIS on a Windows |
| 6 | Init script for old System V systems running PRIS in HTTP mode |
| 7 | Main application file |
| 8 | Systemd script to start PRIS as background daemon, copy to /etc/systemd/system/opennms-pris.service |
| 9 | Start script to run PRIS on a Linux console in foreground |
| 10 | Configuration directory for all requisitions to integrate inventories |
| 11 | Default folder for scripts which are used in requisition configurations to manipulate the inventory import |
| 12 | Drop-in for your custom created scripts |
| 13 | Drop-in for default ready to use scripts |
PRIS needs at minimum two configuration files.
The first is called global.properties, and controls the general behavior of the provisioning integration server.
A requisition is just a directory in the application server directory requisitions and has to contain a file called requisition.properties.
The directory name is used to access the requisition.
You can create multiple requisitions using different sources, by creating a directory for each requisition with a requisition.properties inside.
The global.properties, the requisitions directory and the start script has to be in the same folder.
By default we suggest to install your PRIS archive to /opt/opennms-pris.
If you want to provide the OpenNMS requisitions via HTTP from the built-in Jetty web server as a background daemon, you can use the init scripts in the root directory of PRIS.
1.3. Run on Linux and Windows
It is recommended to use a Linux distribution using Systemd.
Install the opennms-pris.service to /etc/systemd/system/opennms-pris.service and run systemctl daemon-reload.
To enable or start and stop the daemon the systemctl enable | start | stop opennms-pris.service commands can be used.
In case there is an old Linux distribution with SysV init scripts is used, the opennms-pris.init script needs to be copied to /etc/init.d.
To control the daemon behavior the service start | stop commands are supported.
In other cases the opennms-pris.sh or opennms-pris.bat scripts run the daemon in foreground on all other Linux systems or Microsoft Windows.
If you want to run PRIS on Microsoft Windows you probably have to look into a wrapper for the opennms-pris.bat file.
If you want to run PRIS as non-root user, create a user with adduser pris and change the user in the init scripts.
Be aware, user can’t start applications which listen on ports < 1024.
|
2. Quickstart example
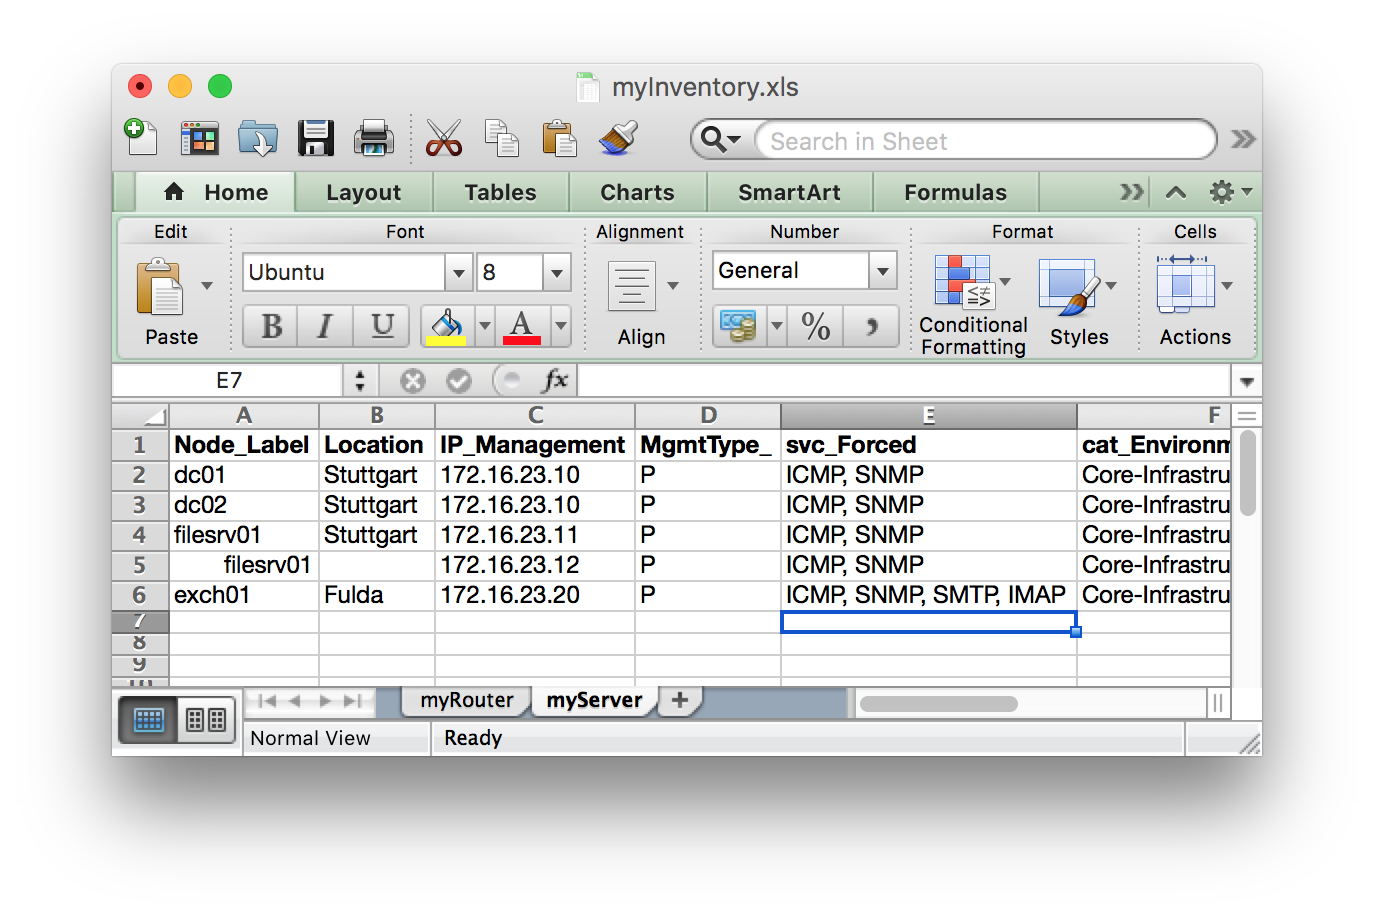
To give an example we want to provide two requisitions from an poor man’s inventory as XLS file (myInventory.xls).
The first requisition has a worksheet containing all routers and the second worksheet has all servers of our network.
This example can be found in examples/source/xlsExample.
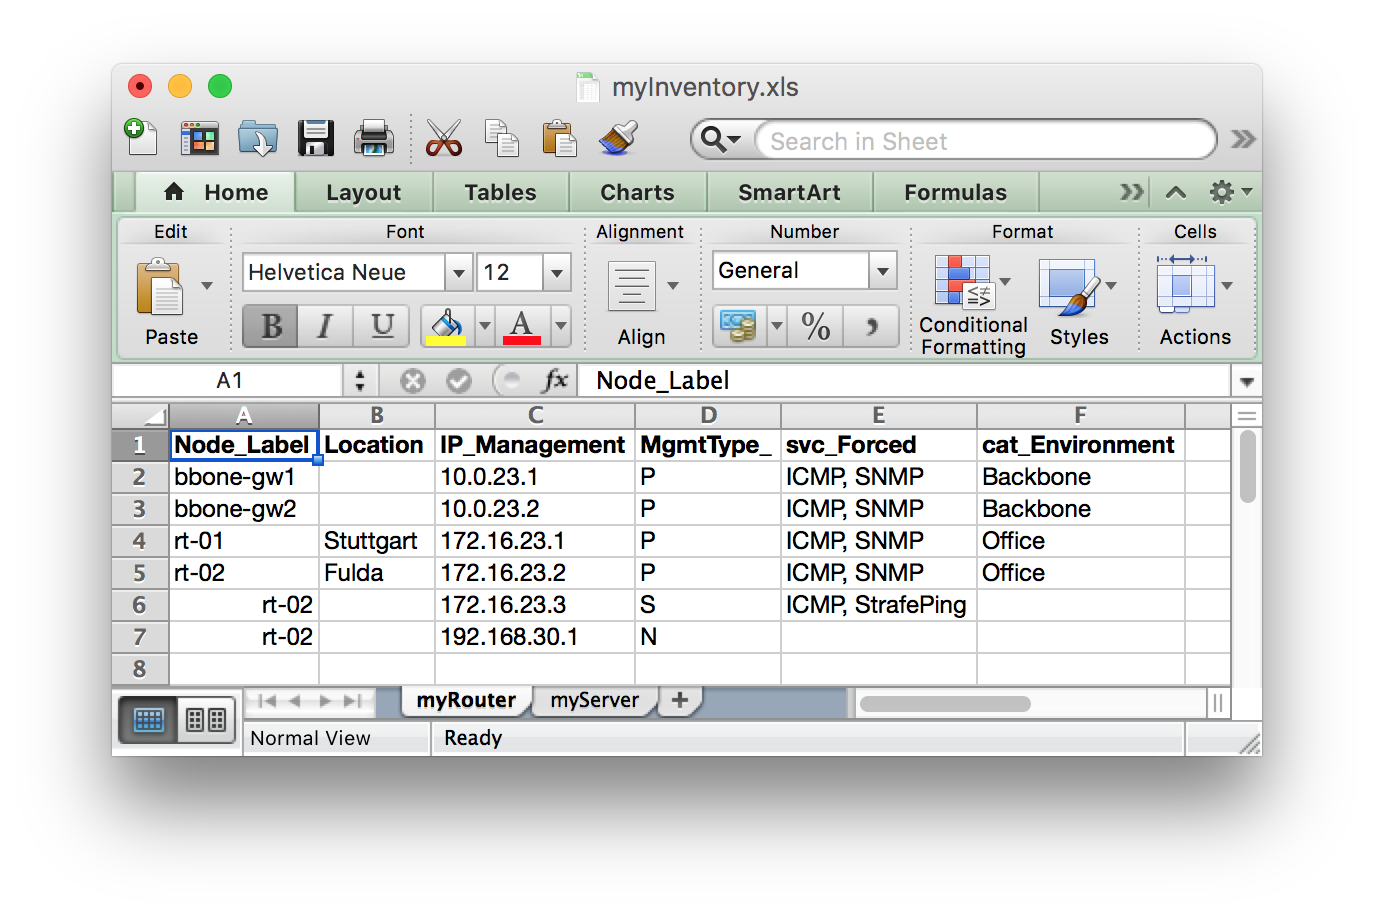
In line 5, 6 and 7 there is a router defined with more than one IP interface. All three interfaces will be manually provisioned. The private IP interface with 192.168.30.1 is not used for SNMP agent communication. The services ICMP, SNMP and StrafePing are forced on some IP interfaces. For all other IP interfaces you can use the OpenNMS Provisiond mechanism scanning IP interface table from SNMP and the detectors for additional services. The server will also be categorized in Backbone and Office.
The OpenNMS requisition should be provided via HTTP and we use OpenNMS Provisiond to synchronize it on a regular basis. We build the following file structure:
[root@localhost opennms-pris]# pwd && tree
/opt/opennms-pris
.
├── documentation
├── examples
├── global.properties
├── lib
├── opennms-pris.jar
├── opennms-pris.service
├── opennms-pris.sh
├── requisitions/
|   ├── myInventory.xls
|   ├── myRouter
|   |   └── requisition.properties
|   └── myServer
|       └── requisition.properties
└── scriptsteps
    ├── custom
    └── default
Providing the OpenNMS requisition over HTTP we create the following global.properties
### File: global.properties
# Start web server
# The web server listens on all interfaces and can be accessed on TCP port 8000
# URL: http://${your-ip}:8000/requisitions/${name-requisition-cfg}

driver = http
host = 0.0.0.0
port = 8000
The HTTP server listens on localhost port 8000/TCP.
We have to create two directories, myServer and myRouter, each containing a requisition.properties file.
Both requisition.properties files reference the main myInventory.xls file which contains two worksheets named myServer and myRouter.
The requisition.properties is the same for both requisitions.
It is possible to create different script or mapping steps for each requisition.
### File: myRouter/requisition.properties
# This example imports devices from a spreadsheet
# named "myRouter" from the myInventory.xls file
# Path to the XLS fils is relative to
# requisitions.properties
source = xls
source.file = ../myInventory.xls

### default no-operation mapper
mapper = echo### File: myRouter/requisition.properties
# This example imports devices from a spreadsheet
# named "myRouter" from the myInventory.xls file
# Path to the XLS fils is relative to
# requisitions.properties
source = xls
source.file = ../myInventory.xls
### default no-operation mapper
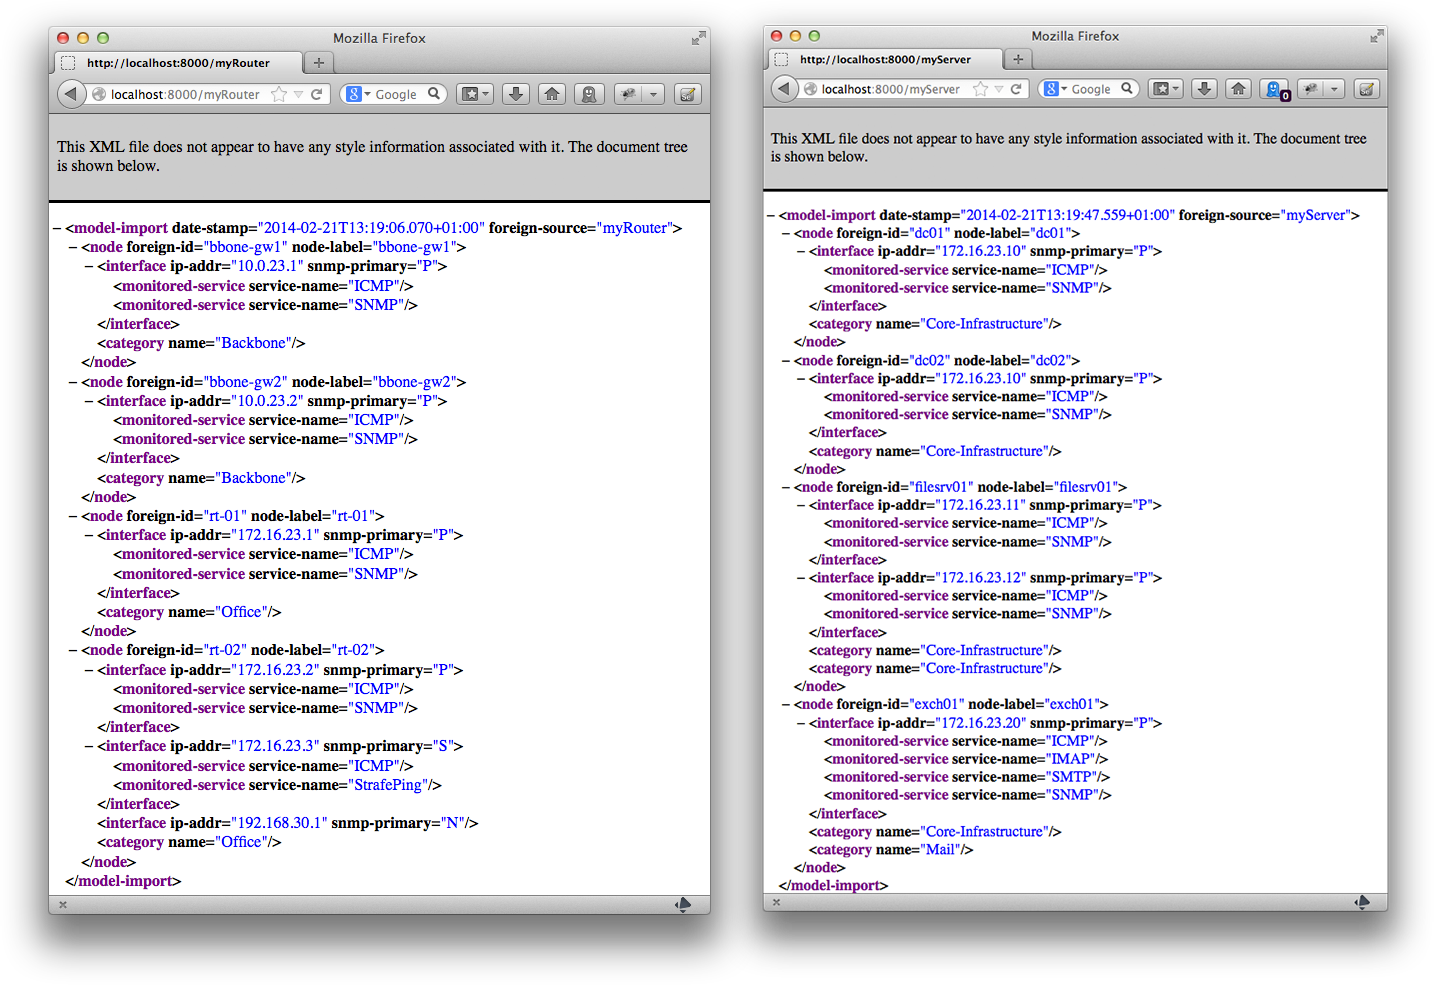
mapper = echoIt is not necessary to restart the PRIS server if you change properties files or the XLS file. All changes will be applied from the next request against the server. With the given configuration you see the result of the OpenNMS requisitions with the URL http://localhost:8000/requisitions/myRouter and http://localhost:8000/requisitions/myServer which can be used in OpenNMS Provisiond.
To get the requisition provided from PRIS automatically into OpenNMS you can configure Provisiond with a schedule.
Create following to entries in provisiond-configuration.xml and they will automatically be synchronized every night at 0h:0m:0s and 1h:0m:0s.
<requisition-def import-name="myRouter" import-url-resource="http://localhost:8000/requisitions/myRouter">
<cron-schedule>0 0 0 * * ? *</cron-schedule>
</requisition-def>
<requisition-def import-name="myServer" import-url-resource="http://localhost:8000/requisitions/myServer">
<cron-schedule>0 0 1 * * ? *</cron-schedule>
</requisition-def>3. Driver
The driver determines how to provide the generated OpenNMS requisition. It is a required global configuration item for the PRIS server. The configuration for the drivers has to be specified in the global.properties file. It is possible to configure exactly one driver for the PRIS server. For the PRIS server you can configure a global log level. The loglevel is also located in the global.properties file and can be configured with the following values:
loglevel = INFO
| Level | Default |
|---|---|
ALL |
|
TRACE |
|
DEBUG |
|
INFO |
* |
WARN |
|
ERROR |
|
OFF |
| Changing the log level requires a restart if you run PRIS as a daemon in HTTP mode. |
The driver is configured in global.properties which is located in the root application directory.
/opt/opennms-pris └── global.properties
3.1. File Driver
This driver offers the ability to generate an OpenNMS requisition directly into the filesystem.
To use the file driver you have to set the parameters in the global.properties:
| Parameter | Required | Description |
|---|---|---|
|
* |
set to |
|
* |
|
|
parameter as Java regular expression filter for the requisition name |
### File: global.properties
# Generate an requistion and create an requisition file to target
# Create a file for all requisitions matching * (Java regular expression)
loglevel = INFO
driver = file
target = /my/output/folder
requistions = *3.2. HTTP Driver
The HTTP driver starts PRIS as a web server to provide the OpenNMS requisition over HTTP.
| Parameter | Required | Description |
|---|---|---|
|
* |
set to |
|
* |
Network interface for listening, e.g. |
|
* |
TCP port to listen for incoming requests. Default is |
Access to the requisition can be tested with a browser to URL http://<your-ip>:<port>8000/requisitions/<name-requisition-cfg>;. The path name-requisition-cfg is the folder name which runs the requisition configuration located in your PRIS server directory.
### File: global.properties
# Start web server
# The web server listens on all interfaces and can be accessed on TCP port 8000
# URL: http://${your-ip}:8000/requisitions/${name-requisition-cfg}
driver = http
host = 0.0.0.0
port = 80004. Source
A Source is used to get the data to build an OpenNMS requisition.
Each requisition requires a source definition in the requisition.properties file.
Depending on the type of the source, different configuration parameters are available.
A JDBC source, for example, has different configuration parameters versus an XLS source.
The existing sources with their respective configuration parameters are described in this section.
A source is configured in the requisition.properties for the requisition.
/opt/opennms-pris
└── requisitions
└── myRequisitionConfiguration
└── requisition.properties
4.1. File Source
The file source allows to read a requisition file from the filesystem.
| Parameter | Required | Description |
|---|---|---|
|
* |
Set |
|
* |
relative path from |
|
* |
Mapper script changing the requisition. For no operation use |
|
If set |
This source reads an already-defined requisition from an XML file. The file to read has to be a valid OpenNMS requisition already.
### File: myFileRequisition/requisition.properties
# This example uses a predefined OpenNMS requisition
# Path to the myCustomRequisitionFile.xml is relative
# to the requisitions.properties
source = file
source.file = myCustomRequisitionFile.xml
### default no-operation mapper
mapper = echo4.2. HTTP Source
This source is similar to the file source. Instead of reading from a local file, it can read a requisition via HTTP from another OpenNMS instance. The location for the requisition is given by an OpenNMS provisioning ReST URL. It is possible to provide authentication credentials to be able to consume the ReST service.
| Parameter | Required | Description |
|---|---|---|
|
* |
Set |
|
* |
OpenNMS requisition ReST service base URL, e.g. http://demo.opennms.org/opennms/rest/requisitions |
|
OpenNMS user name for accessing the requisition ReST URL |
|
|
OpenNMS user password for accessing the requisition ReST URL |
|
|
* |
Mapper script for changing the requisition. For no operation use |
|
If set |
The given example configuration reads the requisition from the publicly available OpenNMS demo system.
### File: opennmsdemo/requisition.properties
# This example reads imports the requisition name Latency from
# the public available demo system.
source = http
source.url = http://demo.opennms.com/opennms/rest/requisitions/Latency
source.username = demo
source.password = demo
### mapper to set asset longitude and latitude based on a surveillance category ###
mapper = script
mapper.file = setGeoInfo.groovy4.3. JDBC Source
The JDBC source provides the ability to run an SQL Query against an external system and map the result to an OpenNMS requisition.
| Parameter | Required | Description |
|---|---|---|
|
* |
Set |
|
* |
JDBC driver, e.g. |
|
JDBC URL, e.g. |
|
|
SQL statement |
|
|
user name for database connection |
|
|
password for database connection |
|
|
* |
Mapper script for changing the requisition. For no operation use |
|
If set |
The following column-headers will be mapped from the result set to the OpenNMS requisition:
| Column Header | Required | Description |
|---|---|---|
|
* |
will be interpreted as |
|
defines the |
|
|
defines the |
|
|
defines the |
|
|
will be interpreted as an IP address for a new IP interface on the node |
|
|
is interpreted as |
|
|
will be interpreted as Interface Status. Value has to be an integer. Use |
|
|
will be interpreted as node label for the node identified by the |
|
|
The monitoring location for the node. When not set, the node is monitored from the OpenNMS server, otherwise from the Minion associated with the |
|
|
will be interpreted as a surveillance category for the node identified by the |
|
|
will be interpreted as a service on the interface of the node identified by the |
This source also supports all asset fields by using Asset_ as a prefix followed by the asset-field-name.
The city field of the assets can be addressed like this: yourvalue AS Asset_City and is not case-sensitive.
Every row of the result set will be checked for the listed column headers.
The provided data will be added to the corresponding node.
Multiple result rows with matching Foreign_Id will be added to the same node.
To use additional JDBC drivers, just drop the JAR files into the opennms-pris/lib directory and set the source.driver and source.url accordingly.
|
### File: phpipam/requisition.properties
# This example connects to an phpIPAM MySQL database and imports the
# data and maps the result an OpenNMS requisition.
# Hint: the MySQL driver has to be manually installed to the opennms-pris/lib
# directory
source = jdbc
## jdbc source parameter to connect against phpIPAM on MySQL
source.driver = com.mysql.jdbc.Driver
source.url = jdbc:mysql://phpipam.foo.org/phpipam
source.user = user
source.password = secret
source.selectStatement = SELECT \
id AS Foreign_Id, \
dns_name AS Node_Label, \
'P' AS MgmtType, \
description AS Asset_Description, \
INET_NTOA(ip_addr) AS Ip_Address, \
owner AS Cat \
FROM ipaddresses;
### default no-operation mapper
mapper = echo### File: opennms/requisition.properties
# This example connects to an OpenNMS PostgreSQL database and imports the
# data and maps the result a new OpenNMS requisition
source = jdbc
## jdbc source parameter to connect against PostgreSQL
source.driver = org.postgresql.Driver
source.url = jdbc:postgresql://localhost:5432/opennms
source.user = opennms
source.password = opennms
source.selectStatement = SELECT \
node.foreignId AS Foreign_Id, \
node.nodelabel AS Node_Label, \
node.location AS Location, \
ipinterface.ipaddr AS IP_Address, \
ipinterface.issnmpprimary AS MgmtType, \
ipinterface.ipstatus AS InterfaceStatus, \
assets.description AS Asset_Description, \
assets.city AS Asset_City, \
assets.state AS Asset_State, \
service.servicename AS Svc, \
categories.categoryname AS Cat \
FROM \
node LEFT OUTER JOIN ipInterface ON node.nodeId=ipInterface.nodeId \
LEFT OUTER JOIN ifServices ON ipInterface.id=ifServices.ipinterfaceid \
LEFT OUTER JOIN service ON ifServices.serviceId=service.serviceId \
LEFT OUTER JOIN category_node ON node.nodeId=category_node.nodeId \
LEFT OUTER JOIN categories ON category_node.categoryId=categories.categoryId \
LEFT OUTER JOIN assets ON node.nodeId=assets.nodeId;
### default no-operation mapper
mapper = echo4.4. Merge Source
The merge source allows to merge two provided requisitions accessed by URLs. You can also use provided resources by PRIS recursively. The example below shows how to configure the merge requisition for two requisitions A and B.
| Parameter | Required | Description |
|---|---|---|
|
* |
set to |
|
* |
URL to the requisition A |
|
username for access |
|
|
password for access |
|
|
* |
URL to the requisition B |
|
username for access |
|
|
password for access |
|
|
if this parameter is present in the config all nodes from requisition A will be present in the resulting requisition. |
|
|
if this parameter is present in the config all nodes from requisition B will be present in the resulting requisition. |
This source is reading two already defined requisitions via HTTP and merges them into one new requisition.
By default the resulting requisition will contain all nodes that are present in both requisitions, identified by the foreignId.
The A-Node (from requisition A) is enriched with the data from B-Node.
### File: merge/requisition.properties
# This example merges two requisitions
source = merge
source.A.url = http://localhost:8000/requisitions/A
source.A.keepAll = false
source.B.url = http://localhost:8000/requisitions/B
source.B.keepAll = false
### default no-operation mapper
mapper = echo4.5. Script Source
This source is provided to give you the flexibility of building your own source without the need to compile from source.
The source uses JSR-223 Scripting Engine.
The script language can be changed by setting the property source.lang in your requisition.properties file.
By default groovy 2.3.3 and beanshell 2.0b5 are ready to use. If you want to use other supported languages, you might need to provide the language jar in the lib folder of PRIS.
| Parameter | Required | Description |
|---|---|---|
|
* |
set |
|
* |
path to script source relative to |
|
JSR-223 Script language by name, by default the file extension is used to detect the language. |
|
|
you can have access to a parameter |
You can find a working Groovy source in the examples/source/scriptExample directory.
A custom parameter name count is passed into the Groovy script.
### File: myGroovySource/requisition.properties
# This example creates a requisition node from a Groovy script
source = script
source.file = myGroovySource.groovy
source.count = 3
### default no-operation mapper
mapper = echo4.6. XLS Source
The xls reads an XLS spreadsheet file and creates an OpenNMS requisition based on the worksheet content.
| Parameter | Required | Description |
|---|---|---|
|
* |
set |
|
* |
path of the XLS file to read relative to the |
|
encoding of the xls file. Default is ISO-8859-1 |
The structure of the spreadsheet has to follow these rules.
The source reads from a sheet named after the requisition you are requesting.
The first row of each sheet is reserved for column names.
These column names have to start with certain prefixes to be recognized.
| Prefixes | Required | Description |
|---|---|---|
|
* |
will be interpreted as node label. It is also used as |
|
The monitoring location for the node. When not set, the node is monitored from the OpenNMS server, otherwise from the Minion associated with the |
|
|
* |
will be interpreted as an IP address as a new interface on the node. |
|
* |
is interpreted as |
|
will be interpreted as |
|
|
defines the |
|
|
defines the |
|
|
defines the |
|
|
will be interpreted as interface status. Use |
|
|
will be interpreted as a surveillance category. Multiple comma-separated categories can be provided. It can be used multiple times per sheet. |
|
|
will be interpreted as a service on the interface of the node. Multiple comma-separated services can be provided. It can be used multiple times per sheet. |
This source also supports all asset-fields by using Asset_ as a prefix followed by the asset-field-name.
The city field of the assets can be addressed like this: Asset_City.
This is not case-sensitive.
To add a node with multiple interfaces, add a subsequent row with the same node label (Node_). This row will be added as a new interface based on the data from the IP_, MgmtType_, svc_ columns.
The order in which the columns are arranged is irrelevant. Also additional columns can be present.
| Check the format of cells to avoid problems with data like IP address. |
### File: myRouter/requisition.properties
# This example imports devices from a spreadsheet
# named "myRouter" from the myInventory.xls file
# Path to the XLS fils is relative to
# requisitions.properties
source = xls
source.file = ../myInventory.xls

### default no-operation mapper
mapper = echo4.7. OCS Source
OCS-Inventory NG is an inventory and software management software. It handles computers and SNMP devices as separate entity types in its APIs. For that reason there are two different sources available to import nodes from OCS. Some parameters are part of both sources and described first.
4.7.1. General OCS Parameters
The following parameters are required:
| Parameter | Required | Description |
|---|---|---|
|
* |
Set |
|
* |
The URL of the OCS web application. |
|
* |
A OCS user with rights to access the OCS Soap interface. |
|
* |
The password for the OCS user with rights to access the OCS Soap interface. |
|
* |
The inexplicably-named |
|
OCS supports tags / custom fields. If a tag is added to the ocs.tags list, just computers and |
|
|
This parameter allows to specify a file to write the result of the source to. The resulting xml file can be used for debugging or test reasons. |
4.7.2. Using a source for OCS computers
This source reads computers from an OCS instance. It supports all parameters listed as general and the following additions:
-
accountinfo=accountinfodata is based on custom fields managed in OCS. These are managed by the Administrative-Data section of the OCS web application. The name of the custom field is presented in all caps. The value of the field as provided by the user. Theocs.accountinfoparameters supports a list ofaccountinfothat must be present on the computer. If any of theaccountinfois not present the computer is skipped. To add multipleaccountinfovalues, separate them with spaces.
4.7.3. Using a source for OCS SNMP devices
This source reads snmpDevices from an OCS instance. It supports all parameters listed as general and no additional at the moment.
4.7.4. Using a mock source for development
For development and testing there are ocs.computers.replay and ocs.devices.replay sources available.
These sources require a file that contains the computers or snmpDevices as an XML file.
The file has also be referenced in the configuration.
### File: computers.basic/requisition.properties
# This example imports OCS computer devices into
# an OpenNMS requisition. To convert the OCS
# computer into a requisition the mapper.groovy
# is used.
source = ocs.computers
source.url = https://your-ocs-webapplication.ocs
source.username = ocs-user
source.password = ocs-password
source.checksum = 4611
source.tags =
### mapper to convert OCS computer model into OpenNMS requisition model
mapper = ocs.computers
mapper.ocs.url = https://your-ocs.webapplication.ocs
## Run a custom mapper script
script.file = mapper.groovy
### CATEGORIES ###
mapper.categoryMap =### File: computers.basic/requisition.properties
# This example imports OCS SNMP devices into
# an OpenNMS requisition. To convert the OCS
# SNMP devices into a requisition the mapper.groovy
# is used.
source = ocs.devices
source.url = https://your-ocs-webapplication.ocs
source.username = ocs-user
source.password = ocs-passowrd
source.checksum = 4611
source.tags =
### run the default mapper for snmp-devices
mapper = ocs.devices
categoryMap =5. Mapper
A mapper can be used to map the result of a source to an OpenNMS Requisition model.
The mapper receives the result of the source.
The source is not limited in the data model it provides to the mapper.
The mapper has to provide an OpenNMS Requisition as its result.
If the source provides a custom data model, the mapper has to map it into a Requisition.
Some sources provide OpenNMS Requisition directly in a ready-to-use form; in those cases the echo.mapper can be used.
Complex sources like the OCS-Sources provide OCS specific models and require their own specific mappers.
A mapper is configured in the requisition.properties for the requisition.
/opt/opennms-pris
└── requisitions
└── myRequisitionConfiguration
└── requisition.properties
5.1. No-operation echo mapper
The echo mapper is a mapper that forwards the result of the source verbatim.
That requires the source to provide a ready-to-use requisition and not a custom model.
This mapper does not change the result of the source.
5.2. Empty requisition mapper
The null mapper is a special mapper that just provides an empty requisition.
This can be useful to handle the entire mapping between the result of the source and the OpenNMS requisition in a script step.
5.3. OCS Mapper
Mappers are used to map the bifurcated OCS data model centered around computers and SNMP devices to the unified OpenNMS data model for provisioning nodes, interfaces, services and assets.
The OCS integration provides one default mapper for computers and one for SNMP devices out of the box.
Additionally it provides for script-based mapping via script steps.
The default mappers for OCS are a simple way to map computers and SNMP devices to OpenNMS nodes.
5.3.1. OCS Computers
To use this mapper, configure your requisition config to use ocs.computers as mapper. This mapper requires a checksum of 4867 to get all required data. It elects the OCS-Source-IP as management-interface of the node. The black- and whitelisting is applied against the interface. If no interface is valid, the node will have no interfaces and a corresponding log message will be written. The elected management interface is enriched with the interface description, if available. The SNMP and ICMP services are forced onto the management interface. Additionally the comment field of the node assets is used to provide an HTML link to the computer page of the OCS instance. The assets for cpu and operatingSystem will be mapped from the OCS computer too. The computer name is used as both foreignId and nodeLabel.
Accountinfo to Category Mapper
The default mapper for Computers supports a mapping between OCS Accountinfo data from OCS to OpenNMS surveillance categories. To use this feature add the mapper.categoryMap parameter to the requisition.properties file and reference a properties file following this syntax example:
# generic example for a properties file that maps OCS Accountinfo data to OpenNMS surveillance categories
ADMINISTRATIVEDATAFILEDNAME.data=OpenNMSCategoryName
# the Accountinfo for ENVIRONMENT is mapped to the OpenNMS surveillance category "Production" if the Accountinfo value is set to "Production"
ENVIRONMENT.Production=Production
# the Accountinfo for JOB is mapped to the OpenNMS surveillance category "Mail" if the Accountinfo value is set to "Mailserver"
JOB.Mailserver=MailAccountinfo to Asset Mapper
The Default mapper for Computers supports a mapping between OCS Accountinfo data from OCS to OpenNMS assets.
Accountinfo entry values can be used as values for OpenNMS asset fields.
To use this feature add the assetMap parameter to the requisition.properties file and reference a properties file following this syntax example:
# generic example for Accountinfo mapping to OpenNMS assets
ADMINISTRATIVEDATAFILEDNAME = OpenNMS-AssetName
# The value of the Accountinfo entry "TAG" is mapped to the OpenNMS asset field "region"
TAG = region
# The value of the Accountinfo entry "SERVERRACK" is mapped to the OpenNMS asset field "rack"
SERVERRACK = rack5.3.2. OCS SNMP Devices
To use this mapper, configure your requisition config to use ocs.devices as mapper.
This mapper requires a checksum of 4099.
It validates the IP address of the snmpDevice against the black- and whitelists.
For the election of the default an IP filter can be used.
If the IP address of the snmpDevice is blocked a log message is written and the node will not have any interfaces.
The interface has assigned ICMP and SNMP as services.
The foreignId is mapped from the OCS id of the snmpDevice.
The nodeLabel is provided by the OCS name of the snmpDevice.
The assets for CPU and operating system are mapped against OCS.
Additionally a link to the OCS snmpDevice page is added to the asset comment field.
5.3.3. Black- and Whitelists
The OCS Integration supports black- and whitelists to control the selection of the management interface for the node. OCS itself does not define a management interface, it just selects one ip-address as default and maintains a networks-list for every device. For the election of the management interface, two IP filters are implemented in the IpInterfaceHelper class. Both read the black- and whitelist from the requisition configuration folder. Name them blackList.properties and whiteList.properties. Every line in those files is interpreted as an IPLike statement to offer ranges.
Default ip-filter
This filter accepts every IP address as valid that is not blacklisted. IP addresses that are whitelisted are preferred over unlisted IP addresses.
Computers
The first IP address of the ocs-networks-list that is whitelisted is used. If no IP address of the ocs-networks-list is whitelisted, the first IP address that is not blacklisted is elected as the management interface. If no IP address of the ocs-networks-list qualifies, the ocs-default-ip is checked against the blacklist. If it is not blacklisted, it is elected as the management interface (no interface description will be available). If it is blacklisted, no interface is added to the node. (selectManagementNetwork)
SnmpDevices
The IP address of an snmpDevice is elected as management interface as long as it is not blacklisted. If it is blacklisted, no interface is added to the node. (selectIpAddress)
Strict ip-filter "WhiteAndBlackOnly"
This filter implements a strict black- and whitelist approach. Computers and snmpDevices are handled independently.
Computers
This mode is just accepts IP addresses that are whitelisted and not blacklisted. If there are multiple IP addresses listed on ocs-networks-list that are whitelisted but not blacklisted, the first such one is selected as management IP. If no IP address from the ocs-networks-list passes the black- and whitelist, the ocs-default-ip is tested against the black- and whitelist. If the ocs-default-ip is whitelisted and not blacklisted, it is elected as management-ip. If no IP address matches the black- and whitelist, no interface is added to the node. If the ocs-default-ip is selected, the interface of the node will not contain any additional parameters like description. (selectManagementNetworkWhiteAndBlackOnly)
SnmpDevices
If the IP address of the snmpDevice is whitelisted and not blacklisted, it is elected as management interface. If the IP address does not pass the lists, no interface is added to the node. (selectIpAddressWhiteAndBlackOnly)
IPLike expressions in lists
In both lists the IPLike syntax can be used to express IP ranges and wildcards. Follow the IPLike description at IPLIKE documentation.
5.4. Script mapper
This mapper is used to give you the flexibility of building your own mapper without the need to compile from source.
The source uses JSR-223 Scripting Engine.
The script language can be changed by setting the property mapper.lang in your requisition.properties file.
The following example runs your script in the the JavaScript Rhino engine:
### File: requisition.properties
## source configuration part
source = ...
## Run a no operation mapper
mapper = echo
# run mapper script in JavaScript
mapper.lang=javascript
mapper.file = myJavaScriptSource.jsIf you don’t set the language lang property the script engine tries to detect the language by evaluating the file extension.
| Parameter | Required | Description |
|---|---|---|
|
* |
|
|
* |
Path to script source relative to |
|
JSR-223 Script language by name |
You can find a working example in Groovy in the configs/examples/script.mapper directory.
In addition to any other mapper, a final script mapper can be used by specifying script.file in your requisition.properties` file.
The specified script will run after the configured mapper and can be used to transform the mapper’s output further.
To specify the scripting language, the script.lang property can be used (see mapper.lang).
6. Asset field mapping
The asset field mapping can be used in xls.source and jdbc.source.
| OpenNMS requisition asset field mapping |
|---|
|
|
|
|
|
|
|
|
|
|
|
|
|
|
|
|
|
|
|
|
|
|
|
|
|
|
|
|
|
|
|
|
|
|
|
|
|
|
|
|
|
|
|
|
|
|
|
|
|
|
|
|
|
|
|
|
|
|
|
|
|
|
|
|
|
|
|
7. Script Steps
After the mapper has delivered its requitition, multiple script steps can be used to customize the result. These script steps can change the requisition initially provided by the mapper. Script steps provide a requisition as their results, which allows the chaining of script steps. Every script step has access to the latest version of the requisition. The first script step reads the requisition from the mapper. The second script step reads the requisition provided by the first script step and so on. Additionally every script step can access the configuration of PRIS and the raw result of the source. The script steps are executed by the JVM following the JSR-223 specification. Therefore all JSR-223 supported languages can be used to write script steps. By default runtimes for Groovy 2.3.3 and Beanshell 2.0b5 are provided out of the box.
Every script step has to provide a Requisition object as its result. For every request of a requisition each script step is reloaded.
Script steps are configured in the requisition.properties for the requisition.
/opt/opennms-pris
└── requisitions
| └── myRequisitionConfiguration
| └── requisition.properties
└── scriptsteps
└── default
| └── reverseDNS.groovy
| └── requisitionRename.groovy
| └── IgnoreNodeByCategory.groovy
└── custom
└── myScript.groovy
### File: requisition.properties
## source configuration part
source = ...
## Run a no operation mapper
mapper = echo
# run script step
script.file = ../../scriptsteps/default/requisitionRename.groovy, ../../scriptsteps/default/IgnoreNodeByCategory.groovy/**
* This script renames the requisition to the value in the newName variable.
* If newBuilding is set to true, each node gets the newName set as building
*/
import org.opennms.pris.model.Requisition
import org.opennms.pris.model.RequisitionNode
logger.info("starting requisitionRename.groovy")
String newName = "myNewRequisitionName"
Boolean newBuilding = false // true
requisition.setForeignSource(newName)
if (newBuilding) {
for (RequisitionNode node : requisition.getNodes()) {
node.setBuilding(newName)
}
}
logger.info("done with requisitionRename.groovy")
return requisition/**
* This script step removes every node from the requisiton that has the "ignore" category assigned to it.
* The category match ignores case.
**/
import org.opennms.pris.model.Requisition
import org.opennms.pris.model.RequisitionNode
import org.opennms.pris.model.RequisitionCategory
import org.opennms.pris.util.RequisitionUtils
logger.info("starting IgnoreNodeByCategory.groovy")
final String IGNORE_CATEGORY = "ignore"
List <RequisitionNode> nodes = new ArrayList<>();
for (RequisitionNode node : requisition.getNodes()) {
if (RequisitionUtils.hasCategory(node, IGNORE_CATEGORY, true)) {
logger.debug("node '{}' has to be ignored", node.getForeignId())
} else {
nodes.add(node)
logger.debug("node '{}' is ok", node.getForeignId())
}
}
requisition.unsetNodes()
requisition.withNodes(nodes)
logger.info("done with IgnoreNodeByCategory.groovy")
return requisition/**
* This script step sets the nodelabel based on a reverse dns lookup of the ip interfaces.
* It reverse dns lookups all interfaces for each node until it findes a dns name for a node.
* If a dns name was found it is set as nodelabel and no other interface of the nodes will be checked.
* If no dns name was found the nodelabel will be changed.
*/
import org.opennms.pris.model.Requisition
import org.opennms.pris.model.RequisitionNode
import org.opennms.pris.model.RequisitionInterface
logger.info("starting reverseDNS.groovy")
for (RequisitionNode node : requisition.getNodes()) {
for (RequisitionInterface myInterface : node.getInterfaces()) {
String ipAddress = myInterface.getIpAddr()
String dnsNodeLabel = InetAddress.getByName(ipAddress).getCanonicalHostName()
logger.debug("For foreignID '{}' dnsNodeLabel for IP '{}' is '{}'", node.getForeignId(), ipAddress, dnsNodeLabel)
if (!ipAddress.equals(dnsNodeLabel)) {
logger.info("Using '{}' as NodeLabel for foreignId '{}' based on IP '{}'", dnsNodeLabel, node.getForeignId(), ipAddress)
node.setNodeLabel(dnsNodeLabel)
break
}
}
}
logger.info("done with reverseDNS.groovy")
return requisition/**
* This script forces a hard failure if the requisition is empty.
* This can avoid provisioning an empty requisition,
* including removing the existing nodes, on a failure of a source or mapper.
**/
import org.slf4j.Logger
import org.opennms.pris.model.Requisition
logger.info("starting failOnEmpty.groovy")
logger.debug("Amount of nodes in the requisition '{}'", (requisition.getNodes().size()))
if (requisition.getNodes().size() == 0) {
throw new Exception("The requisition '" + requisition.getForeignSource() + "' had no nodes. The failOnEmpty.groovy script is failing the request on purpose.")
}
logger.info("done with failOnEmpty.groovy")
return requisition/**
* This script provides backwards compatibility with OpenNMS 1.12 in regards to Assets.
**/
import org.opennms.pris.model.Requisition
import org.opennms.pris.model.RequisitionNode
import org.opennms.pris.model.RequisitionAsset
import org.opennms.pris.util.RequisitionUtils
import org.opennms.pris.model.AssetField_1_12
import org.opennms.pris.util.AssetUtils
logger.info("starting OpenNMS_Assets_1_12.groovy")
List<RequisitionAsset> assetsToRemove = new ArrayList<>();
for (RequisitionNode node : requisition.getNodes()) {
for (RequisitionAsset asset : node.getAssets()) {
if (asset.getName().equalsIgnoreCase("managedObjectInstance") || asset.getName().equalsIgnoreCase("managedObjectType") ) {
assetsToRemove.add(asset);
logger.info("Remove from node '{}' the asset '{}' with the value '{}'", node.getNodeLabel(), asset.getName(), asset.getValue());
} else {
for (AssetField_1_12 assetField : AssetField_1_12.values()) {
if (asset.getName().equalsIgnoreCase(assetField.name())) {
String assetValue_1_12 = AssetUtils.assetStringCleaner(asset.getValue(), assetField.maxLength);
if (!assetValue_1_12.equals(asset.getValue())) {
logger.info("For node '{}' asset '{}' was changed from '{}' to '{}'" , node.getNodeLabel(), asset.getName(), asset.getValue(), assetValue_1_12)
asset.setValue(assetValue_1_12);
}
break;
}
}
}
}
node.getAssets().removeAll(assetsToRemove);
assetsToRemove = new ArrayList<>();
}
logger.info("done with OpenNMS_Assets_1_12.groovy")
return requisitionEvery script step can reference variables from the runtime of PRIS. The following script shows the provided objects:
/**
* This sample script step demonstrates all objects provided by the pris runtime.
* The objects are casted to there exact type and logged.
**/
import java.nio.file.Path
import org.slf4j.Logger
import org.opennms.pris.model.Requisition
import org.opennms.pris.util.InterfaceUtils
import org.opennms.pris.config.InstanceApacheConfiguration
logger.info("starting Sample.groovy")
logger.debug("script '{}'", ((Path)script))
logger.debug("data '{}'", ((Object)data))
logger.debug("requisition '{}'", ((Requisition)requisition))
logger.debug("logger '{}'", ((Logger)logger))
logger.debug("config '{}'", ((InstanceApacheConfiguration)config))
logger.debug("config '{}'", ((InterfaceUtils)interfaceUtils))
logger.info("done with Sample.groovy")
return requisitionThe following two script steps provide a mechanism to fail the requisition on purpose if the amount of nodes has changed to drastically to the previous run. The setup contains of two scripts that have to be included as script steps in order.
/**
* This script persists the amount of nodes delivered for the last request into a previousSize.txt file next to the requisition.properties.
* To configure the script provide a script.sizeChangeAbs parameter in the requisition.properties.
**/
import org.slf4j.Logger
import org.opennms.pris.model.Requisition
import javax.xml.bind.JAXBContext
import java.io.StringWriter
logger.info("starting failOnSizeChange.groovy")
String fileName = "previousSize.txt"
String sizeChangeAbsParam = "sizeChangeAbs"
logger.info("Is '{}' set in config? '{}'", sizeChangeAbsParam ,config.containsKey(sizeChangeAbsParam))
if (config.containsKey(sizeChangeAbsParam)) {
logger.info("fail on size change bigger than '{}'", config.getInt(sizeChangeAbsParam))
int sizeChangeThreshold = config.getInt(sizeChangeAbsParam)
File previousSizeFile = new File("requisitions" + File.separator + requisition.getForeignSource() + File.separator + fileName)
if (previousSizeFile.exists() && previousSizeFile.canRead()) {
int previousSize = previousSizeFile.getText('UTF-8').toInteger()
logger.info("previousSize from file is '{}'. New size is '{}'", previousSize, requisition.getNodes().size())
int sizeChange = (previousSize - requisition.getNodes().size()).abs()
if (sizeChange > sizeChangeThreshold) {
throw new Exception("The requisition '" + requisition.getForeignSource() + "' changed size by '" + sizeChange + "' nodes. The configured limit for size change is '" + sizeChangeThreshold + "' Failed on purpose.")
}
} else {
logger.info("No " + fileName + " found. Deliver requisition.")
}
}
logger.info("done with failOnSizeChange.groovy")
return requisitionThe persistens of the previous requistion size is provided by the second script step of the setup.
/**
* This script persists the amount of nodes delivered for the last request into a previousSize.txt file next to the requisition.properties.
**/
import org.slf4j.Logger
import org.opennms.pris.model.Requisition
import javax.xml.bind.JAXBContext
import java.io.StringWriter
logger.info("starting persistRequisitionSize.groovy")
JAXBContext jc = JAXBContext.newInstance(Requisition)
StringWriter sw = new StringWriter()
jc.createMarshaller().marshal(requisition, sw)
String xml = sw.toString()
File file = new File("requisitions" + File.separator + requisition.getForeignSource() + File.separator + "previousSize.txt")
file.write requisition.getNodes().size() + ""
logger.info("persisted a requisition size of {}", requisition.getNodes().size())
logger.info("done with persistRequisitionSize.groovy")
return requisition8. Provision to OpenNMS
PRIS just provides requisitions in the xml format that OpenNMS understands. There is no "connection" between PRIS and OpenNMS by default. To use the requisition from PRIS in OpenNMS, Provisiond has to be triggered. There are multiple ways to trigger Provisiond to pick up the requisitions from PRIS.
8.1. Provisiond scheduled
Provisiond can be configured to provision a requisition from an URL on a configurable schedule.
To configure Provisiond to provision a requisition from PRIS via http a configuration entry like the following can be used.
<requisition-def import-name="myRouter" import-url-resource="http://localhost:8000/requisitions/myRouter">
  <cron-schedule>0 0 0 * * ? *</cron-schedule>
</requisition-def>

<requisition-def import-name="myServer" import-url-resource="http://localhost:8000/requisitions/myServer">
  <cron-schedule>0 0 1 * * ? *</cron-schedule>
</requisition-def>8.2. Provision via Event
A special OpenNMS Event can be sent to OpenNMS to trigger provisioning of a requisition right away. Sending an event to OpenNMS in general can be achieved via the OpenNMS WebUI or the send-event.pl script. The following example demonstrates the use of send-event.pl to emit the provisioning event.
./send-event.pl -p 'url http://localhost:8000/requisitions/myRouter' uei.opennms.org/internal/importer/reloadImportThe example assumes that OpenNMS is running on the system on which send-event.pl is called.
The url parameter references the url that offers the requisition via PRIS.
Please check the send-event.pl documentation for additional information.
8.3. Provision via RestAPI
OpenNMS provides an extensive RestAPI that covers provisioning.
Please follow the OpenNMS RestAPI documentation for further information.
9. Advanced configuration
This section provides an overview of advanced configurations and use cases.
9.1. Variables in configurations
The configuration mechanism of PRIS supports basic variable substitution.
Therefore it is possible to add properties to the global.properties file and reference the property values in any requisition.properties file.
Properties defined in the global.properties can be overwritten in a requisition.properties file.
It is also possible to use properties defined in a requisition.properties in a different part of the same requisition.properties again.
An implicit property requisition is also available in requisition.properties by default.
The following examples demonstrate the use of properties as variables in PRIS configurations:
global.properties used in requisition.properties.### File: global.properties
# Start web server
# The web server listens for requests and can be accessed on TCP port 8000 of all interfaces
# URL: http://${your-ip}:8000/requisitions/${name-requisition-cfg}
driver = http
host = 0.0.0.0
port = 8000
httpUser = myUser
httpPassword = 987654321
### File: opennmsdemo/requisition.properties
source = http
source.url = http://demo.opennms.com/opennms/rest/requisitions/${requisition}
source.username = ${httpUser}
source.password = ${httpPassword}
### mapper to set asset longitude and latitude based on a surveillance category ###
mapper = script
mapper.file = setGeoInfo.groovy10. Documentation guidelines
| Other than writing documentation, you can help out by providing comments about improvements or reporting bugs - head over to the issue tracker for documentation to do that! |
For how to build the manual see: readme
The documents use the AsciiDoc format, see:
Here you can find other resources to get familiar with AsciiDoc, see:
The cheatsheets are really useful!
10.1. Overall Flow
The documentation for OpenNMS PRIS is organized in as Maven Module.
After building, the documentation is generated as HTML output on the file system.
The output is generated in the target/generated sources folder.
Asciidoc documents have the .asciidoc file extension.
The structure is organized as the following:
Note that different ways to add documentation works best for different cases:
-
Tutorials and How To’s should be published on the OpenNMS Wiki. For example, You want to explain how you used the JDBC source to integrate OpenNMS PRIS with your vendor specific inventory database.
-
The documentation you can find in the source code can be characterized as a non-emotional technical documentation which explains concepts in detail and should be complete.
If you want to contribute a patch to the documentation, just fork the project on github.
Make your changes in the branch called develop and send us a pull request.
After the review of the pull request we will merge it and your change is in the next release.
10.2. Important files and folders
| Directory | Contents |
|---|---|
README.adoc |
Description how to build the documentation from source |
pom.xml |
Maven project settings for the documentation module |
src/asciidoc |
Folder with adoc source files |
src/asciidoc/index.adoc |
root file which includes all the document parts |
src/asciidoc/images |
directory for including images and screenshots in |
src/asciidoc/images_src |
directory for including original format, e.g. |
src/asciidoc/configs |
configuration and script examples referenced in the documentation |
10.3. Headings and document structure
Each document starts over with headings from level zero (the document title). Each document should have an id. In some cases sections in the document need to have id’s as well, this depends on where they fit in the overall structure. To be able to link to content, it has to have an id. Missing id’s in mandatory places will fail the build.
This is how a document should start:
[[unique-id-verbose-is-ok]]
= The Document Title
To push the headings down to the right level in the output, the leveloffset attribute is used when including the document inside of another document.
Subsequent headings in a document should use the following syntax:
== Subheading

... content here ...

=== Subsubheading

content here ...
10.4. Writing
Put one sentence on each line. This makes it easy to move content around, and also easy to spot (too) long sentences.
10.5. Gotchas
-
Always leave a blank line at the end of documents (or the title of the next document might end up in the last paragraph of the document)
-
As {} are used for Asciidoc attributes, everything inside will be treated as an attribute. What you have to do is to escape the opening brace: \\{. If you don’t, the braces and the text inside them will be removed without any warning being issued!
10.6. Links
To link to other parts of the manual the id of the target is used. This is how such a reference looks:
<<community-docs-overall-flow>>Which will render like: Overall Flow
| Just write "see <<target-id>>" and similar, that should suffice in most cases. |
If you need to link to another document with your own link text, this is what to do:
<<target-id, link text that fits in the context>>| Having lots of linked text may work well in a web context but is a pain in print, and we aim for both! |
External links are added like this:
http://www.opennms.org/[Link text here]Which renders like: Link text here
For short links it may be better not to add a link text, just do:
http://www.opennms.org/Which renders like: http://www.opennms.org/
| It’s ok to have a dot right after the URL, it won’t be part of the link. |
10.7. Text Formatting
-
_Italics_ is rendered as Italics and used for emphasis.
-
*Bold* is rendered as Bold and used sparingly, for strong emphasis only.
-
+methodName()+ is rendered as methodName() and is used for literals as well (note: the content between the
+signs will be parsed). -
`command` is rendered as
command(typically used for command-line) (note: the content between the ` signs will not be parsed). -
Mono\\+space+d is rendered as Mono+space+d and is used for monospaced letters.
-
\'my/path/' is rendered as 'my/path/' (used for file names and paths).
-
\``Double quoted'' (that is two grave accents to the left and two acute accents to the right) renders as ``Double quoted''.
-
\`Single quoted' (that is a single grave accent to the left and a single acute accent to the right) renders as `Single quoted'.
10.8. Admonitions
These are very useful and should be used where appropriate. Choose from the following (write all caps and no, we can’t easily add new ones):
| Note. |
| Tip. |
| Important |
| Caution |
| Warning |
Here’s how it’s done:
NOTE: Note.A multiline variation:
[TIP]
Tiptext.
Line 2.
Which is rendered as:
| Tiptext. Line 2. |
10.9. Images
| All images in the entire manual share the same namespace. You know how to handle that. |
10.9.1. Images Files
To include an image file, make sure it resides in the 'images/' directory relative to the document you’re including it from. Then go:
image::opennms-logo.png[]Which is rendered as:
.example.odp
image::example.png[example.odp]
Which is rendered as:
10.10. Attributes
Common attributes you can use in documents: 1.1.7-SNAPSHOT * {docVersion} - rendered as "1.1.7-SNAPSHOT"
These can substitute part of URLs that point to for example APIdocs or source code. Note that opennms-git-tag also handles the case of snapshot/master.
Sample Asciidoc attributes which can be used:
-
{docdir} - root directory of the documents
-
{nbsp} - non-breaking space
10.11. Comments
There’s a separate build including comments.
The comments show up with a yellow background.
This build doesn’t run by default, but after a normal build, you can use make annotated to build it.
You can also use the resulting page to search for content, as the full manual is on a single page.
Here’s how to write a comment:
// this is a commentThe comments are not visible in the normal build. Comment blocks won’t be included in the output of any build at all. Here’s a comment block:
////
Note that includes in here will still be processed, but not make it into the output.
That is, missing includes here will still break the build!
////
10.12. Code Snippets
10.12.1. Explicitly defined in the document
| Use this kind of code snippets as little as possible. They are well known to get out of sync with reality after a while. |
This is how to do it:
<service name="DNS" interval="300000" user-defined="false" status="on">
  <parameter key="retry" value="2" />
  <parameter key="timeout" value="5000" />
  <parameter key="port" value="53" />
  <parameter key="lookup" value="localhost" />
  <parameter key="fatal-response-codes" value="2,3,5" /><!-- ServFail, NXDomain, Refused -->
  <parameter key="rrd-repository" value="/opt/opennms/share/rrd/response" />
  <parameter key="rrd-base-name" value="dns" />
  <parameter key="ds-name" value="dns" />
</service>
If there’s no suitable syntax highlighter, just omit the language: [source].
Currently the following syntax highlighters are enabled:
-
Bash
-
Groovy
-
Java
-
JavaScript
-
Python
-
XML
For other highlighters we could add see https://code.google.com/p/google-code-prettify/.
10.12.2. Fetched from source code
Code can be automatically fetched from source files. You need to define:
-
component: the artifactId of the Maven coordinates,
-
source: path to the file inside the jar it’s deployed to,
-
classifier: sources or test-sources or any other classifier pointing to the artifact,
-
tag: tag name to search the file for,
-
the language of the code, if a corresponding syntax highlighter is available.
Note that the artifact has to be included as a Maven dependency of the Manual project so that the files can be found.
The file will be searched for lines including START SNIPPET: {tag} and END SNIPPET: {tag}, the lines between those will go into the output. Be aware of that the tag "abc" will match "abcd" as well. It’s a simple on/off switch, meaning that multiple occurrences will be assembled into a single code snippet in the output. This behavior can be user to hide away assertions from code examples sourced from tests.
This is how to define a code snippet inclusion:
 [snippet,java]
 ----
 component=opennms-examples
 source=org/opennms/examples/JmxDocTest.java
 classifier=test-sources
 tag=getStartTime
 ----
This is how it renders:
component=opennms-examples
source=org/opennms/examples/JmxDocTest.java
classifier=test-sources
tag=getStartTime