1. Compatibility
OpenNMS Horizon 25.2.1 requires the following component versions:
| Component | Version Compatibility |
|---|---|
OpenNMS Helm |
3+ |
OpenNMS Integration API |
0.2.x |
Cassandra |
3.11.+ |
Elasticsearch |
7.x |
Java Development Kit |
OpenJDK 8, OpenJDK 11 |
Kafka |
1.x - 2.x |
PostgreSQL |
10.x - 12.x |
RRDTool |
1.7.x |
2. Setting up a basic OpenNMS Horizon
The OpenNMS Horizon platform can be installed on multiple OS families. This guide provides instructions for installing the platform on Red Hat Enterprise Linux (RHEL)-based, Debian-based, and Microsoft Windows operating systems.
2.1. Objectives
-
Installing OpenNMS Horizon components on a single node using the built-in JRobin as time series storage
-
Setup OpenNMS Horizon on recommended operating systems
-
Login the Web User Interface and change the default admin password
2.2. Before you begin
The following abbreviations will be used to refer to their respective entry through this documentation.
RHEL |
Red Hat Enterprise Linux 7 or higher, CentOS 7 or higher |
Debian |
Debian 9 or higher, Ubuntu 16.04 LTS or higher |
Windows |
Microsoft Windows Server 2012, Windows 10 |
OpenJDK 11 Development Kit |
Installed OpenJDK 11 Development Kit |
It is recommended to meet the following requirements:
Minimal Hardware |
2 CPU, 2 GB RAM, 20 GB disk |
Operating System |
RHEL or Debian in a current version is recommended. Please be aware OpenNMS Horizon is developed and mostly operated on Linux systems. Community support is limited when you run on Microsoft Windows platform. On Microsoft Windows the R integration for statistical computation on time series data is not supported. |
Internet |
Access to {yum,debian}.opennms.org or SourceForge for Microsoft Windows via https. |
DNS Setup |
Please make sure your DNS settings for the OpenNMS server are correct and the localhost name can be resolved. If there is an incorrect or missing A Resource Record for the server hostname, OpenNMS might not start correctly. The Java security manager might not initialize and an RMI class loader disabled exception will be shown. |
Depending on the installed operating system, the path for OpenNMS Horizon is different.
If the instruction refers to ${OPENNMS_HOME}, the path is resolved to the following directories:
RHEL |
|
Debian |
|
Windows |
|
2.3. Installing on RHEL
The following steps will be described:
-
Installation of the
opennmsmeta package which handles all dependencies -
Initialize PostgreSQL database and configure access
-
Initialize OpenNMS Horizon database and start
-
Log in to the Web User Interface and change default admin password
All commands on the command line interface need to be executed with root permissions.
Step 1: Install OpenNMS Horizon
dnf -y install https://yum.opennms.org/repofiles/opennms-repo-stable-rhel8.noarch.rpm
rpm --import https://yum.opennms.org/OPENNMS-GPG-KEYdnf -y install opennmsThe following packages will be automatically installed:
-
jicmp6 and jicmp: Java bridge to allow sending ICMP messages from OpenNMS Horizon repository.
-
opennms-core: OpenNMS Horizon core services, e.g. Provisiond, Pollerd and Collectd from OpenNMS Horizon repository.
-
opennms-webapp-jetty: OpenNMS Horizon web application from OpenNMS Horizon repository
-
postgresql: PostgreSQL database server from distribution repository
-
postgresql-libs: PostgreSQL database from distribution repository
With the successful installed packages the OpenNMS Horizon is installed in the following directory structure:
[root@localhost /opt/opennms]# tree -L 1
.
└── opennms
   ├── bin
   ├── contrib
   ├── data
   ├── deploy
   ├── etc
   ├── jetty-webapps
   ├── lib
   ├── logs -> /var/log/opennms
   ├── share -> /var/opennms
└── system| We recommend disabling the OpenNMS Horizon repository after installation to prevent unwanted upgrades while it is running. OpenNMS Horizon requires some manual steps upon upgrade configuration files or migrate database schemas to a new version. For this reason, it is recommended to exclude the OpenNMS Horizon packages from update except when you are planning on performing an upgrade. |
dnf config-manager --disable opennms-repo-stable-*Step 2: Initialize and setup PostgreSQL
postgresql-setup --initdb --unit postgresqlsystemctl enable postgresqlsystemctl start postgresqlsu - postgres
createuser -P opennms
createdb -O opennms opennmspsql -c "ALTER USER postgres WITH PASSWORD 'YOUR-POSTGRES-PASSWORD';"
exit| The super user is required to be able to initialize and change the database schema for installation and updates. |
vi /var/lib/pgsql/data/pg_hba.confhost all all 127.0.0.1/32 md5(1)
host all all ::1/128 md5(1)| 1 | Change method from ident to md5 for IPv4 and IPv6 on localhost. |
systemctl reload postgresqlvi ${OPENNMS_HOME}/etc/opennms-datasources.xml<jdbc-data-source name="opennms"
database-name="opennms"(1)
class-name="org.postgresql.Driver"
url="jdbc:postgresql://localhost:5432/opennms"
user-name="** YOUR-OPENNMS-USERNAME **"(2)
password="** YOUR-OPENNMS-PASSWORD **" />(3)
<jdbc-data-source name="opennms-admin"
database-name="template1"
class-name="org.postgresql.Driver"
url="jdbc:postgresql://localhost:5432/template1"
user-name="postgres"(4)
password="** YOUR-POSTGRES-PASSWORD **" />(5)| 1 | Set the database name OpenNMS Horizon should use |
| 2 | Set the user name to access the opennms database table |
| 3 | Set the password to access the opennms database table |
| 4 | Set the postgres user for administrative access to PostgreSQL |
| 5 | Set the password for administrative access to PostgreSQL |
Step 3: Initialize and start OpenNMS Horizon
${OPENNMS_HOME}/bin/runjava -s${OPENNMS_HOME}/bin/install -dissystemctl enable opennmssystemctl start opennmsfirewall-cmd --permanent --add-port=8980/tcp
systemctl reload firewalld| If you want to receive SNMP Traps or Syslog messages you have to allow incoming traffic on your host firewall as well. By default OpenNMS SNMP trap daemon is listening on 162/udp and Syslog daemon is listening on 10514/udp. The SNMP Trap daemon is enabled by default, the OpenNMS Syslog daemon is disabled. |
Step 4: First Login and change default password
After starting OpenNMS the web application can be accessed on http://<ip-or-fqdn-of-your-server>:8980/opennms. The default login user is admin and the password is initialized to admin.
-
Open in your browser http://<ip-or-fqdn-of-your-server>:8980/opennms
-
Login with with admin/admin
-
Click in main navigation menu on "admin → Change Password → Change Password"
-
Set as current password admin and set a new password and confirm your newly set password
-
Click "Submit"
-
Logout and login with your new password
Next Steps
Additional information can be found in these follow up documents:
-
Getting Started Guide
Learn the first steps to setup, configure, and maintain an OpenNMS Horizon.
-
Reference Guide
Find in-depth information on the detecters, monitors, collectors, and configuration files used by the OpenNMS Horizon platform.
2.4. Installing on Debian
The following steps will be described:
-
Installation of the
opennmsmeta package which handles all dependencies -
Initialize PostgreSQL database and configure access
-
Initialize OpenNMS Horizon database and start
-
Log in to the Web User Interface and change default admin password
All commands on the command line interface need to be executed with root permissions.
Step 1: Install OpenNMS Horizon
cat << EOF | sudo tee /etc/apt/sources.list.d/opennms.list
deb https://debian.opennms.org stable main
deb-src https://debian.opennms.org stable main
EOF
wget -O - https://debian.opennms.org/OPENNMS-GPG-KEY | apt-key add -
apt updateapt -y install opennmsThe following packages are required by the opennms package and will be automatically installed:
-
jicmp6 and jicmp: Java bridge to allow sending ICMP messages from OpenNMS repository.
-
opennms-core: OpenNMS core services, e.g. Provisiond, Pollerd and Collectd from OpenNMS repository.
-
opennms-webapp-jetty: OpenNMS web application from OpenNMS repository
-
postgresql: PostgreSQL database server from distribution repository
-
postgresql-libs: PostgreSQL database from distribution repository
With the successful installed packages the OpenNMS Horizon is installed in the following directory structure:
[root@localhost /usr/share/opennms]# tree -L 1
.
└── opennms
├── bin
├── data
├── deploy
├── etc -> /etc/opennms
├── instances
├── jetty-webapps
├── lib -> ../java/opennms
├── logs -> /var/log/opennms
├── share -> /var/lib/opennms
└── system| We recommend disabling the OpenNMS Horizon repository after installation to prevent unwanted upgrades while it is running. OpenNMS Horizon requires some manual steps upon upgrade configuration files or migrate database schemas to a new version. For this reason, it is recommended to exclude the OpenNMS Horizon packages from update except when you are planning on performing an upgrade. |
apt-mark hold libopennms-java \
libopennmsdeps-java \
opennms-common \
opennms-dbStep 2: Initialize and setup PostgreSQL
The Debian package installs the PostgreSQL database and is already initialized. The PostgreSQL service is already added in the runlevel configuration for system startup.
systemctl start postgresqlsu - postgres
createuser -P opennms
createdb -O opennms opennmspsql -c "ALTER USER postgres WITH PASSWORD 'YOUR-POSTGRES-PASSWORD';"
exit| The super user is required to be able to initialize and change the database schema for installation and updates. |
vi ${OPENNMS_HOME}/etc/opennms-datasources.xml<jdbc-data-source name="opennms"
database-name="opennms"(1)
class-name="org.postgresql.Driver"
url="jdbc:postgresql://localhost:5432/opennms"
user-name="** YOUR-OPENNMS-USERNAME **"(2)
password="** YOUR-OPENNMS-PASSWORD **" />(3)
<jdbc-data-source name="opennms-admin"
database-name="template1"
class-name="org.postgresql.Driver"
url="jdbc:postgresql://localhost:5432/template1"
user-name="postgres"(4)
password="** YOUR-POSTGRES-PASSWORD **" />(5)| 1 | Set the database name OpenNMS Horizon should use |
| 2 | Set the user name to access the opennms database table |
| 3 | Set the password to access the opennms database table |
| 4 | Set the postgres user for administrative access to PostgreSQL |
| 5 | Set the password for administrative access to PostgreSQL |
Step 3: Initialize and start OpenNMS Horizon
${OPENNMS_HOME}/bin/runjava -s${OPENNMS_HOME}/bin/install -dissystemctl enable opennmssystemctl start opennms| If you want to receive SNMP Traps or Syslog messages you have to allow incoming traffic on your host firewall as well. By default OpenNMS SNMP trap daemon is listening on 162/udp and Syslog daemon is listening on 10514/udp. The SNMP Trap daemon is enabled by default, the OpenNMS Syslog daemon is disabled. |
Step 4: First Login and change default password
After starting OpenNMS the web application can be accessed on http://<ip-or-fqdn-of-your-server>:8980/opennms. The default login user is admin and the password is initialized to admin.
-
Open in your browser http://<ip-or-fqdn-of-your-server>:8980/opennms
-
Login with with admin/admin
-
Click in main navigation menu on "admin → Change Password → Change Password"
-
Set as current password admin and set a new password and confirm your newly set password
-
Click "Submit"
-
Logout and login with your new password
Next Steps
Additional information can be found in these follow up documents:
-
Getting Started Guide
Learn the first steps to setup, configure, and maintain an OpenNMS Horizon.
-
Reference Guide
Find in-depth information on the detecters, monitors, collectors, and configuration files used by the OpenNMS Horizon platform.
2.5. Installing on Windows
The installer for Microsoft Windows does not handle PostgreSQL and Java dependencies as on Linux operating systems.
| Ensure you have installed Oracle Java Development Kit 8 (JDK) or higher from the Oracle web page or from the OpenJDK community build site. |
The following steps will be described:
-
Install PostgreSQL on Microsoft Windows
-
Install OpenNMS Horizon with GUI installer
-
Initialize PostgreSQL database and configure access
-
Log in to the Web User Interface and change default admin password
It is required to have local administration permission to install OpenNMS Horizon.
| To edit OpenNMS configuration files on Microsoft Windows the tool Notepad++ can deal with the formatting of .property and .xml files. |
Step 1: Install PostgreSQL
PostgreSQL is available for Microsoft Windows and latest version can be downloaded from Download PostgreSQL page. Follow the on-screen instructions of the graphical installer.
The placeholder {PG-VERSION} represents the PostgreSQL version number.
Check the Compatibility Matrix to find a suited PostgreSQL version.
|
During the installation of PostgreSQL the following information need to be provided:
-
Installation directory for PostgreSQL, e.g.
C:\Program Files\PostgreSQL{PG-VERSION} -
Password for the database superuser (postgres), this password will be used during the OpenNMS setup.
-
Port to listen for PostgreSQL connections, default is
5432and can normally be used. -
Locale for the database, keep
[Default locale], if you change the locale, OpenNMS may not be able to initialize the database.
| It is not required to install anything additional from the PostgreSQL Stack Builder. |
Step 2: Install OpenNMS with GUI installer
For Microsoft Windows environments download the standalone-opennms-installer-{ONMS-VERSION}.zip file from the OpenNMS SourceForge repository. Extract the downloaded ZIP file.
The {ONMS-VERSION} has to be replaced with the latest stable version number.
|
Start the graphical installer and follow the on screen instructions. The following information has to be provided:
-
Path to Oracle JDK, e.g.
C:\Program Files\Java\jdk1.8.0_71 -
Installation path for OpenNMS, e.g.
C:\Program Files\OpenNMS -
Select packages which has to be installed, the minimum default selection is Core and Docs
-
PostgreSQL Database connection
-
Host: Server with PostgreSQL running, e.g.
localhost -
Name: Database name for OpenNMS, e.g.
opennms -
Port: TCP port connecting to PostgreSQL server, e.g.
5432 -
Username (administrative superuser): PostgreSQL superuser, e.g.
postgres -
Password (administrative superuser): Password given during PostgreSQL setup for the superuser
-
Username (runtime user for opennms): Username to connect to the OpenNMS database, e.g.
opennms -
Password (runtime user for opennms): Password to connect to the OpenNMS database, e.g.
opennms
-
-
Configure a discovery range for an initial node discovery. If you don’t want any discovery set begin and end to the same unreachable address.
| Choose secure passwords for all database users and don’t use the example passwords above in production. |
Step 3: Configure PostgreSQL access for OpenNMS Horizon
<jdbc-data-source name="opennms"
                    database-name="opennms"(1)
                    class-name="org.postgresql.Driver"
                    url="jdbc:postgresql://localhost:5432/opennms"
                    user-name="** YOUR-OPENNMS-USERNAME **"(2)
                    password="** YOUR-OPENNMS-PASSWORD **" />(3)

<jdbc-data-source name="opennms-admin"
                    database-name="template1"
                    class-name="org.postgresql.Driver"
                    url="jdbc:postgresql://localhost:5432/template1"
                    user-name="postgres"(4)
password="** YOUR-POSTGRES-PASSWORD **" />(5)| 1 | Set the database name OpenNMS Horizon should use |
| 2 | Set the user name to access the opennms database table |
| 3 | Set the password to access the opennms database table |
| 4 | Set the postgres user for administrative access to PostgreSQL |
| 5 | Set the password for administrative access to PostgreSQL |
After setting the username and passwords in opennms-datasources.xml re-run the graphical installer and also initialize the database.
OpenNMS can be started and stopped with the start.bat and stop.bat script located in %OPENNMS_HOME%\bin directory.
The Wiki article Configuring OpenNMS as Windows Service describes how to create a Windows Service from the start.bat files.
There is also a Java Wrapper which allows to install Java applications as Windows Service.
|
Step 4: First Login and change default password
After starting OpenNMS the web application can be accessed on http://<ip-or-fqdn-of-your-server>:8980/opennms. The default login user is admin and the password is initialized to admin.
-
Open in your browser http://<ip-or-fqdn-of-your-server>:8980/opennms
-
Login with with admin/admin
-
Click in main navigation menu on "admin → Change Password → Change Password"
-
Set as current password admin and set a new password and confirm your newly set password
-
Click "Submit"
-
Logout and login with your new password
Next Steps
Additional information can be found in these follow up documents:
-
Getting Started Guide
Learn the first steps to setup, configure, and maintain an OpenNMS Horizon.
-
Reference Guide
Find in-depth information on the detecters, monitors, collectors, and configuration files used by the OpenNMS Horizon platform.
3. Monitor isolated location with Minion
This section describes how to install the Minion to monitor devices and services in a location which can’t be reached from an OpenNMS Horizon instance.
3.1. Objectives
-
Install a Minion to monitor devices and services unreachable from an OpenNMS Horizon instance
-
Configure an authenticated unencrypted communication between Minion and OpenNMS Horizon using ActiveMQ and REST
3.2. Before you begin
Setting up a OpenNMS Horizon with Minions requires:
-
Instance of OpenNMS Horizon needs to be exact same version as Minion packages
-
Packages are available as RPMs for RHEL-based systems and DEBs for Debian-based systems
-
OpenNMS Horizon needs to be installed and communication to the REST (8980/tcp) and ActiveMQ (616161/tcp) endpoints is possible
Depending on the installed operating system, the path for Minion is different.
If the instruction refers to ${MINION_HOME}, the path is resolved to the following directories:
RHEL |
|
Debian |
|
3.3. Installing on RHEL
-
Setup OpenNMS Horizon to allow Minion communication
-
Installation of the
opennms-minionmeta package which handles all dependencies -
Starting Minion and access the Karaf console over SSH
-
Configure Minion to communicate with OpenNMS Horizon
-
Verify the connectivity between Minion and OpenNMS Horizon
All commands on the command line interface need to be executed with root permissions.
Step 1: Setup OpenNMS Horizon to allow Minion communication
Communication between a Minion and OpenNMS Horizon uses REST API and a messaging system, by default ActiveMQ. An authenticated user in OpenNMS Horizon is required for these communication channels. The security role ROLE_MINION includes the minimal amount of permissions required for a Minion to operate.
| As an example we use in this guide the user name minion with password minion. Change the credentials accordingly. |
-
Login the web user interface with a user which has administrative permissions
-
Go in the main navigation to "Login Name → Configure OpenNMS → Configure Users, Groups and On-Call Roles → Configure Users"
-
Add a new user with login name minion and password minion and click Ok
-
Assign the security role ROLE_MINION, optional fill in a comment for what location and purpose the user is used for and click Finish
-
The minion user should now be listed in the User List
vi ${OPENNMS_HOME}/etc/opennms-activemq.xml<transportConnector name="openwire" uri="tcp://0.0.0.0:61616?useJmx=false&maximumConnections=1000&wireformat.maxFrameSize=104857600"/>systemctl restart opennmsss -lnpt sport = :61616
State Recv-Q Send-Q Local Address:Port Peer Address:Port
LISTEN 0 128 *:61616 *:* users:(("java",pid=1,fd=706))Step 2: Install the repository and Minion package
Connect with SSH to your remote RHEL system where you need a Minion to be installed.
dnf -y install https://yum.opennms.org/repofiles/opennms-repo-stable-rhel8.noarch.rpm
rpm --import https://yum.opennms.org/OPENNMS-GPG-KEYdnf -y install opennms-minionWith the successful installed packages the Minion is installed in the following directory structure:
[root@localhost /opt/minion]# $ tree -L 1
.
├── bin
├── deploy
├── etc
├── lib
├── repositories
└── system
The Minion’s startup configuration can be changed by editing the /etc/sysconfig/minion file.
It allows to override the defaults used at startup including:
-
Location of the JDK
-
Memory usage
-
User to run as
Step 3: Starting the Minion and test access to Karaf Shell
systemctl enable minionsystemctl start minionssh -p 8201 admin@localhostStep 4: Configure Minion to communicate with OpenNMS Horizon
ssh -p 8201 admin@localhost[root@localhost /root]# $ ssh -p 8201 admin@localhost
...
admin@minion()> config:edit org.opennms.minion.controller
admin@minion()> config:property-set location Office-Pittsboro
admin@minion()> config:property-set http-url http://opennms-fqdn:8980/opennms
admin@minion()> config:property-set broker-url failover:tcp://opennms-fqdn:61616
admin@minion()> config:update
Include the failover: portion of the broker URL to allow the Minion to re-establish connectivity on failure.
For a reference on the different URL formats, see ActiveMQ URI Protocols.
|
admin@minion()> scv:set opennms.http minion minion
admin@minion()> scv:set opennms.broker minion minion
Another way to configure credentials is to use the scvcli utility in your Minion bin directory.
|
scvcli[root@localhost /root]# $ cd /opt/minion
[root@localhost /opt/minion]# $ ./bin/scvcli set opennms.http minion minion
[root@localhost /opt/minion]# $ ./bin/scvcli set opennms.broker minion minion[root@localhost /root]# $ systemctl restart minion| The credentials are configured separately since they are encrypted on disk. |
Step 5: Verifying Connectivity
ssh -p 8201 admin@localhostadmin@minion()> minion:ping
Connecting to ReST...
OK
Connecting to Broker...
OK
admin@minion()>3.4. Installing on Debian
-
Setup OpenNMS Horizon to allow Minion communication
-
Installation of the
opennms-minionmeta package which handles all dependencies -
Starting Minion and access the Karaf console over SSH
-
Configure Minion to communicate with OpenNMS Horizon
-
Verify the connectivity between Minion and OpenNMS Horizon
All commands on the command line interface need to be executed with root permissions.
Step 1: Setup OpenNMS Horizon to allow Minion communication
Communication between a Minion and OpenNMS Horizon uses REST API and a messaging system, by default ActiveMQ. An authenticated user in OpenNMS Horizon is required for these communication channels. The security role ROLE_MINION includes the minimal amount of permissions required for a Minion to operate.
| As an example we use in this guide the user name minion with password minion. Change the credentials accordingly. |
-
Login the web user interface with a user which has administrative permissions
-
Go in the main navigation to "Login Name → Configure OpenNMS → Configure Users, Groups and On-Call Roles → Configure Users"
-
Add a new user with login name minion and password minion and click Ok
-
Assign the security role ROLE_MINION, optional fill in a comment for what location and purpose the user is used for and click Finish
-
The minion user should now be listed in the User List
vi ${OPENNMS_HOME}/etc/opennms-activemq.xml<transportConnector name="openwire" uri="tcp://0.0.0.0:61616?useJmx=false&maximumConnections=1000&wireformat.maxFrameSize=104857600"/>systemctl restart opennmsss -lnpt sport = :61616
State Recv-Q Send-Q Local Address:Port Peer Address:Port
LISTEN 0 128 *:61616 *:* users:(("java",pid=1,fd=706))Step 2: Install the repository and Minion package
echo 'deb https://debian.opennms.org stable main \
      deb-src https://debian.opennms.org stable main' > /etc/apt/sources.list.d/opennms.list
wget -O - https://debian.opennms.org/OPENNMS-GPG-KEY | apt-key add -
apt updateapt -y install opennms-minionThe Minion packages setup the following directory structure:
[root@localhost /usr/share/minion]# $ tree -L 1
.
├── bin
├── deploy
├── etc
├── lib
├── repositories
└── system
Additionally, symbolic links are set up pointing to /etc/minion and /var/log/minion to match Debian’s expected filesystem layout.
The Minion’s startup configuration can be changed by editing the /etc/default/minion file.
It allows to override the defaults used at startup including:
-
Location of the JDK
-
Memory usage
-
User to run as
Step 3: Starting the Minion and test access to Karaf Shell
systemctl enable minionsystemctl start minionssh -p 8201 admin@localhostStep 4: Configure Minion to communicate with OpenNMS Horizon
ssh -p 8201 admin@localhost[root@localhost /root]# $ ssh -p 8201 admin@localhost
...
admin@minion()> config:edit org.opennms.minion.controller
admin@minion()> config:property-set location Office-Pittsboro
admin@minion()> config:property-set http-url http://opennms-fqdn:8980/opennms
admin@minion()> config:property-set broker-url failover:tcp://opennms-fqdn:61616
admin@minion()> config:update
Include the failover: portion of the broker URL to allow the Minion to re-establish connectivity on failure.
For a reference on the different URL formats, see ActiveMQ URI Protocols.
|
admin@minion()> scv:set opennms.http minion minion
admin@minion()> scv:set opennms.broker minion minion
Another way to configure credentials is to use the scvcli utility in your Minion bin directory.
|
scvcli[root@localhost /root]# $ cd /opt/minion
[root@localhost /opt/minion]# $ ./bin/scvcli set opennms.http minion minion
[root@localhost /opt/minion]# $ ./bin/scvcli set opennms.broker minion minion[root@localhost /root]# $ systemctl restart minion| The credentials are configured separately since they are encrypted on disk. |
Step 5: Verifying Connectivity
ssh -p 8201 admin@localhostadmin@minion()> minion:ping
Connecting to ReST...
OK
Connecting to Broker...
OK
admin@minion()>4. Sentinel
This section describes how to install the Sentinel to scale individual components of OpenNMS Horizon.
| At the moment only flows can be distributed using Sentinel. In the future more components will follow. |
4.1. Before you begin
Setting up a OpenNMS Horizon with Sentinel requires:
-
Instance of OpenNMS Horizon needs to be exact same version as Sentinel packages
-
Packages are available as RPMs for RHEL-based systems and DEBs for Debian-based systems
-
OpenNMS Horizon needs to be installed and communication to the REST (8980/tcp) and ActiveMQ (616161/tcp) endpoints is possible
-
At least one Minion needs to be installed and successful communicate with the OpenNMS Horizon
Depending on the installed operating system, the path for Sentinel is different.
If the instruction refers to ${SENTINEL_HOME}, the path is resolved to the following directories:
RHEL |
|
Debian |
|
4.2. Installing on RHEL
-
Setup OpenNMS Horizon to allow Sentinel communication
-
Installation of the
opennms-sentinelmeta package which handles all dependencies -
Starting Sentinel and access the Karaf console over SSH
-
Configure Sentinel to communicate with OpenNMS Horizon
-
Verify the connectivity between Sentinel and OpenNMS Horizon
All commands on the command line interface need to be executed with root permissions.
Step 1: Setup OpenNMS Horizon to allow Sentinel communication
This step is exactly the same as for Minion.
Even the role name ROLE_MINION can be used, as there does not exist a dedicated role ROLE_SENTINEL yet.
Therefore, please refer to section Setup OpenNMS Horizon to allow Minion communication.
| Even if we have to configure the communication to the OpenNMS Horizon exactly the same as for Minion no ReST requests are made and may be removed at a later state. |
Step 2: Install the repository and Sentinel package
Connect with SSH to your remote RHEL system where the Sentinel should be installed.
dnf install -y https://yum.opennms.org/repofiles/opennms-repo-stable-rhel8.noarch.rpm
rpm --import https://yum.opennms.org/OPENNMS-GPG-KEYdnf -y install opennms-sentinelWith the successful installed packages the Sentinel is installed in the following directory structure:
[root@localhost /opt/sentinel]# $ tree -L 1
.
|-- bin
|-- COPYING
|-- data
|-- deploy
|-- etc
|-- lib
`-- system
The Sentinel’s startup configuration can be changed by editing the /etc/sysconfig/sentinel file.
It allows to override the defaults used at startup including:
-
Location of the JDK
-
Memory usage
-
User to run as
Step 3: Starting the Sentinel and test access to Karaf Shell
systemctl enable sentinelsystemctl start sentinelssh -p 8301 admin@localhostStep 4: Configure Sentinel to communicate with OpenNMS Horizon
ssh -p 8301 admin@localhost[root@localhost /root]# $ ssh -p 8201 admin@localhost
...
admin@sentinel()> config:edit org.opennms.sentinel.controller
admin@sentinel()> config:property-set location Office-Pittsboro
admin@sentinel()> config:property-set http-url http://opennms-fqdn:8980/opennms
admin@sentinel()> config:property-set broker-url failover:tcp://opennms-fqdn:61616
admin@sentinel()> config:update
Include the failover: portion of the broker URL to allow the Sentinel to re-establish connectivity on failure.
For a reference on the different URL formats, see ActiveMQ URI Protocols.
|
| Even if the id, location and http-url must be set the same ways as for Minion, this may change in future versions of Sentinel. |
admin@sentinel()> scv:set opennms.http minion minion
admin@sentinel()> scv:set opennms.broker minion minion
Username and password is explicitly set to minion as it is assumed that they share the same credentials and roles.
Another way to configure credentials is to use the scvcli utility in your Sentinel bin directory.
|
scvcli[root@localhost /root]# $ cd /opt/sentinel
[root@localhost /opt/sentinel]# $ ./bin/scvcli set opennms.http minion minion
[root@localhost /opt/sentinel]# $ ./bin/scvcli set opennms.broker minion minion[root@localhost /root]# $ systemctl restart sentinel| The credentials are configured separately since they are encrypted on disk. |
Step 5: Verifying Connectivity
ssh -p 8301 admin@localhostadmin@sentinel()> feature:install sentinel-core
admin@sentinel> health:check
Verifying the health of the container
Verifying installed bundles [ Success ]
Connecting to OpenNMS ReST API [ Success ]
=> Everything is awesome
admin@sentinel()>
The health:check command is a newer and more flexibel version of the original minion:ping command.
Therefore on Sentinel there is no equivalent such as sentinel:ping.
|
4.3. Installing on Debian
-
Setup OpenNMS Horizon to allow Sentinel communication
-
Installation of the
opennms-sentinelmeta package which handles all dependencies -
Starting Sentinel and access the Karaf console over SSH
-
Configure Sentinel to communicate with OpenNMS Horizon
-
Verify the connectivity between Sentinel and OpenNMS Horizon
All commands on the command line interface need to be executed with root permissions.
Step 1: Setup OpenNMS Horizon to allow Sentinel communication
This step is exactly the same as for Minion.
Even the role name ROLE_MINION can be used, as there does not exist a dedicated role ROLE_SENTINEL yet.
Therefore, please refer to section Setup OpenNMS Horizon to allow Minion communication.
| Even if we have to configure the communication to the OpenNMS Horizon exactly the same as for Minion no ReST requests are made and may be removed at a later state. |
Step 2: Install the repository and Sentinel package
echo 'deb https://debian.opennms.org stable main \
      deb-src https://debian.opennms.org branches/features-sentinel main' > /etc/apt/sources.list.d/opennms.list
wget -O - https://debian.opennms.org/OPENNMS-GPG-KEY | apt-key add -
apt updateapt -y install opennms-sentinelThe Sentinel packages setup the following directory structure:
[root@localhost /usr/share/sentinel]# $ tree -L 1
.
|-- bin
|-- COPYING
|-- data
|-- debian
|-- deploy
|-- etc
|-- lib
`-- system
Additionally, symbolic links are set up pointing to /etc/sentinel and /var/log/sentinel to match Debian’s expected filesystem layout.
The Minion’s startup configuration can be changed by editing the /etc/default/sentinel file.
It allows to override the defaults used at startup including:
-
Location of the JDK
-
Memory usage
-
User to run as
Step 3: Starting the Sentinel and test access to Karaf Shell
systemctl enable sentinelsystemctl start sentinelssh -p 8301 admin@localhostStep 4: Configure Sentinel to communicate with OpenNMS Horizon
ssh -p 8301 admin@localhost[root@localhost /root]# $ ssh -p 8201 admin@localhost
...
admin@sentinel()> config:edit org.opennms.sentinel.controller
admin@sentinel()> config:property-set location Office-Pittsboro
admin@sentinel()> config:property-set http-url http://opennms-fqdn:8980/opennms
admin@sentinel()> config:property-set broker-url failover:tcp://opennms-fqdn:61616
admin@sentinel()> config:update
Include the failover: portion of the broker URL to allow the Sentinel to re-establish connectivity on failure.
For a reference on the different URL formats, see ActiveMQ URI Protocols.
|
| Even if the id, location and http-url must be set the same ways as for Minion, this may change in future versions of Sentinel. |
admin@sentinel()> scv:set opennms.http minion minion
admin@sentinel()> scv:set opennms.broker minion minion
Username and password is explicitly set to minion as it is assumed that they share the same credentials and roles.
Another way to configure credentials is to use the scvcli utility in your Sentinel bin directory.
|
scvcli[root@localhost /root]# $ cd /opt/sentinel
[root@localhost /usr/share/sentinel]# $ ./bin/scvcli set opennms.http minion minion
[root@localhost /usr/share/sentinel]# $ ./bin/scvcli set opennms.broker minion minion[root@localhost /root]# $ systemctl restart sentinel| The credentials are configured separately since they are encrypted on disk. |
Step 5: Verifying Connectivity
ssh -p 8301 admin@localhostadmin@sentinel()> feature:install sentinel-core
admin@sentinel> health:check
Verifying the health of the container
Verifying installed bundles [ Success ]
Connecting to OpenNMS ReST API [ Success ]
=> Everything is awesome
admin@sentinel()>
The health:check command is a newer and more flexibel version of the original minion:ping command.
Therefore on Sentinel there is no equivalent such as sentinel:ping.
|
5. Run with Docker
Modern infrastructure allows you to deploy and run workloads in containers. With OpenNMS Horizon we provide and publish container images on DockerHub.
| We don’t install all available plugins in our published Docker image. If you want ot customize and maintain your own image, you can find the Dockerfiles in our source repository. |
5.1. Objectives
-
Run OpenNMS Horizon using Docker Compose with a basic setup and PostgreSQL on your local system as a quickstart
-
Persist RRD files from OpenNMS Horizon and PostgreSQL in a volume
-
Run and configure a Minion in the stack and connect it to the OpenNMS Horizon instance using environment variables
-
Introduce a reference with all available configuration and mount conventions for more advanced setups
5.2. Before you begin
It is required you have at least the following components installed:
-
Current stable Docker release installed, e.g. installed from Docker Documentation
-
Current stable Docker Compose installed, e.g. installed from Docker Compose instructions
-
You should have a basic knowledge about Docker, Docker Compose with networking, persisting files and mounting directories
5.3. Quickstart service stack
Step 1: Create service stack for PostgreSQL and OpenNMS Horizon
The first section describes how to setup OpenNMS Horizon service stack in a docker-compose.yml file.
Create a project directory withg mkdir opennms-horizon and create inside a docker-compose.yml file with the following content:
---
version: '3'

volumes:
  data-postgres: {}(1)
  data-opennms: {}(2)

services:
  database:(3)
    image: postgres:12(4)
    container_name: database(5)
    environment:(6)
      - TZ=Europe/Berlin
      - POSTGRES_USER=postgres
      - POSTGRES_PASSWORD=postgres
    volumes:(7)
      - data-postgres:/var/lib/postgresql/data
    healthcheck:(8)
      test: [ "CMD-SHELL", "pg_isready -U postgres" ]
      interval: 10s
      timeout: 30s
      retries: 3

  horizon:
    image: opennms/horizon:25.0.0(9)
    container_name: horizon
    environment:(10)
      - TZ=Europe/Berlin
      - POSTGRES_HOST=database
      - POSTGRES_PORT=5432
      - POSTGRES_USER=postgres
      - POSTGRES_PASSWORD=postgres
      - OPENNMS_DBNAME=opennms
      - OPENNMS_DBUSER=opennms
      - OPENNMS_DBPASS=opennms
    volumes:
      - data-opennms:/opt/opennms/share/rrd(11)
      - ./overlay:/opt/opennms-overlay(12)
    command: ["-s"]
    ports:(13)
      - "8980:8980/tcp"
      - "8101:8101/tcp"
      - "61616:61616/tcp"
    healthcheck:(14)
      test: [ "CMD", "curl", "-f", "-I", "http://localhost:8980/opennms/login.jsp" ]
      interval: 1m
      timeout: 5s
      retries: 3

  minion:
    image: opennms/minion:25.0.0
    container_name: minion
    environment:
      - TZ=Europe/Berlin
      - MINION_ID=my-minion(15)
      - MINION_LOCATION=my-location(16)
      - OPENNMS_BROKER_URL=failover:tcp://horizon:61616(16)
      - OPENNMS_HTTP_URL=http://horizon:8980/opennms(16)
    command: ["-f"]
    ports:(17)
      - "8201:8201/tcp"
- "162:1162/udp"| 1 | Volume definition to persist permanently the PostgreSQL database |
| 2 | Volume definition to persist permanently the RRD files from OpenNMS Horizon |
| 3 | Service name database for the PostgreSQL instance |
| 4 | Image reference for the vanilla PostgreSQL Docker image with a fixed version |
| 5 | Friendly container name |
| 6 | Environment variables to initialize a postgres user with a password. |
| 7 | Assign volume to persist the PostgreSQL database |
| 8 | Create a health check for the PostgreSQL database |
| 9 | Image reference for the OpenNMS Horizon container image using the latest stable version |
| 10 | Setup a data base connection using the postgres root user and initialize an opennms database with user and credentials |
| 11 | Assign the volume to persist the RRD files permanently |
| 12 | Mount the configuration files to make them accessible in a local directory |
| 13 | Publish ports for the web user interface, Karaf Shell and ActiveMQ |
| 14 | Create a health check against the login page from OpenNMS Horizon |
| 15 | A defined identifier for this Minion, if not set a UUID will be generated |
| 16 | The name of the location the Minion and the connection to the ActiveMQ broker running in OpenNMS Horizon |
| 17 | Publish ports for SSH access to the Karaf Shell and listen for SNMP Traps forwarding to an internal un-privileged port |
| In this example we haven’t set credentials to connect the Minion via REST and the ActiveMQ Message Broker. The _Minion will fall back and uses the default admin/admin credentials for the communication. |
Step 2: Start the service stack and test the functionality
cd opennms-horizon
docker-compose up -d
The startup and download can take a while, you can use the docker-compose ps command and wait until the health check for the horizon service is up (healthy).
After download and startup verify if you can access the web user interface with going to http://localhost:8980.
|
Step 3: Configure ActiveMQ using the overlay directory convention
mkdir overlay/etc && cd overlay/etc
docker cp $(docker ps -qf name=horizon):/opt/opennms/etc/opennms-activemq.xml .
Step 4:
vi opennms-activemq.xml
<!-- Uncomment this line to allow external TCP connections -->
<!--
WARNING: Access to port 61616 should be firewalled to prevent unauthorized injection
of data into OpenNMS when this port is open.
-->
<transportConnector name="openwire" uri="tcp://0.0.0.0:61616?useJmx=false&maximumConnections=1000&wireformat.maxFrameSize=104857600"/>
Step 5: Restart OpenNMS Horizon
docker-compose stop horizon
docker-compose up -d
Step 6: Run Minion health check
ssh admin@localhost -p 8201

admin@minion> health:check
Verifying the health of the container

Connecting to OpenNMS ReST API   [ Success  ]
Verifying installed bundles      [ Success  ]
Connecting to JMS Broker         [ Success  ]

=> Everything is awesome| The default admin password for the Minion Karaf Shell is admin. |
Step 7: Verify status in the administrative Web UI
-
Login as admin
-
Configure OpenNMS → Manage Minions, the Minion should be registered and the Status should be up
-
Verify if Minion is provisioned automatically going to Info → Nodes and select the Minion, the services JMX-Minion, Minion-Heartbeat and Minion-RPC should be up and provisioned on the local loopback interface
5.4. Configuration Reference
5.4.1. OpenNMS Horizon
Startup Arguments
| Argument | Description |
|---|---|
|
Display help with available arguments. |
|
Start the process in the foreground and use existing data and configuration. |
|
One-time command to initialize or update database and configuration files and do NOT start. |
|
Command to initialize or update database and configuration files and start OpenNMS in the foreground. |
|
One-time command to run the config-tester against the configuration. |
Environment Variables
Environment variable |
Description |
Required |
Default value |
|
Allows to add additional Java options |
optional |
|
| Environment variable | Description | Required | Default value |
|---|---|---|---|
|
Database name used for OpenNMS Horizon |
required |
- |
|
Username with access to the database |
required |
- |
|
Password for user with acccess to the database |
required |
- |
|
Host with the PostgreSQL server instance running |
required |
- |
|
PostgreSQL server port |
optional |
|
|
PostgreSQL super user to initialize database schema specified in |
required |
- |
|
PostgreSQL super user password |
required |
- |
|
Database connection pool factory |
optional |
|
|
Database connection pool idle timeout |
optional |
|
|
Database connection pool login timeout |
optional |
|
|
Minimal connection pool size |
optional |
|
|
Maximum connection pool size |
optional |
|
|
Maximum connections |
optional |
|
| Environment variable | Description | Required | Default value |
|---|---|---|---|
|
Used Timeseries storage strategy |
optional |
|
|
Store timeseries data by foreign source instead of the database node id |
optional |
|
|
Java RRD Strategy class |
optional |
|
|
Java RRD Interface library |
optional |
|
|
JRRD2 libray path |
optional |
|
| Environment variable | Description | Required | Default value |
|---|---|---|---|
|
Listen interface for SNMP Trapd |
optional |
|
|
Port to listen for SNMP Traps |
optional |
|
|
Create new suspect event based Trap recepient for unknown devices |
optional |
|
|
Preserve raw messages in SNMP Traps |
optional |
|
|
Set maximum thread size to process SNMP Traps |
optional |
|
|
Set maximum queue for SNMP Trap processing |
optional |
|
|
Set batch size for SNMP Trap processing |
optional |
|
|
Set batch processing interval in milliseconds |
optional |
|
| Environment variable | Description | Required | Default value |
|---|---|---|---|
|
Listen interface for Karaf shell |
optional |
|
|
SSH Port for Karaf shell |
optional |
|
| Environment variable | Description | Required | Default value |
|---|---|---|---|
|
Set Cassandra replication factor for the newts keyspace if Newts is used |
optional |
|
|
A comma separated list with Cassandra hosts for Newts |
optional |
|
|
Name of the keyspace used by Newts |
optional |
|
|
Cassandra server port |
optional |
|
|
Username with access to Cassandra |
optional |
|
|
Password for user with access to Cassandra |
optional |
|
Directory Conventions
| Mountpoint | Description |
|---|---|
|
Allows to overwrite files relative to |
|
Directory with RRDTool/JRobin files and generated PDF reports sent to the file system |
5.4.2. Minion
Startup Arguments
| Argument | Description |
|---|---|
|
Display help with available arguments. |
|
Start Minion and use environment credentials to register Minion on OpenNMS Horizon. |
|
One-time command to initialze an encrypted keystore file with credentials in |
|
Initialize and start Minion in foreground. |
Environment Variables
| Environment variable | Description | Required | Default value |
|---|---|---|---|
|
Unique Minion identifier |
optional |
generated UUID |
|
Name of the location the Minion is associated |
required |
- |
| Environment variable | Description | Required | Default value |
|---|---|---|---|
|
Web user interface base URL for REST |
required |
- |
|
User name for the ReST API |
optional |
|
|
Password for the ReST API |
optional |
|
|
ActiveMQ broker URL |
required |
- |
|
Username for ActiveMQ authentication |
optional |
|
|
Password for ActiveMQ authentication |
optional |
|
If you want to use Apache Kafka the environment variable names are converted with a prefix convention:
-
Prefix
KAFKA_RPC_will be written toorg.opennms.core.ipc.rpc.kafka.cfg -
Prefix
KAFKA_SINK_will be written toorg.opennms.core.ipc.sink.kafka.cfg -
Everything behind will be converted to lower case and
_is replaced with.
As an example:
environment:
  - KAFKA_RPC_BOOTSTRAP_SERVERS=192.168.1.1,192.168.1.2
This will create the file org.opennms.core.ipc.rpc.kafka.cfg with the content:
bootstrap.servers=192.168.1.1,192.168.1.2Directory Conventions
| Mountpoint | Description |
|---|---|
|
Allows to overwrite files relative to |
|
Directory with credentials for encrypted keystore file |
5.4.3. Sentinel
Startup Arguments
| Argument | Description |
|---|---|
|
Display help with available arguments. |
|
Start Sentinel and use environment credentials to connect to OpenNMS Horizon. |
|
One-time command to initialze an encrypted keystore file with credentials in |
|
Start with Karaf in debug mode |
|
Initialize and start Sentinel in foreground. |
Environment Variables
| Environment variable | Description | Required | Default value |
|---|---|---|---|
|
Web user interface base URL for REST |
required |
- |
|
User name for the ReST API |
optional |
|
|
Password for the ReST API |
optional |
|
|
ActiveMQ broker URL |
required |
- |
|
Username for ActiveMQ authentication |
optional |
|
|
Password for ActiveMQ authentication |
optional |
|
Directory Conventions
| Mountpoint | Description |
|---|---|
|
Allows to overwrite files relative to |
|
Directory with credentials for encrypted keystore file |
6. Minion with custom messaging system
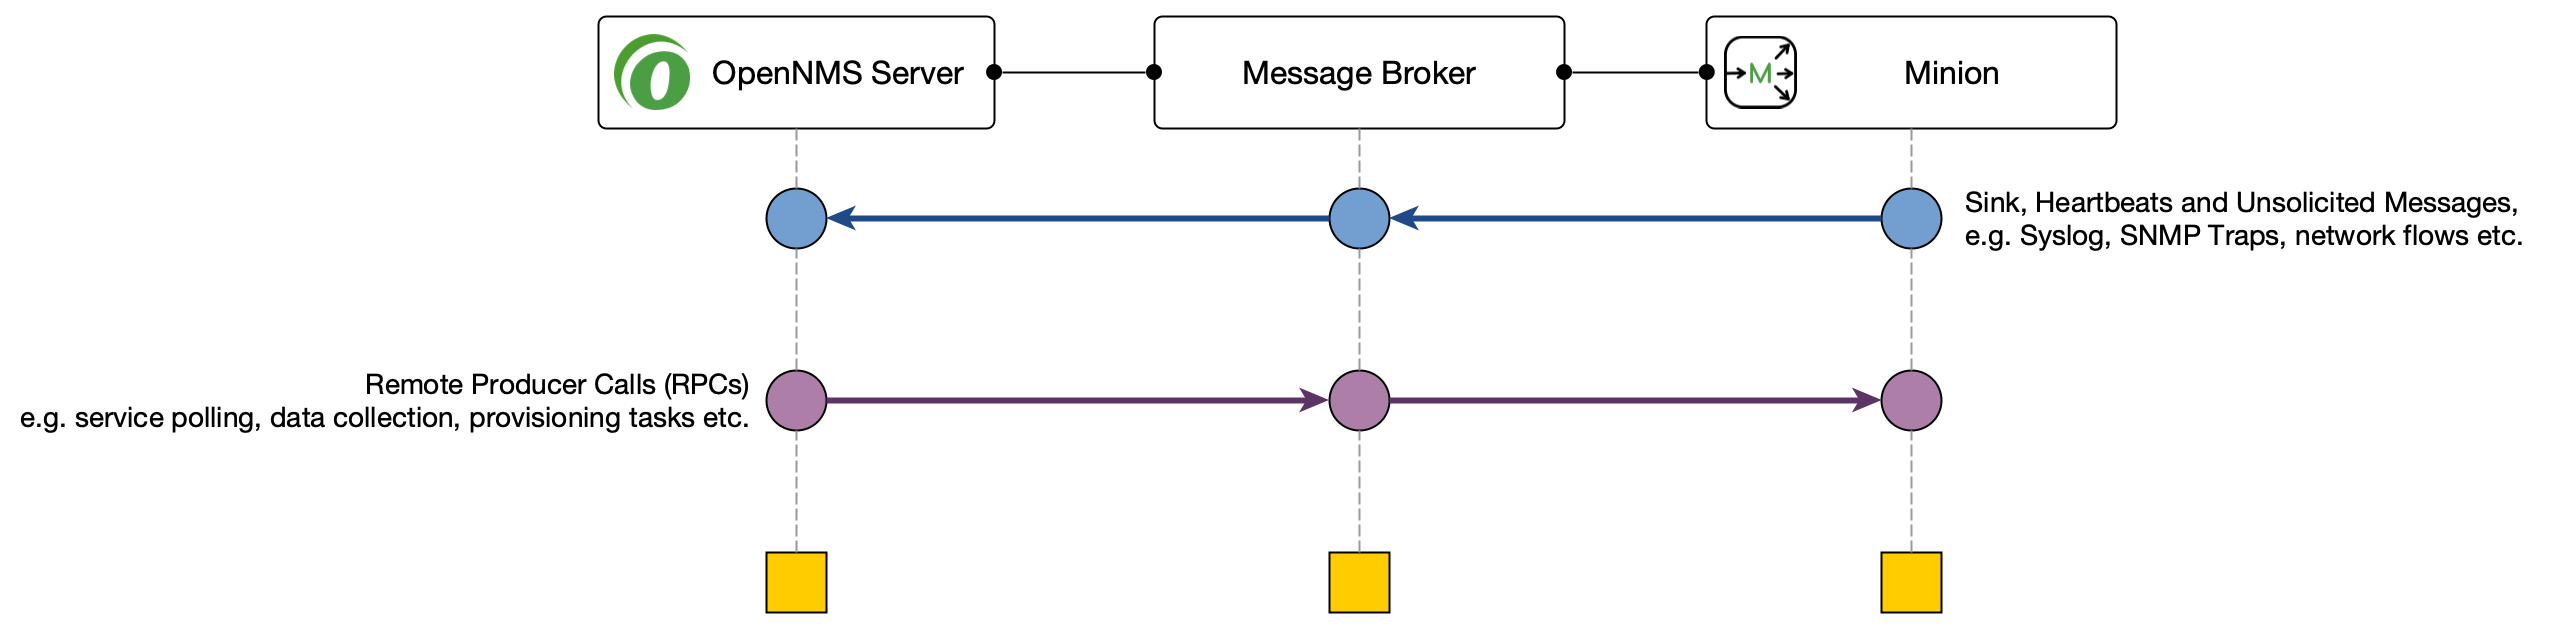
Minions and OpenNMS Horizon communicate via a messaging system. By default, an embedded ActiveMQ broker is used. OpenNMS Horizon is designed to work with different messaging systems and based on the system requirements or workload, an alternative to ActiveMQ can be used. In general, the communication between OpenNMS Horizon and Minion is provided by two patterns:
-
Remote Producer Calls (RPCs) are used to issue specific tasks (such as a request to poll or perform data collection) from an OpenNMS Horizon instance to a Minion in a remote location.
-
These calls are normally self-contained and include all of the meta-data and information required for them to be performed.
-
-
The Sink pattern is used to send unsolicited messages (i.e. Syslog, SNMP Traps or Flows) received from a Minion to an OpenNMS Horizon instance
This section describes how you can setup OpenNMS Horizon to use other supported messaging systems for the communication with Minions.
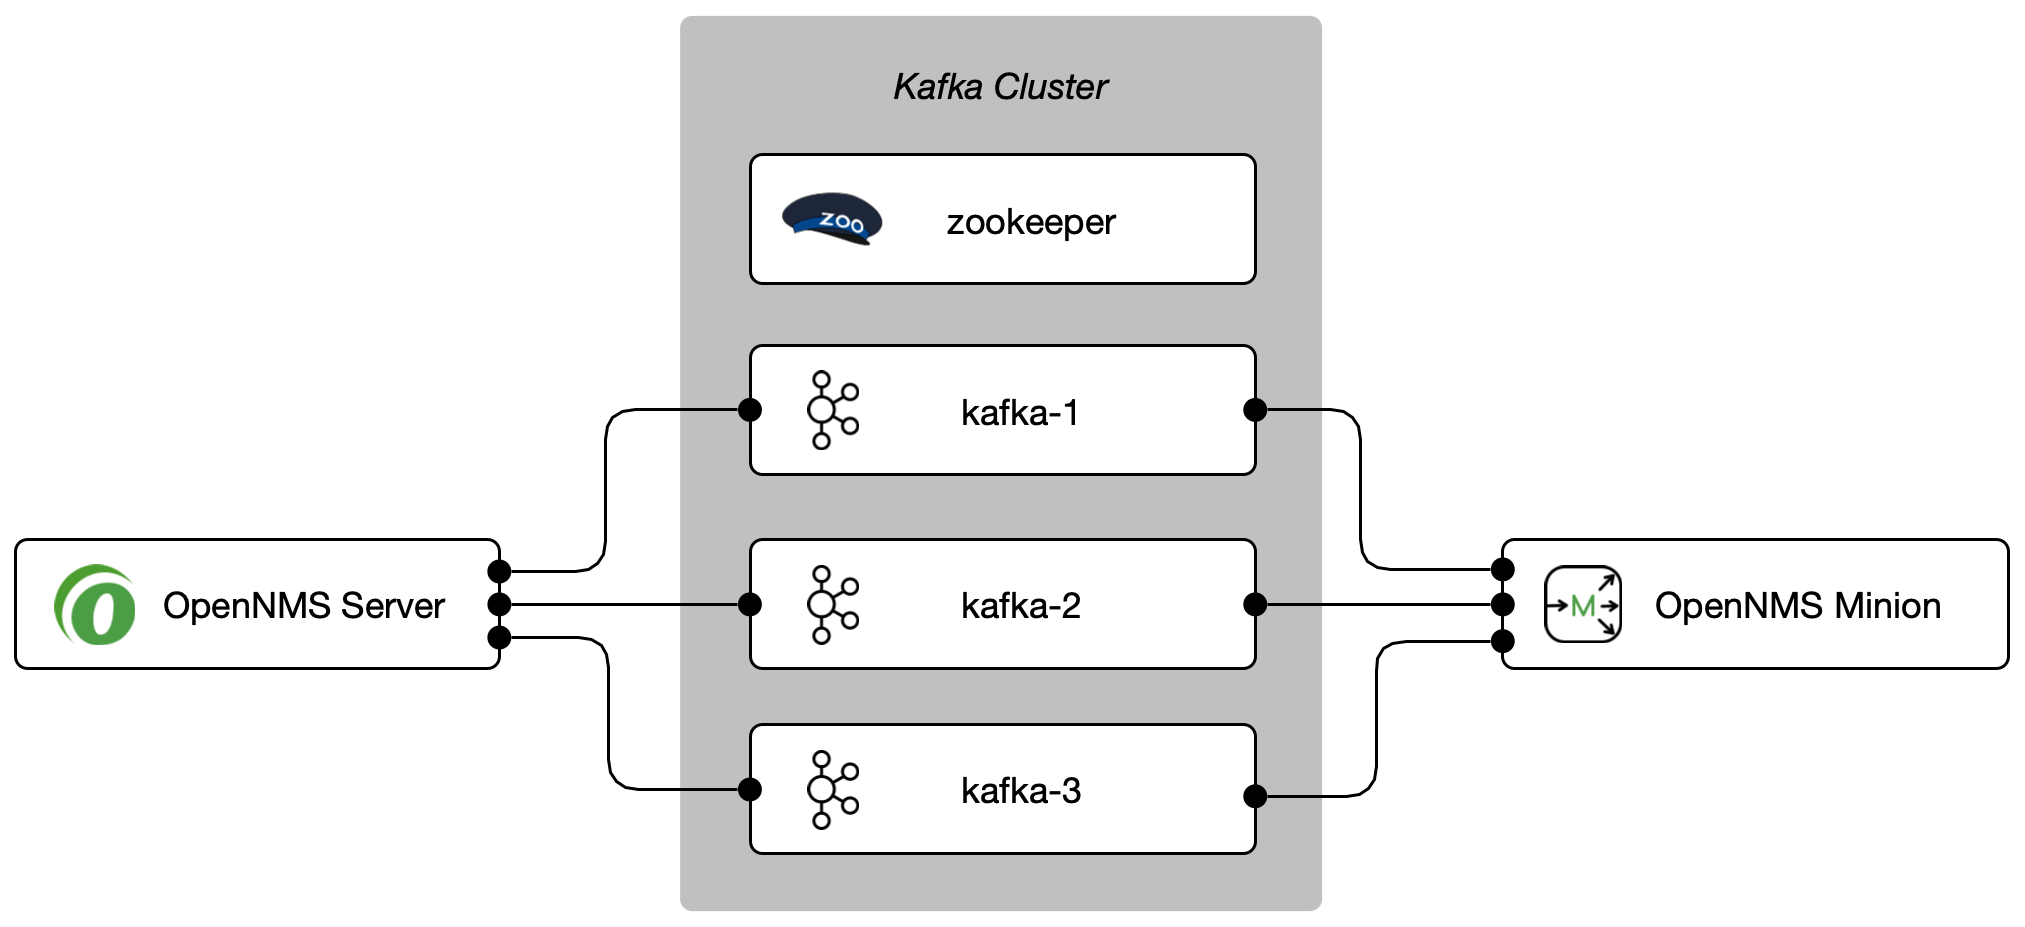
6.1. Setup using Apache Kafka
This section describes how to use Apache Kafka as a messaging system between OpenNMS Horizon and Minions in a remote location.
6.1.1. Objectives
-
Configure OpenNMS Horizon to forward RPC to a Minion
-
Configure Minion to forward messages over the Sink component to an OpenNMS Horizon instance
-
Disable the embedded Active MQ message broker on the Minion.
-
Verify the functionality on the Minion using the
health:checkcommand and ensure the Minion is registered and monitored in the OpenNMS Horizon web interface
6.1.2. Before you begin
The following requirements should be satisfied before you can start with this tutorial:
-
At least a minimal Kafka system up and running If you want to start in a lab, the Apache Kafka Quickstart guide is a good starting point
-
An instance running with OpenNMS Horizon and at least one deployed Minion
-
Communication between OpenNMS Horizon, Minion and Apache Kafka is possible on TCP port 9092
| The example is used to describe how the components need to be configured. IP addresses and hostnames need to be adjusted accordingly. |
| You can add more than one Kafka server to the configuration. The driver will attempt to connect to the first entry. If that is successful the whole broker topology will be discovered and will be known by the client. The other entries are only used if the connection to the first entry fails. |
6.1.3. Configure OpenNMS Horizon
Step 1: Set Kafka as RPC strategy and add Kafka server
cat <<EOF >${OPENNMS_HOME}/etc/opennms.properties.d/kafka.properties
org.opennms.core.ipc.rpc.strategy=kafka
org.opennms.core.ipc.rpc.kafka.bootstrap.servers=kafka-1:9092,kafka-2:9092,kafka-3:9092
EOF
Step 2: Set Kafka as Sink strategy and add Kafka server
cat <<EOF >>${OPENNMS_HOME}/etc/opennms.properties.d/kafka.properties
# Ensure that messages are not consumed from Kafka until the system has fully initialized
org.opennms.core.ipc.sink.initialSleepTime=60000
org.opennms.core.ipc.sink.strategy=kafka
org.opennms.core.ipc.sink.kafka.bootstrap.servers=kafka-1:9092,kafka-2:9092,kafka-3:9092
EOF
Step 3: Restart OpenNMS Horizon
systemctl restart opennms6.1.4. Configure Minion
Step 1: Disable ActiveMQ for RPC and Sink
cat <<EOF >${MINION_HOME}/etc/featuresBoot.d/disable-activemq.boot
!minion-jms
!opennms-core-ipc-rpc-jms
!opennms-core-ipc-sink-camel
EOF
Step 2: Enable Kafka for RPC and Sink
cat <<EOF >${MINION_HOME}/etc/featuresBoot.d/kafka.boot
opennms-core-ipc-rpc-kafka
opennms-core-ipc-sink-kafka
EOF
Step 3: Configure Kafka server
cat <<EOF >${MINION_HOME}/etc/org.opennms.core.ipc.rpc.kafka.cfg
bootstrap.servers=kafka-1:9092,kafka-2:9092,kafka-3:9092
acks=1
EOFcat <<EOF >${MINION_HOME}/etc/org.opennms.core.ipc.sink.kafka.cfg
bootstrap.servers=kafka-1:9092,kafka-2:9092,kafka-3:9092
acks=1
EOFStep 4: Restart Minion to apply changes
systemctl restart minionStep 5: Verify Kafka configuration and connectivity
ssh admin@localhost -p 8201feature:list | grep opennms-core-ipc-rpc-kafka
opennms-core-ipc-rpc-kafka | 25.0.0 | x | Started
feature:list | grep opennms-core-ipc-sink-kafka
opennms-core-ipc-sink-kafka | 25.0.0 | x | Startedhealth:check
Verifying the health of the container
Connecting to OpenNMS ReST API [ Success ]
Verifying installed bundles [ Success ]
Connecting to Kafka from RPC [ Success ]
Connecting to Kafka from Sink [ Success ]
=> Everything is awesomeStep 6. Verify Minion functionality
-
Login as Administrator
-
Configure OpenNMS
-
Manage Minions
-
Minion should be registered and should be shown as "Up"
-
Click on the name of the Minion and go to the node detail page
-
Verify if the services on the loopback interface JMX-Minion, Minion-Heartbeat, Minion-RPC are monitored and "Up"
6.1.5. Tuning Apache Kafka
The configuration is shipped with sane defaults, but depending on the size and network topology it can be required to tune the Apache Kafka environment to meet certain needs.
Apache Kafka options can be set directly in the org.opennms.core.ipc.rpc.kafka.cfg and org.opennms.core.ipc.sink.kafka.cfg file.
Alternatively: Kafka producer/consumer options can be set by defining additional system properties prefixed with org.opennms.core.ipc.rpc.kafka and org.opennms.core.ipc.sink.kafka.
You can find available configuration parameters for Kafka here:
-
Producer Configs for RPC communication
-
New Consumer Configs for Sink communication
Multiple OpenNMS Horizon instances
Topics will be automatically created and are prefixed by default with OpenNMS.
If you want to use an Apache Kafka cluster with multiple OpenNMS Horizon instances, the topic prefix can be customized by setting org.opennms.core.ipc.rpc.kafka.group.id and org.opennms.core.ipc.sink.kafka.group.id to a string value which identifies your instance.
Tips for Kafka
| For Kafka RPC, the number of partitions should always be greater than the number of minions at a location. When there are multiple locations, partitions >= max number of minions at a location. |
| By default, Kafka RPC supports buffers greater than >1MB by splitting large buffer into chunks of 900KB(912600). Max buffer size (900KB, by default) can be configured by setting org.opennms.core.ipc.rpc.kafka.max.buffer.size ( in bytes). |
Default time to live (time at which request will expire) is 20000 msec (20sec).
It can be changed by configuring system property org.opennms.core.ipc.rpc.kafka.ttl in msec.
|
7. Install other versions than stable
Installation packages are available for different releases of OpenNMS Horizon or Minion. You will need to choose which release you would like to run and then configure your package repository to point to that release. Configuring a package repository will enable you to install and update the software by using standard Linux software update tools like yum and apt.
The following package repositories are available:
| Release | Description |
|---|---|
|
Latest stable release. This version is recommended for all users. |
|
Release candidate for the next stable release. |
|
Latest successful development build, the "nightly" build. |
|
Install from a specific branch name for testing a specific feature that is under development. Available branches can be found in https://yum.opennms.org/branches/ or https://debian.opennms.org/dists/branches/. |
To install a different release the repository files have to be installed and manually modified.
In Debian systems modify the repository file in /etc/apt/sources.list.d/opennms.list.
deb https://debian.opennms.org snapshot main(1)
deb-src https://debian.opennms.org snapshot main(1)
EOF
wget -O - https://debian.opennms.org/OPENNMS-GPG-KEY | apt-key add -
apt update| 1 | Change from stable to snapshot |
On RHEL systems you can install a snapshot repository with:
yum -y install https://yum.opennms.org/repofiles/opennms-repo-snapshot-rhel7.noarch.rpm
For branches use repofiles/opennms-repo-branches-${branch-name}-rhel7.noarch.rpm.
|
The installation procedure is the same as with the stable version.
8. Setup Minion with a config file
Beside manually configuring a Minion instance via the Karaf CLI it is possibleto modify and deploy its configuration file through configuration management tools.
The configuration file is located in ${MINION_HOME}/etc/org.opennms.minion.controller.cfg.
All configurations set in Karaf CLI will be persisted in this configuration file which can also be populated through configuration management tools.
id = 00000000-0000-0000-0000-deadbeef0001
location = MINION
broker-url = tcp://myopennms.example.org:61616
http-url = http://myopennms.example.org:8980/opennms
The Minion needs to be restarted when this configuration file is changed.
In case the credentials needs to be set through the CLI with configuration management tools or scripts, the ${MINION_HOME}/bin/client command can be used which allows to execute Karaf commands through the Linux shell.
|
9. Running in non-root environments
This section provides information running OpenNMS Horizon and Minions processes in non-root environments. Running with a system user have restricted possibilites. This section describes how to configure your Linux system related to:
-
sending ICMP packages as an unprivileged user
-
receiving Syslog on ports < 1023, e.g. 514/udp
-
receiving SNMP Trap on ports < 1023,e.g. 162/udp
9.1. Send ICMP as non-root
By default, Linux does not allow regular users to perform ping operations from arbitrary programs (including Java).
To enable the Minion or OpenNMS Horizon to ping properly, you must set a sysctl option.
# run this command as root to allow ping by any user (does not survive reboots)
sysctl net.ipv4.ping_group_range='0 429496729'
If you wish to restrict the range further, use the GID for the user the Minion or OpenNMS Horizon will run as, rather than 429496729.
To enable this permanently, create a file in /etc/sysctl.d/ to set the range:
# we start this filename with "99-zzz-" to make sure it's last, after anything else that might have set it
net.ipv4.ping_group_range=0 429496729
9.2. Trap reception as non-root
If you wish your Minion or OpenNMS Horizon to listen to SNMP Traps, you will need to configure your firewall to port forward from the privileged trap port (162) to the Minion’s default trap listener on port 1162.
# enable masquerade to allow port-forwards
firewall-cmd --add-masquerade
# forward port 162 TCP and UDP to port 1162 on localhost
firewall-cmd --add-forward-port=port=162:proto=udp:toport=1162:toaddr=127.0.0.1
firewall-cmd --add-forward-port=port=162:proto=tcp:toport=1162:toaddr=127.0.0.1
9.3. Syslog reception as non-root
If you wish your Minion or OpenNMS Horizon to listen to syslog messages, you will need to configure your firewall to port forward from the privileged Syslog port (514) to the Minion’s default syslog listener on port 1514.
# enable masquerade to allow port-forwards
firewall-cmd --add-masquerade
# forward port 514 TCP and UDP to port 1514 on localhost
firewall-cmd --add-forward-port=port=514:proto=udp:toport=1514:toaddr=127.0.0.1
firewall-cmd --add-forward-port=port=514:proto=tcp:toport=1514:toaddr=127.0.0.1
10. Use R for statistical computing
R is a free software environment for statistical computing and graphics. OpenNMS Horizon can leverage the power of R for forecasting and advanced calculations on collected time series data.
OpenNMS Horizon interfaces with R via stdin and stdout, and for this reason, R must be installed on the same host as OpenNMS Horizon. Note that installing R is optional, and not required by any of the core components.
| The R integration is not supported on Microsoft Windows systems. |
10.1. Install R on RHEL
dnf -y install dnf-plugins-corednf config-manager --set-enabled PowerToolsdnf -y install epel-releasednf -y install R-core10.2. Install R on Debian
apt -y install r-recommended11. Using a different Time Series Storage
OpenNMS Horizon stores performance data in a time series storage which is by default JRobin. For different scenarios it is useful to switch to a different time series storage. The following implementations are supported:
JRobin |
JRobin is a clone of RRDTool written in Java, it does not fully cover the latest feature set of RRDTool and is the default when you install OpenNMS Horizon. Data is stored on the local file system of the OpenNMS Horizon node. Depending on I/O capabilities it works good for small to medium sized installations. |
RRDTool |
RRDTool is active maintained and the de-facto standard dealing with time series data. Data is stored on the local file system of the OpenNMS Horizon node. Depending on I/O capabilities it works good for small to medium sized installations. |
Newts |
Newts is a database schema for Cassandra. The time series is stored on a dedicated Cassandra cluster which gives growth flexibility and allows to persist time series data in a large scale. |
This section describes how to configure OpenNMS Horizon to use RRDTool and Newts.
| The way how data is stored in the different time series databases makes it extremely hard to migrate from one technology to another. Data loss can’t be prevented when you switch from one to another. |
11.1. RRDtool
In most Open Source applications, RRDtool is often used and is the de-facto open standard for Time Series Data. The basic installation of OpenNMS Horizon comes with JRobin but it is simple to switch the system to use RRDtool to persist Time Series Data. This section describes how to install RRDtool, the jrrd2 OpenNMS Java Interface and how to configure OpenNMS Horizon to use it.
11.1.1. Install RRDTool on RHEL
| Following this guide does not cover data migration from JRobin to RRDTool. |
To install jrrd2 enable the OpenNMS YUM repository ensure the repositories are enabled.
You can enable them with dnf config-manager --enable opennms-repo-stable-*.
|
Step 1: Install RRDTool and the jrrd2 interface
dnf -y install rrdtool jrrd2Step 2: Configure OpenNMS Horizon to use RRDTool
cat << EOF | sudo tee /opt/opennms/etc/opennms.properties.d/timeseries.properties
org.opennms.rrd.strategyClass=org.opennms.netmgt.rrd.rrdtool.MultithreadedJniRrdStrategy
org.opennms.rrd.interfaceJar=/usr/share/java/jrrd2.jar
opennms.library.jrrd2=/usr/lib64/libjrrd2.so
org.opennms.web.graphs.engine=rrdtool # optional, unset if you want to keep Backshift as default
EOF
The visualization with the graph engine is optional.
You can still use the default graphing engine backshift by not setting the org.opennms.web.graphs.engine property and use the system default.
|
Step 3: Restart OpenNMS Horizon and verify setup
find /opt/opennms/share/rrd -iname "*.rrd"With the first data collection, RRDTool files with extension .rrd will be created. The JRobin files with extension .jrb are not used anymore and are not deleted automatically.
11.1.2. Reference
The following configuration files have references to the RRDTool binary and may be changed if you have a customized RRDTool setup.
| Configuration file | Property |
|---|---|
|
|
|
|
|
|
|
|
|
|
11.1.3. Install RRDTool on Debian
| Following this guide does not cover data migration from JRobin to RRDTool. |
A more current version of RRDTool is in the OpenNMS YUM repository.
The provided versions can be shown with apt show rrdtool.
This guide uses the RRDTool provided in the OpenNMS repository.
When using the Debian/Ubuntu provided RRDTool package verify the path to the rrdtool binary file.
|
Step 1: Install RRDTool and the jrrd2 interface
apt -y install rrdtool jrrd2Step 2: Configure OpenNMS Horizon to use RRDTool
cat << EOF | sudo tee /usr/share/opennms/etc/opennms.properties.d/timeseries.properties
org.opennms.rrd.strategyClass=org.opennms.netmgt.rrd.rrdtool.MultithreadedJniRrdStrategy
org.opennms.rrd.interfaceJar=/usr/share/java/jrrd2.jar
opennms.library.jrrd2=/usr/lib/jni/libjrrd2.so
org.opennms.web.graphs.engine=rrdtool # optional, unset if you want to keep Backshift as default
EOF
The visualization with the graph engine is optional.
You can still use the default graphing engine backshift by not setting the org.opennms.web.graphs.engine property and use the system default.
|
Step 3: Restart OpenNMS Horizon and verify setup
find /usr/share/opennms/share/rrd -iname "*.rrd"With the first data collection, RRDTool files with extension .rrd will be created. The JRobin files with extension .jrb are not used anymore and are not deleted automatically.
11.1.4. Reference
The following configuration files have references to the RRDTool binary and may be changed if you have a customized RRDTool setup.
| Configuration file | Property |
|---|---|
|
|
|
|
|
|
|
|
|
|
11.2. Newts for Time Series data
Newts is a time-series data schema for Apache Cassandra. It enables horizontally scale capabilities for your time series storage and is an alternative to JRobin and RRDtool.
The Cassandra cluster design, setup, sizing, tuning and operation is out of scope for this section. To install and set up a Cassandra cluster please follow the Cassandra installation instructions. For further information see Cassandra Getting Started Guide.
To avoid unwanted updates disable the Cassandra repository on DNF/YUM based distributions or use apt-mark hold cassandra on APT based distributions.
|
For simplicity we use the ${OPENNMS_HOME}/bin/newts init command which initializes a Newts keyspace for you and the defaults are not optimal tuned for a production-ready environment.
If you want to build a production environment please consult Sizing Cassandra for Newts and planning Anti-patterns in Cassandra articles.
|
11.2.1. Objectives
-
Configure OpenNMS Horizon to use an existing Cassandra cluster
-
Initializing the Newts keyspace using
newts initwith STCS without production-ready tuning -
Verify time series data is stored and can be accessed
11.2.2. Before you begin
-
A running instance of OpenNMS Horizon running on Linux
-
Working data collection and response time metrics from Collectd and Pollerd
-
Cassandra cluster with access to the Cassandra client port
TCP/9042
| It is currently not supported to initialize the Newts keyspace from Microsoft Windows Server operating system. Microsoft Windows based Cassandra server can be part of the cluster, but keyspace initialization is only possible using a Linux operating system. |
11.2.3. Configure OpenNMS Horizon to use Newts
Step 1: Configure Cassandra endpoints, keyspace and time series strategy
cat << EOF | sudo tee /opt/opennms/etc/opennms.properties.d/timeseries.properties
# Configure storage strategy
org.opennms.rrd.storeByForeignSource=true(1)
org.opennms.timeseries.strategy=newts(2)

# Configure Newts time series storage connection
org.opennms.newts.config.hostname={cassandra-ip1,cassandra-ip2}(3)
org.opennms.newts.config.keyspace=newts(4)
org.opennms.newts.config.port=9042(5)

# One year in seconds
org.opennms.newts.config.ttl=31540000

# Seven days in seconds
org.opennms.newts.config.resource_shard=604800
EOF| 1 | Associate time series data by the foreign ID instead of the database generated Node-ID |
| 2 | Set time-series strategy to use newts |
| 3 | Host or IP addresses of the Cassandra cluster nodes can be a comma-separated list |
| 4 | Name of the keyspace which is initialized and used |
| 5 | Port to connect to Cassandra |
Step 2: Initialize the Newts schema in Cassandra
${OPENNMS_HOME}/bin/newts initStep 3: Verify if the keyspace was properly initialized
Connect to a Cassandra node with a CQL shell
cd $CASSANDRA_HOME/bin
./cqlsh

use newts;
describe table terms;
describe table samples;
Step 4: Apply changes and verify your configuration
systemctl restart opennmsGo to the Node detail page from a SNMP managed device and verify if you response time graphs for ICMP and Node-level Performance data.