1. Introduction
This document is the guideline for people who wish to contribute to writing documentation for the OpenNMS project. The OpenNMS software is free and open source, contribution of any kind is welcome. We ask that you observe the rules and guidelines outlined here to maintain consistency across the project.
2. Overall Layout
Each (sub)project is represented as a section of the documentation.
Each section will produce a HTML output in the file system that is generated in the target/generated sources folder.
The chosen file format for documentation is AsciiDoc (Asciidoc Homepage). Document files use the .adoc file extension.
Note that there are different ways to contribute documentation, each suitable for the different use cases:
-
Tutorials and How To’s should be published on the OpenNMS Wiki. For example: you want to describe how to use the Net-SNMP agent and the SNMP monitor from OpenNMS to solve a special use case with OpenNMS.
-
The documentation in the source code should be formal technical documentation. The writing style should be accurate and concise. However, ensure that you explain concepts in detail and do not make omissions.
3. File Structure in 'opennms-doc'
| Directory | Contents |
|---|---|
guide-doc/ |
module with this overview working on documentation |
guide-user/ |
module with the guide for OpenNMS user e.g. NOC user who don’t change behavior of OpenNMS. |
guide-admin/ |
module with the guide for administrators configuring, optimizing and running OpenNMS |
guide-development/ |
module with the guide for those who want to develop OpenNMS |
guide-install/ |
module with the guide of how to install OpenNMS on different operating systems |
releasenotes/ |
module with the changelog and release notes |
4. Issues in JIRA and GitHub workflow
Changes in the official documentation and code base are tracked by JIRA - the issue tracker of OpenNMS. This is the main tool in the project to organize tasks and plan releases. When a new version of OpenNMS is released, all issues are reflected in the release notes.
It is required to have JIRA account for creating and commenting issues and a GitHub account for giving your contribution as Pull Request.
The main workflow to add or fix something is defined as the following:
-
Create an issue in JIRA. The issue number is a unique identifier and is used as a reference, e.g. NMS-7214
-
Fork OpenNMS to your private GitHub repository
-
Create a feature branch from
developwith the following name schema:NMS-<number>-<Your-Issue-Headline> -
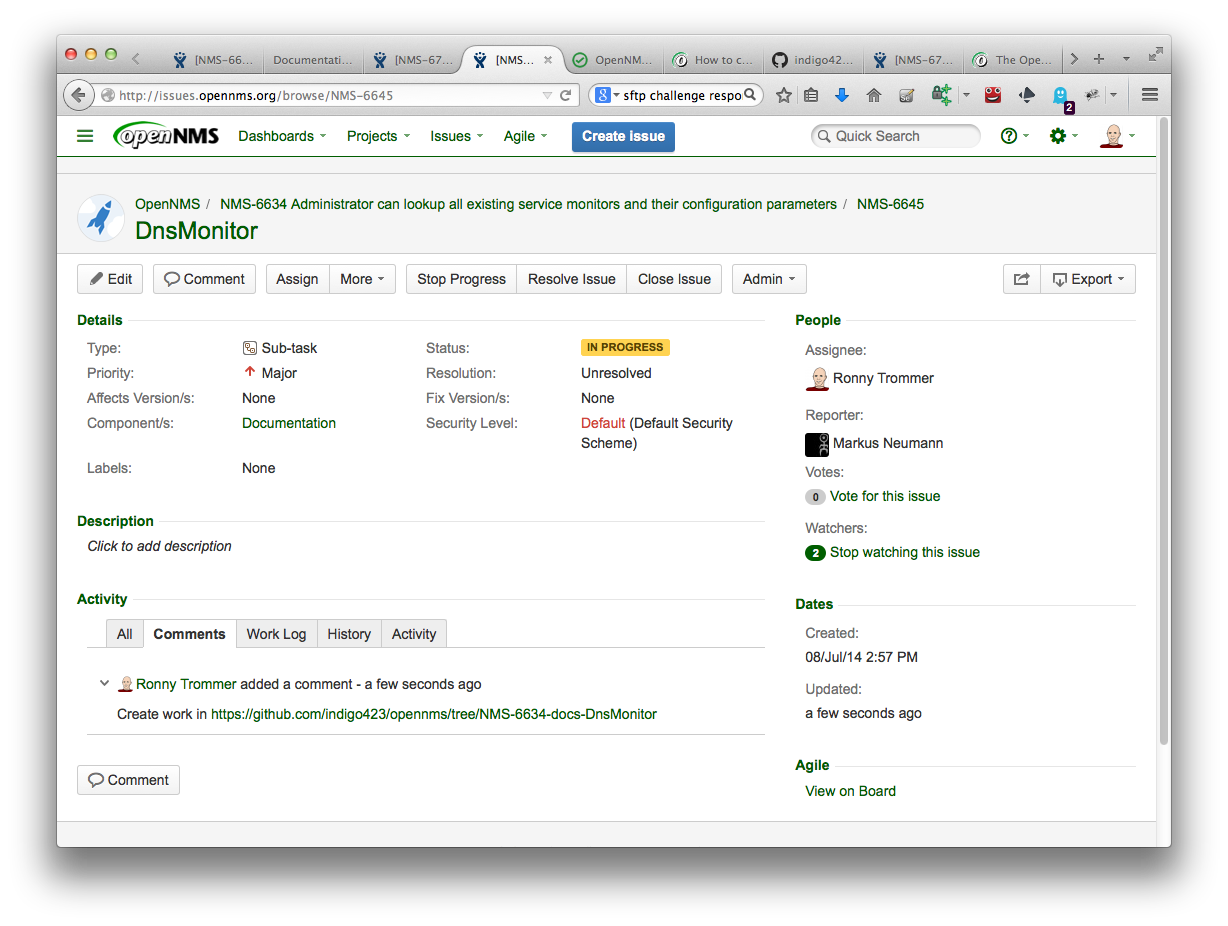
Add a link of your working branch to your JIRA issue and allow others to help
-
Create or fix documentation
-
When you’ve finished, send a Pull Request of your changes to the OpenNMS repository
-
Add a review header in your Pull Request comment message
-
Add a link with to the Pull Request and ask for a review
-
If the review is worked in, the Pull Request will be merged into the codebase and is now in the official release cycle.
4.1. Example workflow creating documentation
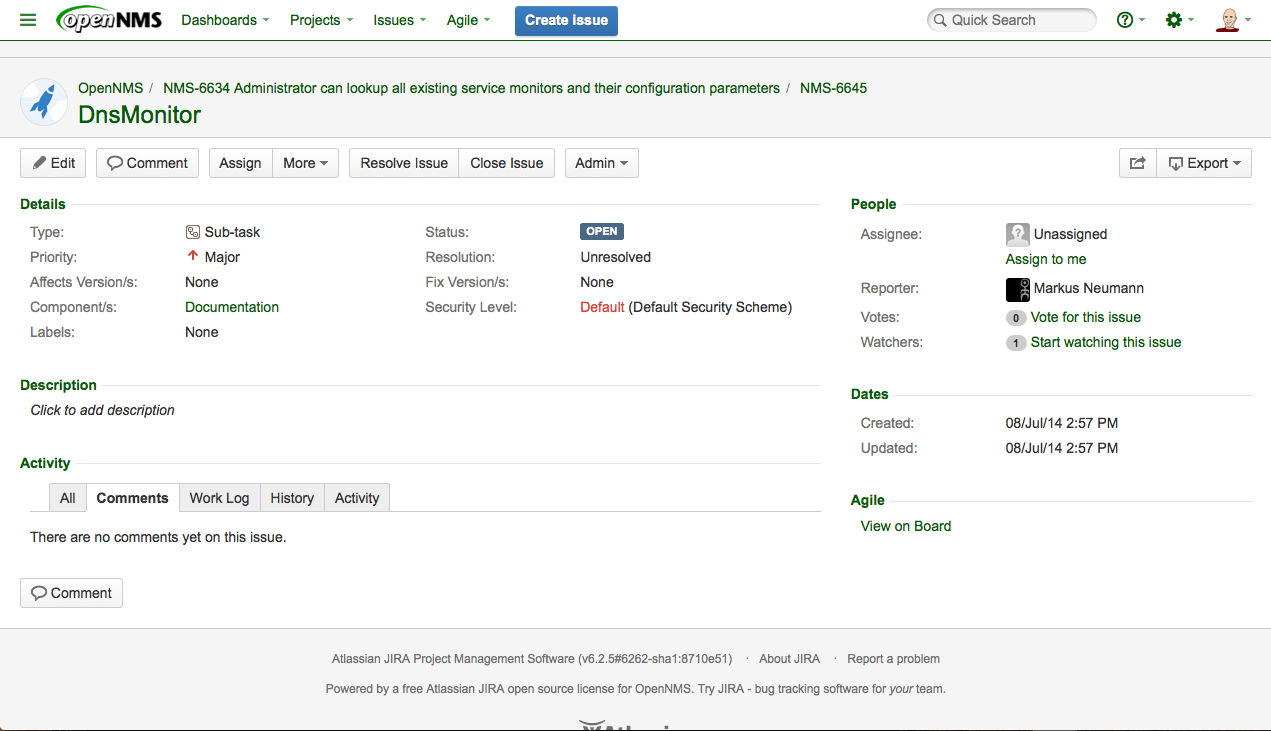
The following example describes a workflow how to create a new documentation for the DnsMonitor.
-
Everything starts with an JIRA issue
-
Fork the OpenNMS project in your GitHub repository.
-
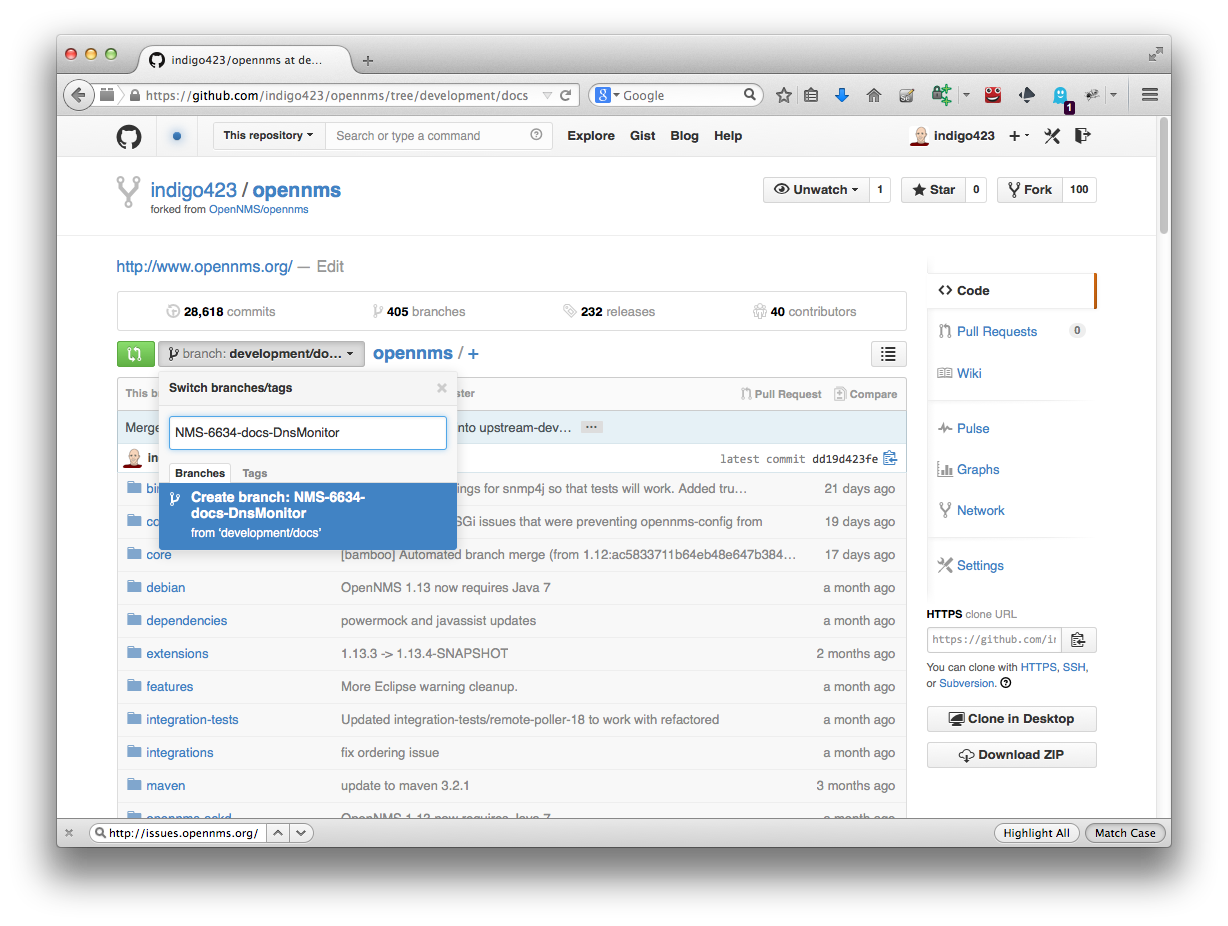
Go to your GitHub account with your repositories and create working branch from develop, which is the default so you don’t have to change anything.
-
Create a working branch for the JIRA issue you want to work on with the given name schema:
NMS-<number>-docs-<Subject-without-spaces>
For our example: NMS-6634-docs-DnsMonitor.
This name is used later in the Pull Request and helps to identify and track changes driven by this issue.
Type in the name in the input field and GitHub create the branch for you.
There are two ways to work on the issue.
-
Option 1: Make a local copy and work on your local computer
-
Option 2: Edit directly all the files online in the GitHub web editor
4.1.1. Work on your computer locally
To work on your local computer git or the GitHub GUI is required. Clone your repository to you local computer with
git clone https://github.com/<your-github-nick>/opennms.git
It will download the repository with all the branches to your local system in the 'opennms' directory. By default you are in the develop branch of OpenNMS. You can switch to your previously created working branch with the following command:
git checkout -b NMS-6634-docs-DnsMonitor origin/NMS-6634-docs-DnsMonitor
You can show list all existing branches with
git branch -r
Now you have your working branch where you can start your contribution.
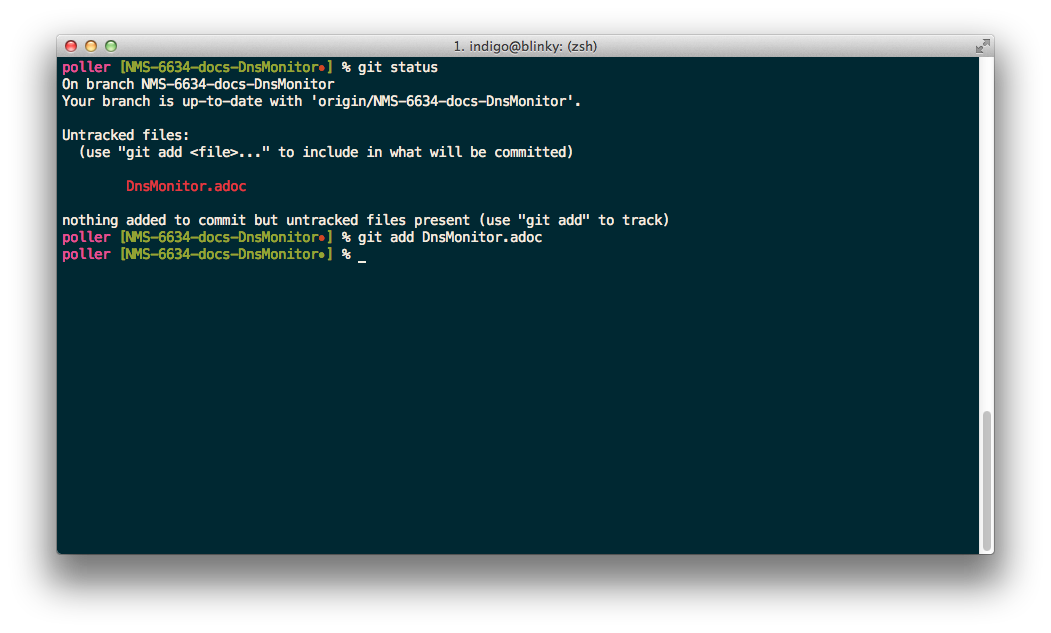
The command git status gives you all changes.
To add your work to the version controlled history you have to add your changes to a commit.
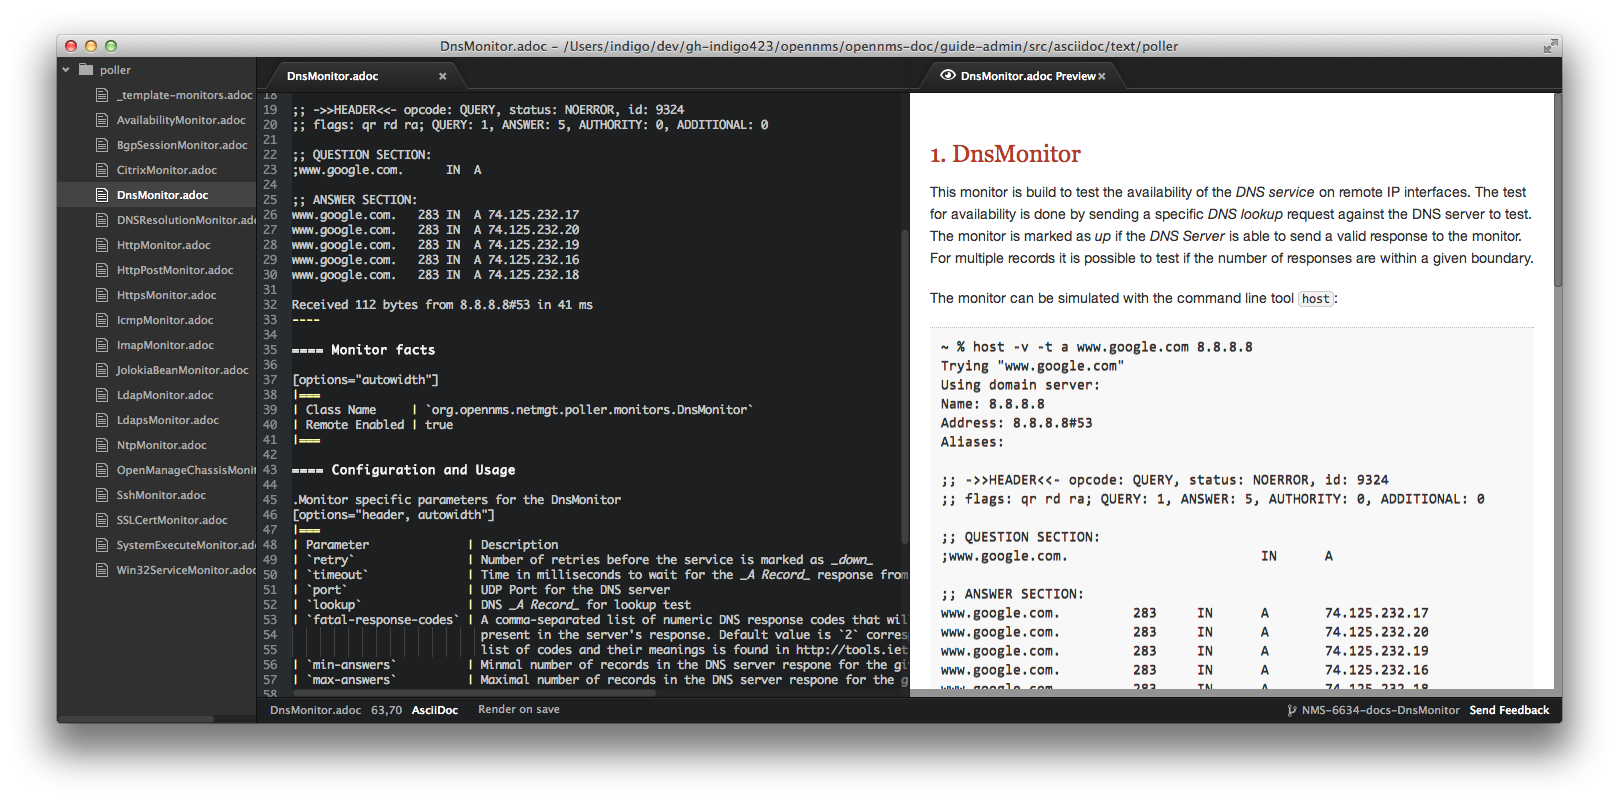
In our example we have created the 'DnsMonitor.adoc' file and it is shown as currently untracked in git.
The command
git add DnsMonitor.adoc
adds this file for the next commit.
| The full path to the file to add depends on your current location in the file system. |
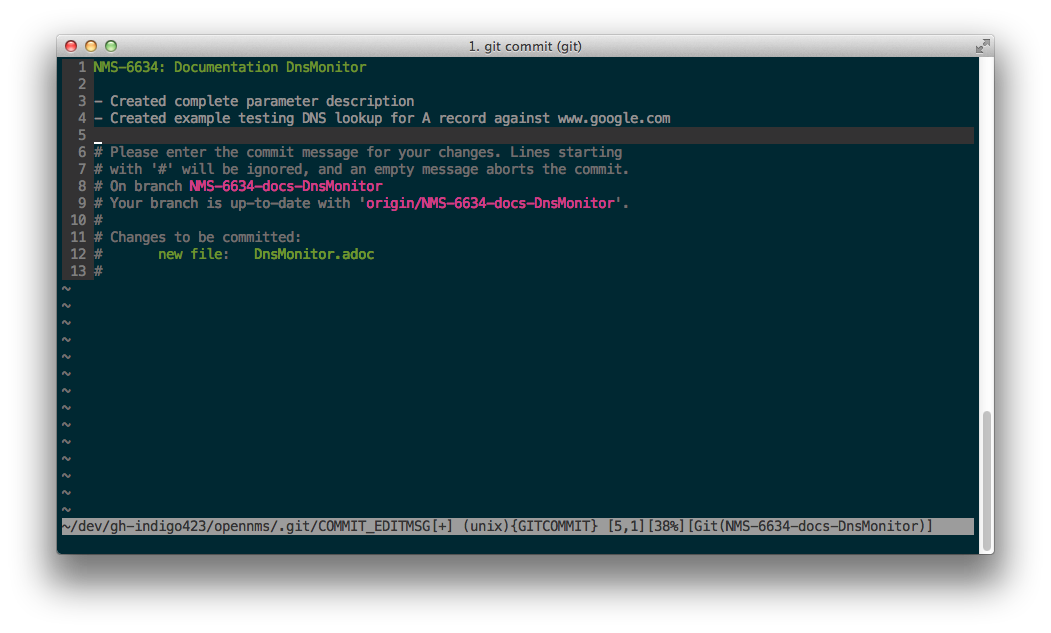
Write a comment which explains what you did. The first line in the commit message is used as a subject line and should contain the JIRA issue number and the JIRA issue subject. After the subject keep one empty line and you can use bullet points to describe your changes
The commit with your change is now stored in the local history of your repository. With the following command you can upload your changes to your GitHub repository.
git push
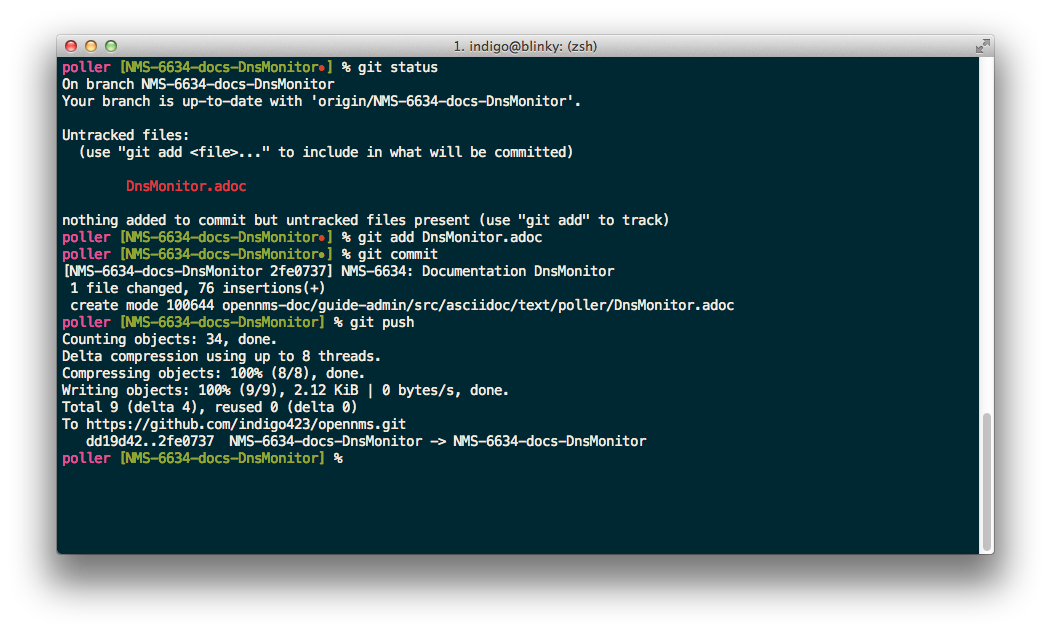
| Upload changes to your repository doesn’t have any effect on the project. You can use it as your backup and to stage your working progress. It also allows others to help you in your current working branch. |
The next step is sending your changes to the official OpenNMS repository described in section Send the Pull Request.
4.1.2. Work with the GitHub Web editor
It is possible to work completely on the GitHub editor.
| Be careful if you don’t have a reliable internet connection. It could be possible you loose the content in case of connection loss. |
You can create a new file your repository as following:
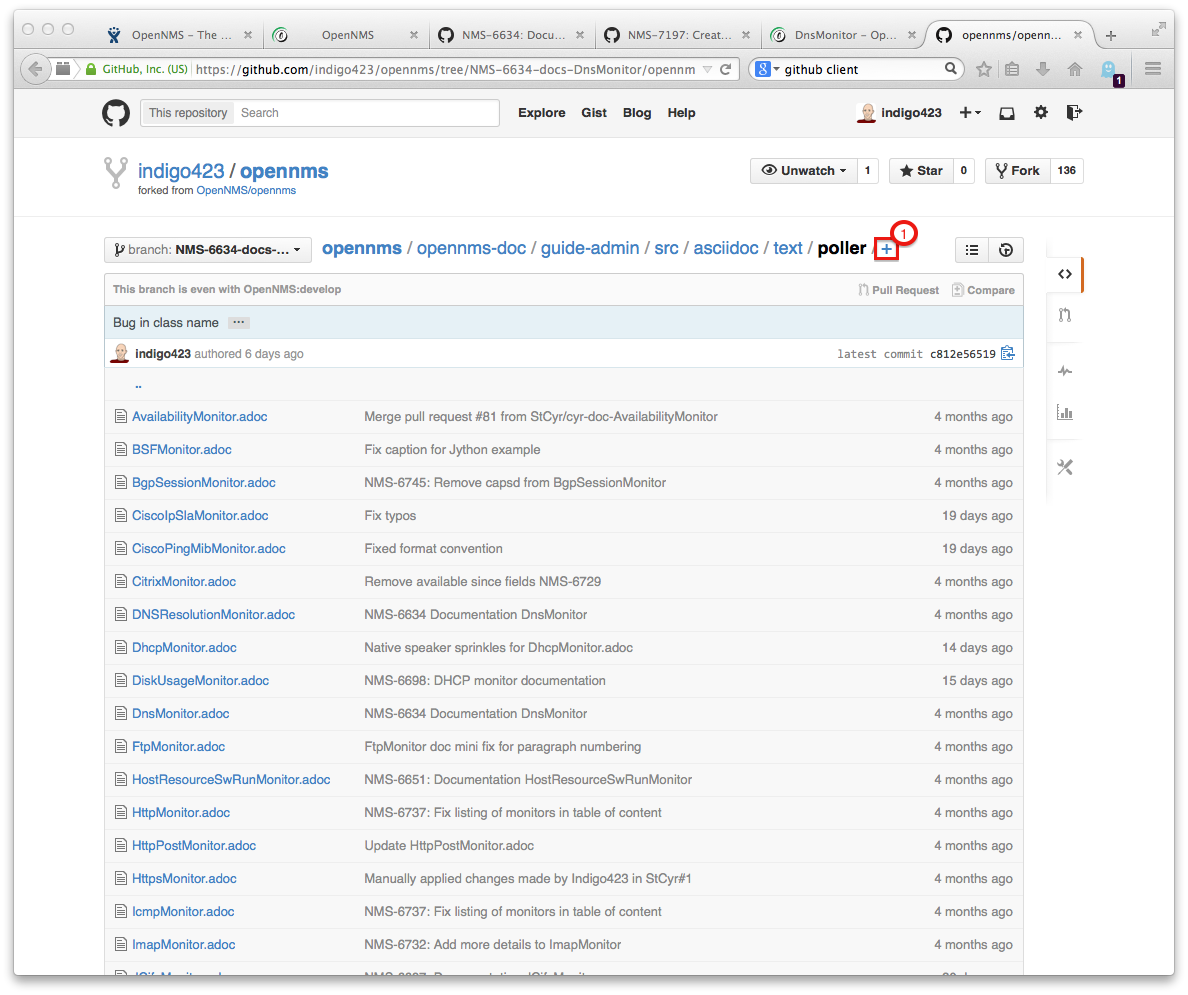
+ in (1)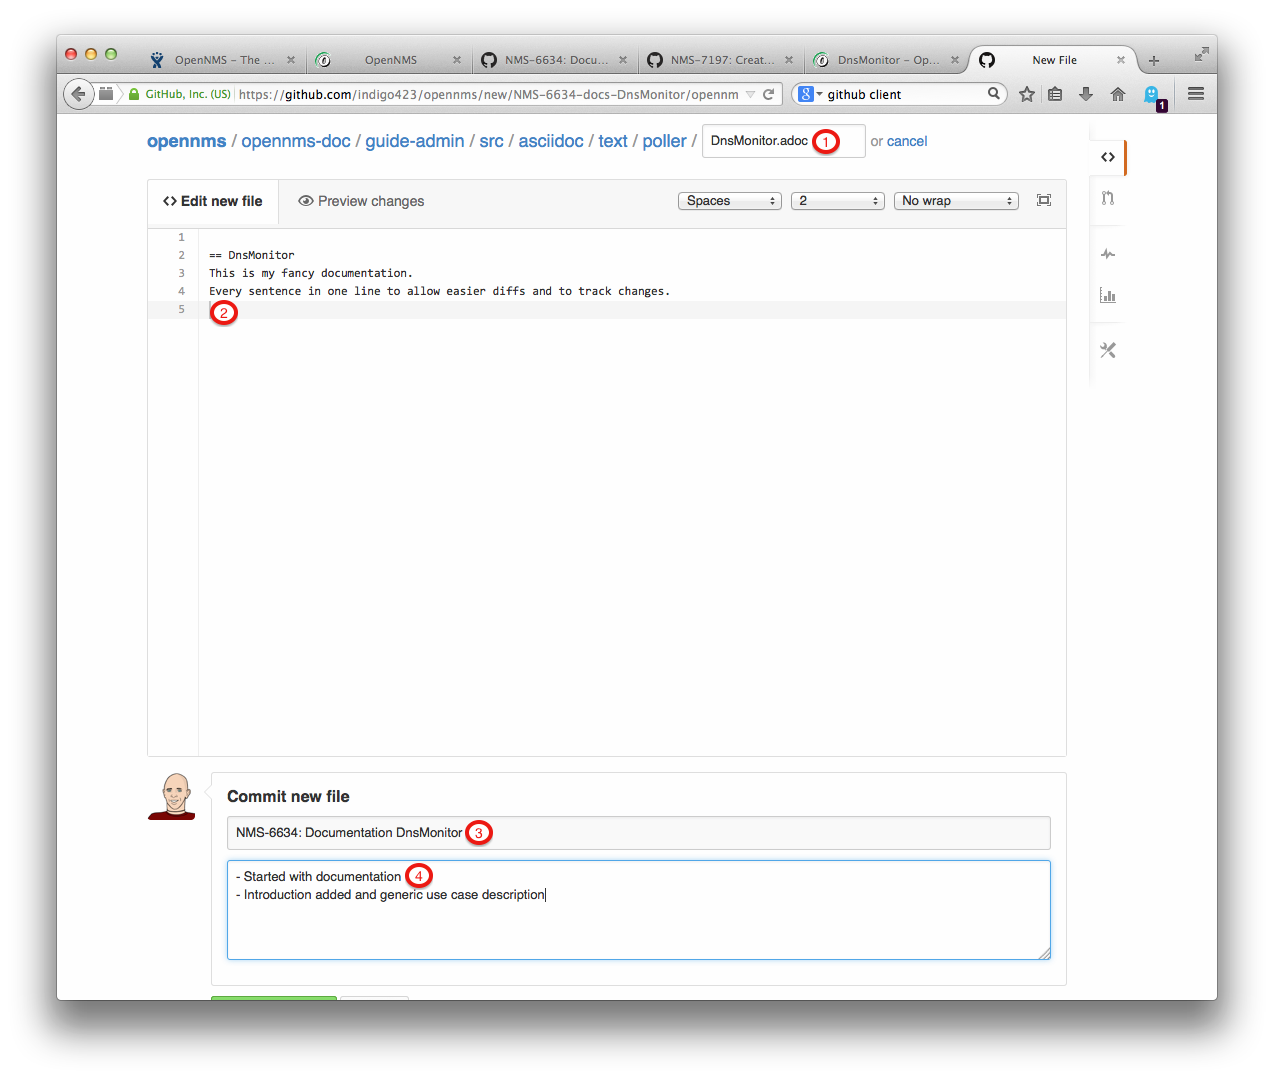
-
File name to create in our case a new documentation file with the name 'DnsMonitor.adoc'
-
Documentation in AsciiDoc format
-
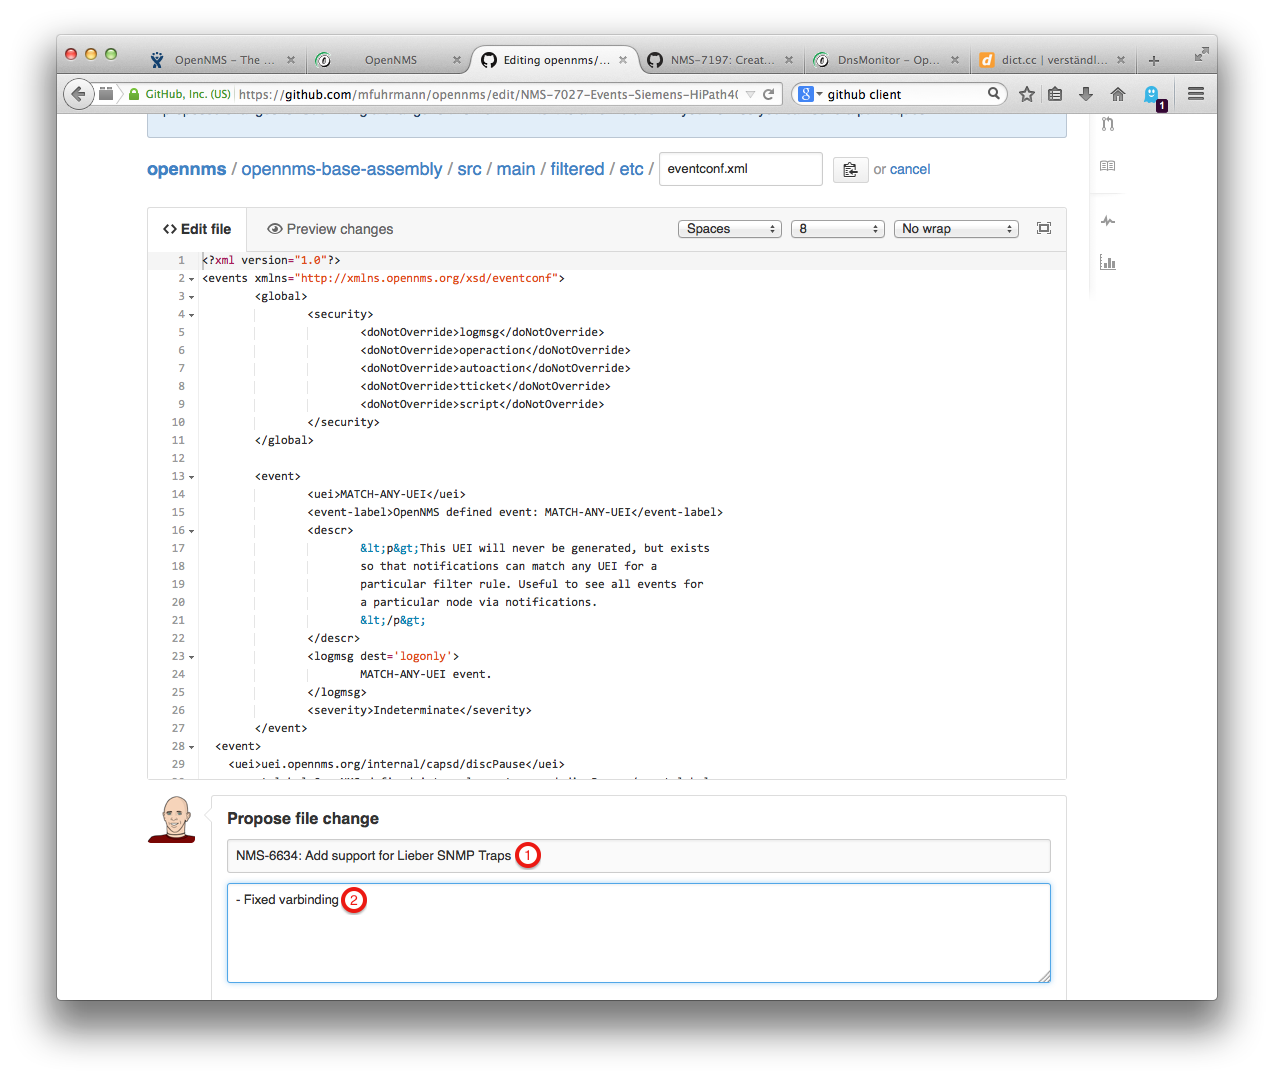
Subject for the commit message with
NMS-<number>-docs-<Subject-without-spaces> -
Short information about your change
You can commit the change directly online by clicking on Commit changes on the bottom end of the page.
The next step is sending your changes to the official OpenNMS repository described in section Send the Pull Request.
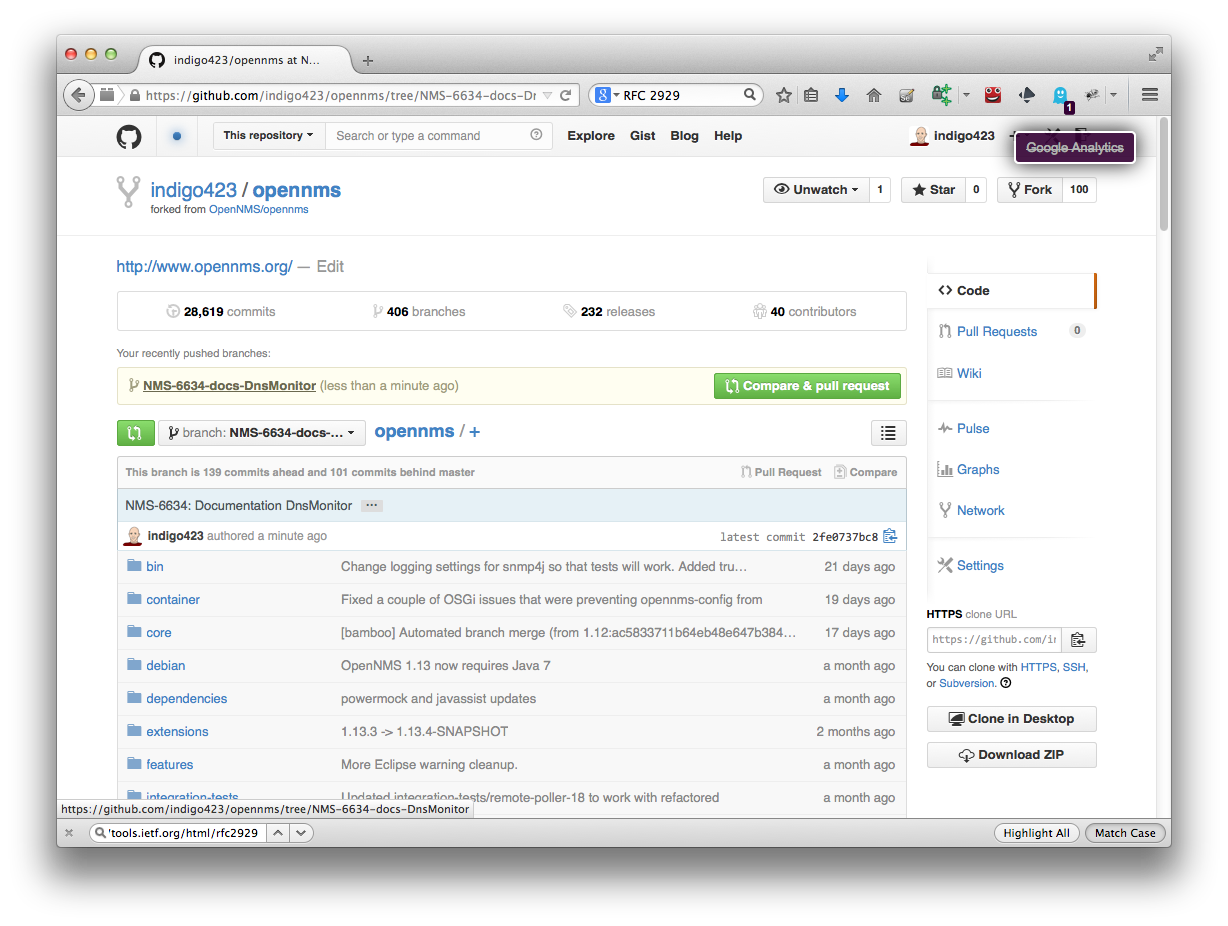
4.1.3. Send the Pull Request
If you have finished, it’s time to create a Pull Request to indicate your contribution should go in the official OpenNMS codebase. Commit and push all your changes to your GitHub repository. Create a Pull Request from the GitHub web application with click on Compare & pull request. The Pull Request will be created automatically against the correct develop branch.
GitHub will use your last git commit message for the Pull Request. Add to your commit message the following information:
JIRA: http://issues.opennms.org/browse/NMS-6634

Todo Review:
- [ ] Typo and grammar
- [ ] Formatting and conventions
- [ ] Content
This comment creates a review status indicator for the review.
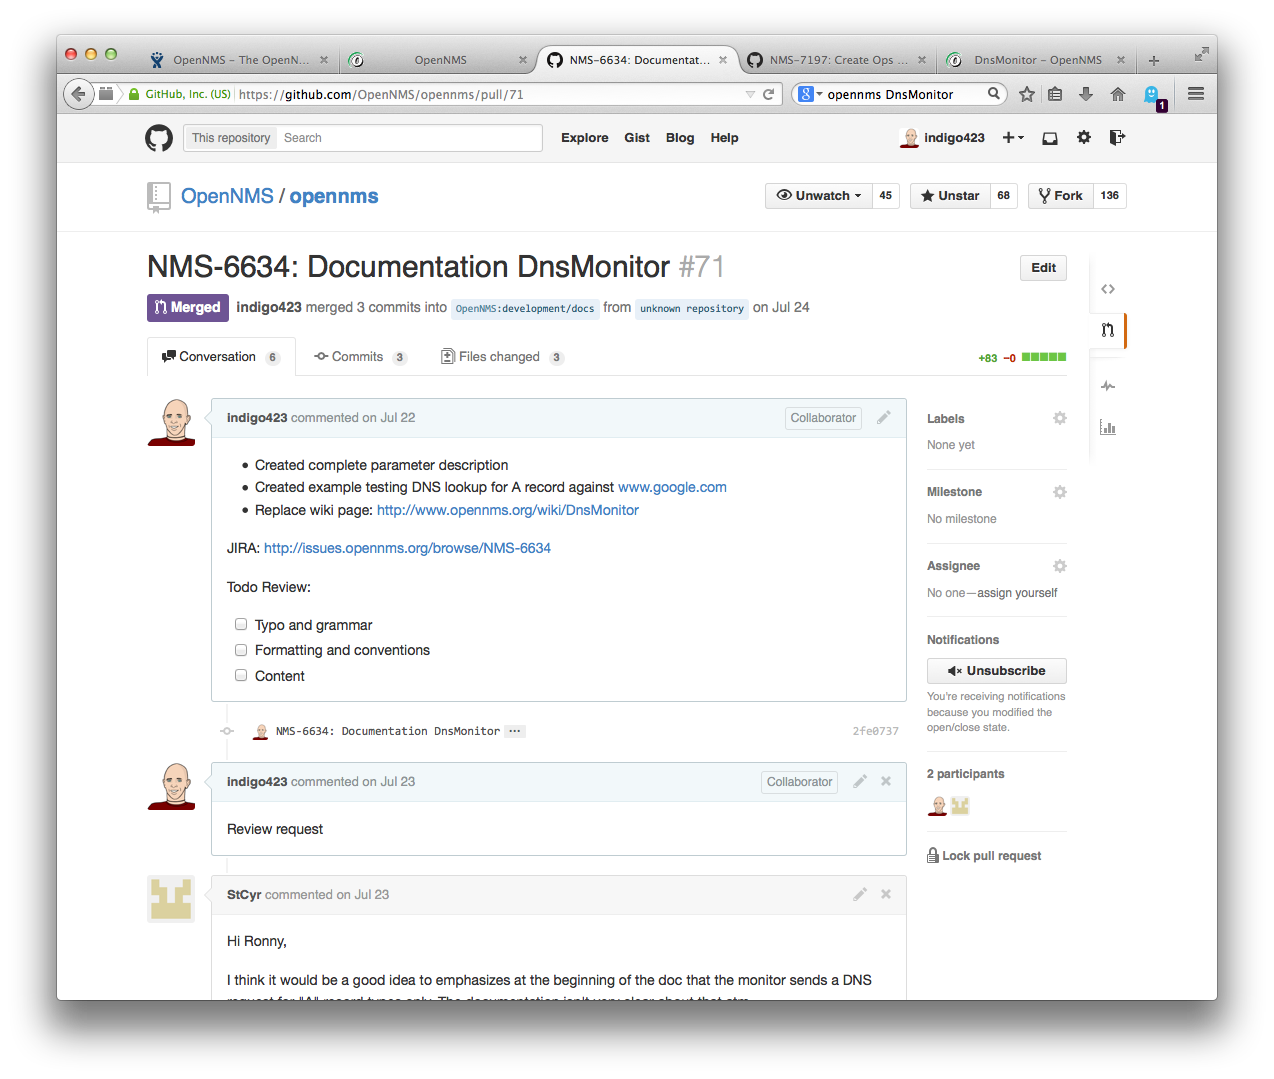
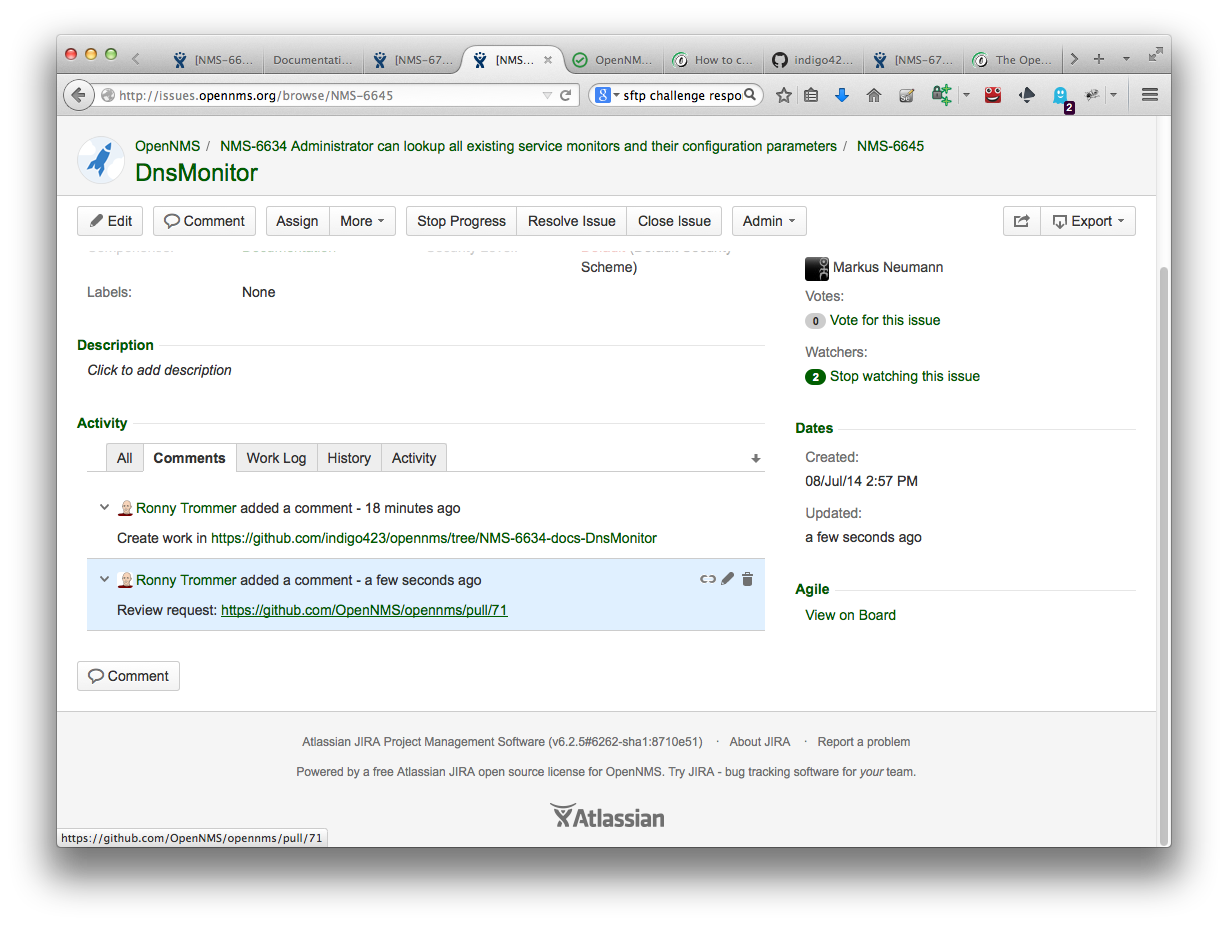
To indicate you need a review set a link for the Pull Request in the JIRA issue.
Reviewer can add annotations lines in your contributed changes. You can work in this comments by just making your changes in your working branch, commit and push them to your repository. GitHub will automatically add this commits to your pull requests. If the status for Content, Formatting and conventions and Typo and grammar is finished, the Pull Request will be merged to the official OpenNMS code base.
| You will be notified if a reviewer adds comments or request changes through the GitHub. |
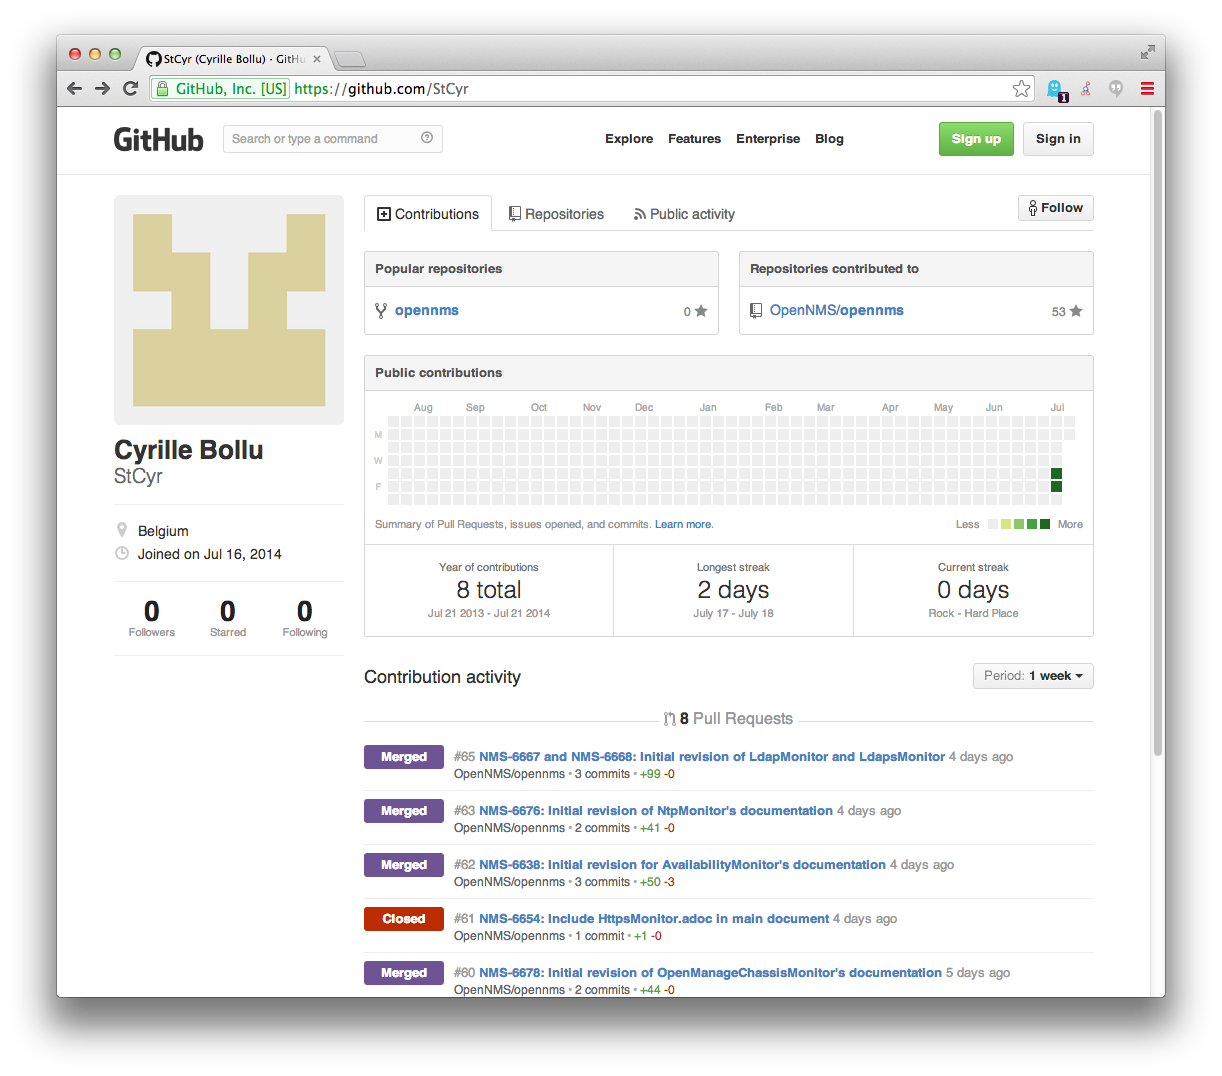
If your Pull Request is merged you will be also notified and the status of your outstanding Pull Request changes to status Merged on your GitHub profile page.
The OpenNMS Continuous Integration system based on Bamboo picks up the merged pull request and starts a build and deploys a version with your changes automatically. You can see the build jobs on the public available Bamboo system.
5. Writing
The following rules will help you to commit correctly formatted and prepared documentation for inclusion in the OpenNMS project. It is important that we maintain a level of consistency across all of our committers and the documentation they produce.
When writing place a single sentence on each line. This makes it easy to move content around, and also easy to spot long, or fragmented, sentences. This will also allow us to assign comments on a sentence in GitHub which will facilitate easier merging.
| Other than writing documentation, you can help out by providing comments on documentation, reviewing, suggesting improvements or reporting bugs. To do this head over to: issue tracker for documentation! |
5.1. Conventions for text formatting
The following conventions are used:
-
File names and path are written in
'poller-configuration.xml'they will be rendered in: 'poller-configuration.xml'; -
Names that indicate special attention, e.g. this configuration matches *any* entry: this is rendered as: this configuration matches any entry;
-
_Italics_ is rendered as Italics and used for emphasis and indicate internal names and abbreviations;
-
*Bold* is rendered as Bold and should be used sparingly, for strong emphasis only;
-
+methodName()+ is rendered as methodName() and is also used for literals, (note: the content between the
+signs will be parsed); -
`command` is rendered as
command(typically used for command-line or parts used in configuration files), (note: the content between the ` signs will not be parsed); -
Mono\\+space[]+d is rendered as Mono+space+d and is used for monospaced letters;
-
\'my/path/' is rendered as 'my/path/' this is used for file names and paths;
-
\``double quote'' (which is two grave accents to the left and two acute accents to the right) renders as ``double quote'';
-
\`single quote' (which is a single grave accent to the left and a single acute accent to the right) renders as `single quote'.
5.2. Gotchas
-
Always leave a blank line at the top of the documents section. It might be the title ends up in the last paragraph of the document;
-
Always leave a blank line at the end of documents;
-
As {} are used for Asciidoc attributes, everything inside will be treated as an attribute. To avoid this you have to escape the opening brace: \\{. If you do not escape the opening brace, the braces and the text inside them will be removed without any warning being issued!;
-
Forcing line breaks can be achieved with ` +` at the end of the line followed by a line break.
This is the first line +
and this a forced 2nd lineThis is the first line
and this a forced 2nd line
6. Headings and document structure
Each document starts over with headings from level zero (the document title). Each document should have an id. In some cases sections in the document need to have id’s as well, this depends on where they fit in the overall structure. If you wish to have a link to specific content that content has to have an id. A missing id in a mandatory place will cause the build to fail.
To start a document:
[[unique-id-verbose-is-ok]]
= The Document Title
If you are including the document inside another document and you need to push the headings down to the right level in the output, the leveloffset attribute is used.
Subsequent headings in a document should use the following syntax:
== Subheading

... content here ...

=== Subsubheading

content here ...
7. Links
When you need to link to other parts of the manual you use the target id. To use a target id you follow this syntax:
<<doc-guidelines-links>>This will render as: Links
| To use the target id in you document simply write the target id in your text, for example: |
see <<target-id>>
this should suffice for most cases.
If you need to link to another document with your own link text, then follow this procedure:
<<target-id, link text that fits in the context>>| Having lots of linked text may work well in a web context but is a distracting in print. The documentation we are creating is intended for both mediums so be considerate of this in your usage. |
If you wish to use an external link, they are are added as:
http://www.opennms.org/[Link text here]This will render in the output as: Link text here
For short links it may be beneficial not to use accompanying link text:
http://www.opennms.org/Which renders as: http://www.opennms.org/
| It is acceptable to have a period trailing after the URL, it will not render as a part of the link. |
8. Admonitions and useful notes
These are useful for defining specific sections, such as Notes, Tips and Important information. We encourage the use of them in the documentation as long as they are used appropriately. Choose from the following:
NOTE: This is my note.This is how its rendered:
| This is my note. |
TIP: This is my tip.This is how its rendered:
| This is my tip. |
IMPORTANT: This is my important hint.This is how its rendered:
| This is my important hint. |
CAUTION: This is my caution.This is how its rendered:
| This is my caution. |
WARNING: This is my warning.This is how its rendered:
| This is my warning. |
A multiline variation:
[TIP]
Tiptext. +
Line 2.
Which is rendered as:
|
Tiptext. Line 2. |
| Remember to write these in full caps. There is no easy manner in which to add new admonitions, do not create your own. |
9. Attributes
Common attributes you can use in documents:
-
{opennms-version} - rendered as "16.0.3"
These can substitute part of URLs that point to, for example, APIdocs or source code. Note that opennms-git-tag also handles the case of snapshot/master.
Sample Asciidoc attributes which can be used:
-
{docdir} - root directory of the documents
-
{nbsp} - non-breaking space
10. Comments
There’s a separate build that includes comments.
When the comments are used they show up with a yellow background.
This build doesn’t run by default, but after a normal build, you can use make annotated to create a build yourself.
You can use the resulting 'annotated' page to search for content as the full manual is a single page.
To write a comment:
// this is a commentComments are not visible in the standard build. Comment blocks won’t be included in the output of any build. The syntax for a comment block is:
////
Note that includes in here will still be processed, but not make it into the output.
That is, missing includes here will still break the build!
////
11. Tables
For representing structured information you can use tables. A table is constructed in the following manner:
[options="header, autowidth"]
|===
| Parameter     | Description                | Required | Default value
| `myFirstParm` | my first long description  | required | `myDefault`
| `myScndParm`  | my second long description | required | `myDefault`
|===
This is rendered as:
| Parameter | Description | Required | Default value |
|---|---|---|---|
|
my first long description |
required |
|
|
my second long description |
required |
|
| Please align your columns in the AsciiDoc source in order to give better readability when editing in text view. If you have a very long description, break at 120 characters and align the text to improve source readability. |

this is rendered as:
| Parameter | Description | Required | Default value |
|---|---|---|---|
|
Authentication credentials to perform basic authentication.
Credentials should comply to RFC1945 section 11.1,
without the Base64 encoding part. That’s: be a string made of the concatenation of: |
optional |
|
|
Additional headers to be sent along with the request. Example of valid parameter’s names are
|
optional |
|
12. Include images
When visualizing complex problems you can help the explanation and provide greater information by using an image. We use in OpenNMS documentation modules two directories for images.
The image folder structure mirrors the text structure. In this case it is a little bit easier to locate the AsciiDoc text file where the image is included.
.
└── opennms-doc(1)
    └── guide-doc(2)
        ├── README.adoc
        ├── pom.xml
        ├── src(3)
        |   └── asciidoc(4)
        |       ├── configs
        |       |   └── poller-configuration.xml
        |       ├── images(5)
        |       |   ├── 01_opennms-logo.png(6)
        |       |   └── 02_pris-overview.png
        |       ├── images_src(7)
        |       |   └── pris-overview.graphml(8)
        |       ├── index.adoc(9)
        |       └── text
        |           ├── images.adoc(10)
        |           ├── include-source.adoc
        |           ├── introduction.adoc
        |           └── writing.adoc
└── target(11)| 1 | This folder contains all documentation modules; |
| 2 | The module for this documentation for target group of documentation contributors; |
| 3 | Indicates a source folder; |
| 4 | The documentation root folder; |
| 5 | Folder for images. Images should be *.png or *.jpg if included in the documentation; |
| 6 | The image used, the format is a leading <number>_ followed by a name using no spaces; |
| 7 | Some images are created from tools like yED, this folder should contain the editable version of the file with the same file name; |
| 8 | Editable version of the image source file, note no spaces in the name; |
| 9 | Main document file which includes all documentation parts and is rendered as index.html for the web; |
| 10 | AsciiDoc source file which can include images; |
| 11 | Target folder with generated HTML output after mvn clean package has been performed; |
| All images in the entire manual share the same namespace, it is therefore best practice to use unique identifiers for images. |
To include an image file, make sure that it resides in the 'images/' directory relative to the document you’re including it within. Then use the following syntax for inclusion in the document:
.This is a caption of the image
image::../images/01_opennms-logo.png[]
Which is rendered as:
| The image path for the images you include is relative to the *.adoc source file, where you use the image. |
13. Code Snippets
You can include code snippets, configuration- or source code files in the documentation. You can enable syntax highlighting by providing the given language parameter, this will work on source code or configuration.
13.1. Explicitly defined in the document
| be careful to use this kind of code snippets as sparsely as possible. Code becomes obsolete very quickly, archaic usage practices are detrimental. |
if you do wish to include snippets use the following method:
<service name="DNS" interval="300000" user-defined="false" status="on">
  <parameter key="retry" value="2" />
  <parameter key="timeout" value="5000" />
  <parameter key="port" value="53" />
  <parameter key="lookup" value="localhost" />
  <parameter key="fatal-response-codes" value="2,3,5" /><!-- ServFail, NXDomain, Refused -->
  <parameter key="rrd-repository" value="/opt/opennms/share/rrd/response" />
  <parameter key="rrd-base-name" value="dns" />
  <parameter key="ds-name" value="dns" />
</service>
If there’s no suitable syntax highlighter for the code used just omit the language: [source].
Currently the following syntax highlighters are enabled:
-
Bash
-
Groovy
-
Java
-
JavaScript
-
Python
-
XML
For other highlighters that could be added see https://code.google.com/p/google-code-prettify/.
13.2. Included from an example file
You can include source or configuration from an external file. In this way you can provide a working example configuration maintaining doc and example at the same time. The procedure and rules are the same as with images, the path is relative to the *.adoc file where the file to be used is included.
[source,xml]
----
include::../configs/wmi-config.xml[]
----
This is how it’s rendered:
<?xml version="1.0"?>
<wmi-config retry="2" timeout="1500"
	username="Administrator" domain="WORKGROUP" password="password">
</wmi-config>
13.3. Include parts of a file
If you want to include just a specific segment of a large configuration file, you can assign tags that indicate to AsciiDoc the section that is to be included. In this example just the service definition of the ICMP monitor should be included.
In the 'poller-configuration.xml' tag the section in the following manner:
...
<rrd step="300">
  <rra>RRA:AVERAGE:0.5:1:2016</rra>
  <rra>RRA:AVERAGE:0.5:12:1488</rra>
  <rra>RRA:AVERAGE:0.5:288:366</rra>
  <rra>RRA:MAX:0.5:288:366</rra>
  <rra>RRA:MIN:0.5:288:366</rra>
</rrd>
# tag::IcmpServiceConfig[] -->
<service name="ICMP" interval="300000" user-defined="false" status="on">
  <parameter key="retry" value="2" />
  <parameter key="timeout" value="3000" />
  <parameter key="rrd-repository" value="/opt/opennms/share/rrd/response" />
  <parameter key="rrd-base-name" value="icmp" />
  <parameter key="ds-name" value="icmp" />
</service>
# end::IcmpServiceConfig[] -->
<service name="DNS" interval="300000" user-defined="false" status="on">
  <parameter key="retry" value="2" />
  <parameter key="timeout" value="5000" />
  <parameter key="port" value="53" />
...[source,xml] ---- include::../configs/poller-configuration.xml[tags=IcmpServiceConfig] ----
    <service name="ICMP" interval="300000" user-defined="false" status="on">
      <parameter key="retry" value="2" />
      <parameter key="timeout" value="3000" />
      <parameter key="rrd-repository" value="/opt/opennms/share/rrd/response" />
      <parameter key="rrd-base-name" value="icmp" />
      <parameter key="ds-name" value="icmp" />
</service>| Spaces and tabs are taken from the original file. |
14. Cheat Sheets and additional hints
For instructions on how to build your own version of the manual:
The documentation uses the AsciiDoc format. There are a number of guides that will help you to get started with using AsciiDoc:
For other resources, to gain familiarity with AsciiDoc, you can visit:
We recommend you use the cheatsheets (they are super useful!).
15. Review documentation
Reviews help to improve the quality of code or documentation. As a reviewer keep in mind, you are looking in a result, somebody spent free time and effort in the contribution. Treat contributions with respect. Open Pull Requests in the OpenNMS repository can be found here: https://github.com/OpenNMS/opennms/pulls.
A review for documentation is finished if Type and grammar, Formatting and conventions and Content are checked on the Pull Request. Pull Request are executed by elected community members OGP or members of the OpenNMS Group.
You have the following possibilities reviewing a contribution:
-
Everything is perfect and you there is no change necessary you can just merge the pull request and set the JIRA issue to status closed.
-
There are changes necessary, in this case comment the lines in the pull request directly and follow up the conversation there.
-
Bigger conceptual changes necessary or information out of reach for the contributor, you can provide a pull request back and give the contributor a change working your additional information in.
-
Reject the pull request, cause it is not possible for any reason to get the code in the official code base.
The following sections describe the workflow for reviewing a pull request for documentation.
15.1. Formal check, is everything there
Every Pull Request should have in the first comment the following content:
-
Comment with the back link to the JIRA issue and a Todo list for the review, see below
JIRA: http://issues.opennms.org/browse/NMS-6634

Todo Review:
- [ ] Typo and grammar
- [ ] Formatting and conventions
- [ ] Content-
The JIRA issue should be in status "Resolved"
15.2. Review criteria
-
Check for typos and grammar, normally a native speaker can help here
-
Check if the contribution is complete and reasonable. You don’t have to verify the documentation parts in local test environment.
-
Check the marks for the steps you were able to finish.
| You can’t know everything. It will happen, somebody documents a behavior somebody doesn’t know. Don’t hesitate to ask in the OpenNMS mailing list or IRC channels to clarify issues. If nobody knows the correct behavior don’t get blocked, make a warning note and merge it. A bug can be created if the described behavior doesn’t work. |
15.3. Feedback
If you have two possibilities to give feedback on a Pull Request. You can directly change the content or start a conversation using the annotation function in GitHub.
15.3.1. Change the content directly in GitHub.
You want to fix or add something directly in the document. Go to the Pull Request and select the register card Files Changed.
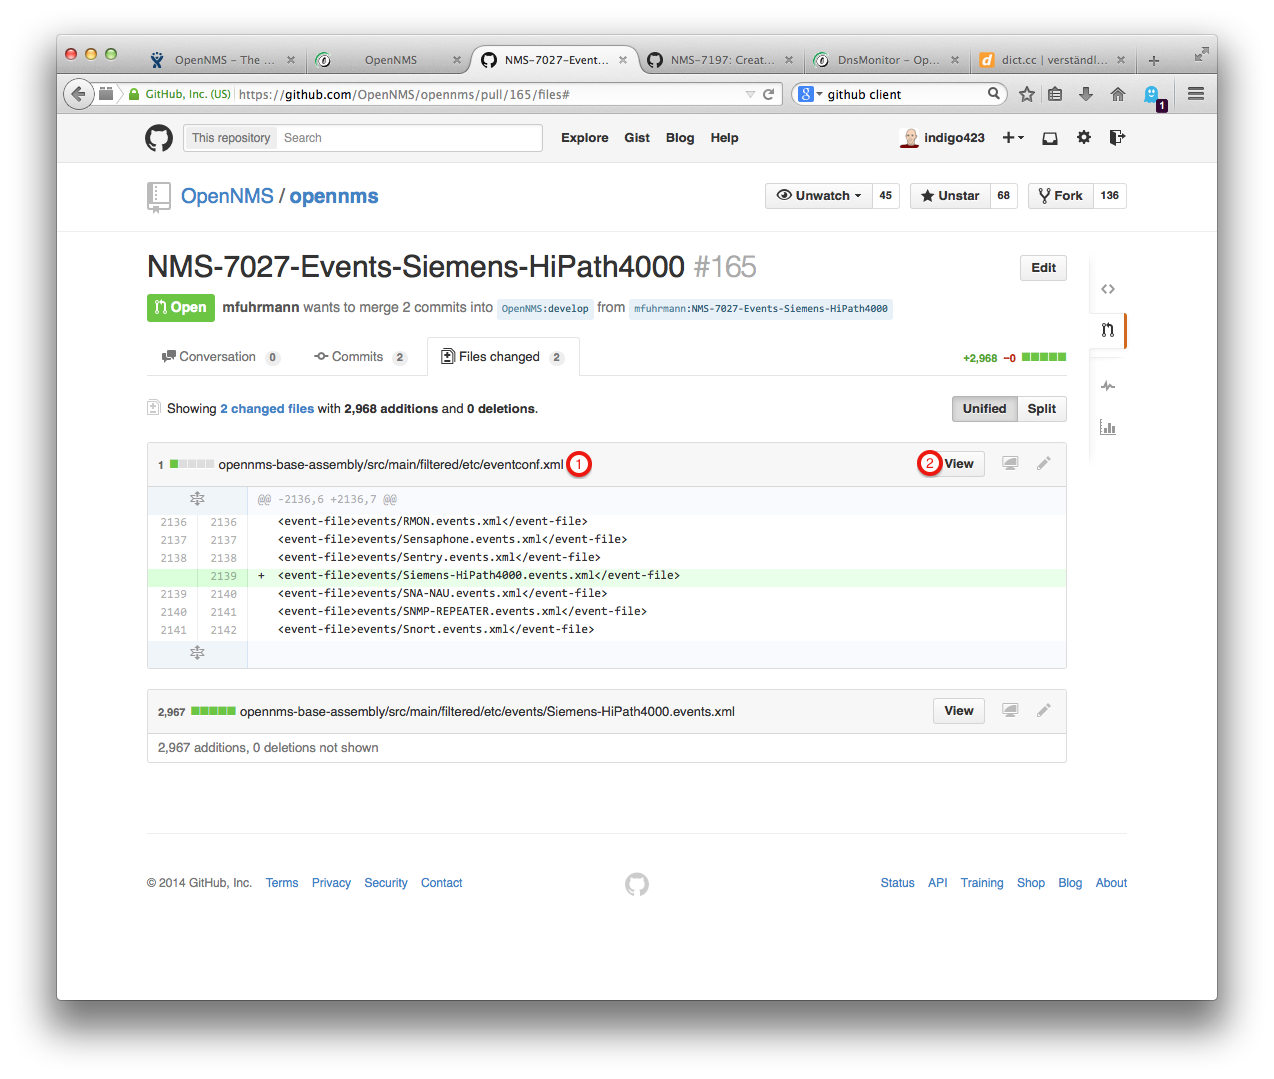
-
The file you want to edit.
-
Select first View to show the file content
| Don’t be confused, the Pen to edit isn’t available at this place. You can just edit the file in the View screenshot below. |
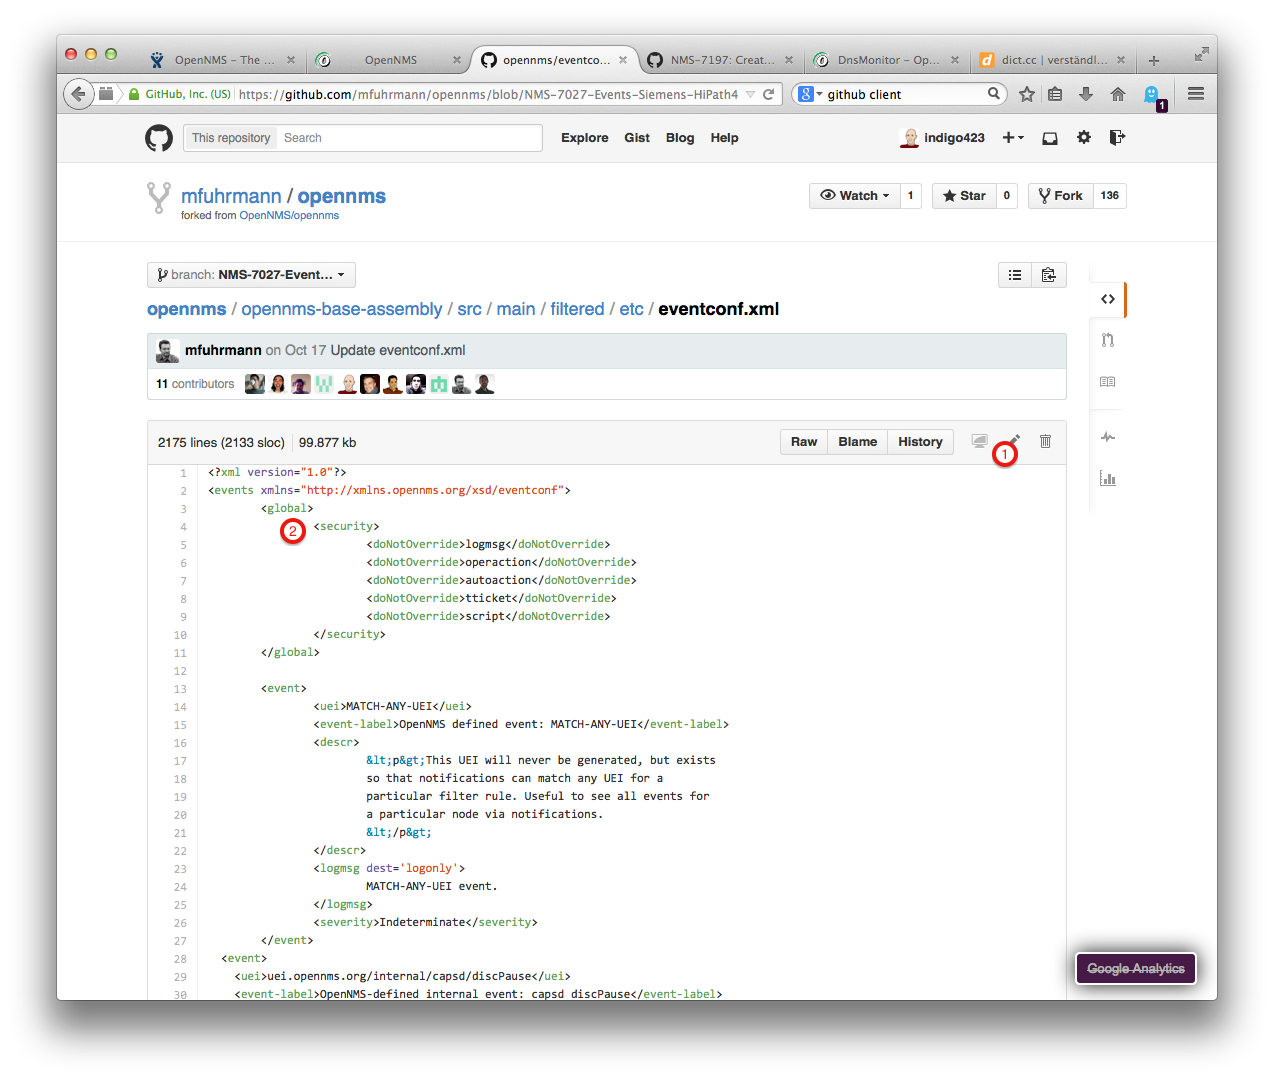
-
The Pen icon is available, click to edit
-
Change in the editor directly
It will create automatically a Pull Request back to the author to accept your changes. The author is notified with the GitHub notification. The following two sections describe both options in detail.
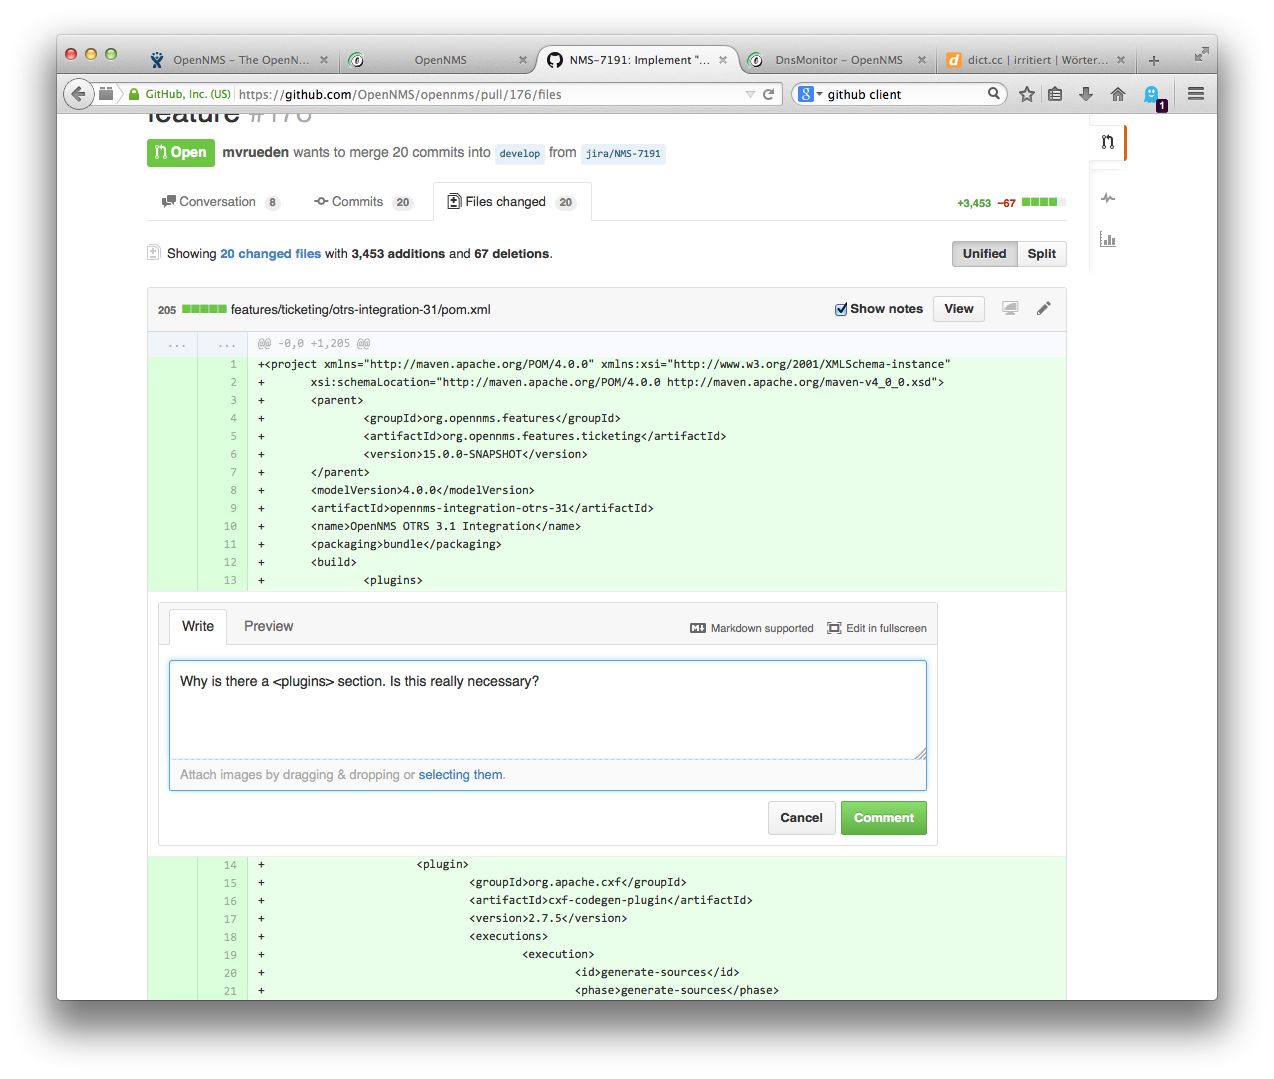
15.3.2. Conversation with comments
Instead of changing the content directly, you can also start a conversation. . Go to the Pull Request and select Files changed. . Click on View. . If you use the mouse cursor, you’ll see a blue plus icon behind the line number. . Click on the + icon and add your question or note and save with _Comment . The author is notified through GitHub about your annotation and can give feedback.
15.4. Merge contribution to official code base
If all changes of the review are worked in, the Pull Request can be merged by an elected community OGP member.
-
Merge the pull request
-
Change JIRA status from Resolved to Closed
-
Check if the build in Bamboo and the deployment was ok